One of the tasks I dread is configuring a web server to send email correctly via Gmail. The simplest way of sending emails is SMTP, and there are a number of scripts out there that provide a simple method to send mail that way with a minimum of configuration. There’s even PHP mail(), although it’s less than reliable.
Out of the box, Gmail requires OAUTH2 for authentication and to share user data, which has the major advantage of not requiring that you store your username and password in the application that requires access to your account. While they have an ‘allow less secure apps’ option that allows SMTP access for legacy products like Microsoft Outlook, it just doesn’t seem like the right way forward. Google documents how to interact with their API with OAUTH2, so why not just use that instead of putting my username and password in plaintext in a bunch of prototypes and test scripts?
Those are the thoughts that run through my head every time this comes up for a project, and each time I’ve somehow forgotten the steps to do it, also forgotten to write it down, and end up wasting quite a bit of time due to my own foolishness. As penance, I’ve decided to document the process and share it with all of you, and then also make it work on an ESP8266 board running the Arduino development environment.
Before we continue, now would be a good time for a non-technical refresher on how OAUTH works. The main differences between OAUTH and OAUTH2 are that the latter requires HTTPS, and the access tokens that allow an application to use specific services in a user account have an expiry.
To use Gmail with OAUTH2, we will need to start with five things: An application registered in the Google APIs, its client ID and client secret, a computer running LAMP (a by-the-hour VPS works just fine here), and a domain name that points to it.
Registering an application with Google API is easy. Go to the Google API console, log in, create a new project, and enter it. Enable the Gmail API; it should be suggested on the front page.
Then click on ‘credentials’ on the sidebar, create credentials, and finally ‘create OAUTH Client ID’. Before you can continue, you need to create a consent screen. The only entry you really need to fill out at this time is ‘Product Name Shown to Users’.
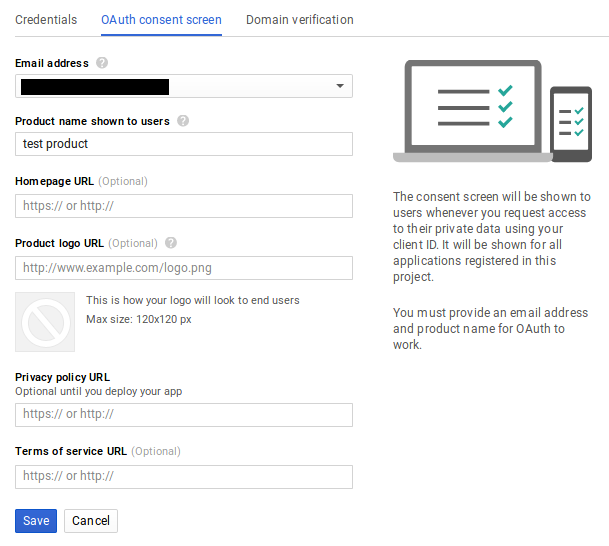
After saving that form, select ‘Web Application’ as your application type. Note the field called ‘Authorized redirect URIs’, we’ll return to it later. It’s important that it be correctly set for us to be able to receive a refresh token later on in this process.

For now, just press ‘Create’. A pop-up will display containing your Client ID and Client secret. You’ll need them soon, so best to copy/paste them into a local file on your computer for now.
Next, we will use those two pieces of data to request an access token and refresh token. We may as well accomplish two things at the same time here by installing the popular PHP email sender called PHPMailer on our web server. It includes a tool to request an OAUTH2 access/refresh token as well as being easily capable of sending a quick test email. To install it, we’ll use the Composer PHP dependency management tool:
$sudo apt-get install composer
Then we should navigate to our web-accessible directory, in my case /var/www/html, and install a few PHP scripts. Note that this should not be done as root, so create another user if needed and give them access to the directory:
$composer require phpmailer/phpmailer
$composer require league/oauth2-client
$composer require league/oauth2-google
Now enter the directory vendor/phpmailer/phpmailer. There will be a script called get_oauth_token.php. Move this script up three directories into the directory you just ran the ‘composer’ commands from. The location of this script as seen from the web needs to be entered into the ‘Authorized redirect URIs’ field of the Google API that we saw earlier. In this case it would have been https://mydomain.com/get_oauth_token.php. Public IP addresses will not work, this is why a domain name pointed to your web server is a requirement.
Now, open get_oauth_token.php in a text editor and paste in your Client ID and Client Secret where needed. Don’t try to run the script locally, it will fail. Open up a web browser on any computer, and navigate to the URL you entered as the ‘Authorized redirect URI’. Then select Google from the list of email services – at this point if it worked you will be asked to log in and then authorize the unverified application, under ‘Advanced’ under the warning prompt, at which point you will finally receive a refresh token. If you only want an access token for some reason you’ll have to edit the script to echo it back.
If that didn’t work, there are two common reasons: a wrong redirect URI or the script cannot find its dependencies. In the former case, the error message from Google will tell you the script URL as it sees it, and you can use that information to update the redirect URI in the Google API Console to fix the issue. For the latter, check your apache error log, probably located in /var/log/apache2/error.log, to see what dependency is not being found. You might see something like this:
PHP Warning: require(vendor/autoload.php): failed to open stream: No such file or directory in /var/www/html/mydomain/get_oauth_token.php on line 59, referer: http://mydomain.com/get_oauth_token.php
If you have received your refresh token, congratulations: the painful part is over. You can just go to the PHPMailer Github page and fill out their OAUTH2 example (gmail_xoauth.phps), and it ought to just work. If all you needed to do is send mail from a project on your VPS, you’re more or less ready to move on to more interesting parts of your project:
$email = 'someone@gmail.com';
$clientId = 'RANDOMCHARS-----duv1n2.apps.googleusercontent.com';
$clientSecret = 'RANDOMCHARS-----lGyjPcRtvP';
//Obtained by configuring and running get_oauth_token.php
//after setting up an app in Google Developer Console.
$refreshToken = 'RANDOMCHARS-----DWxgOvPT003r-yFUV49TQYag7_Aod7y0';
Remember to clean up any unnecessary scripts that contain your refresh token and other sensitive data before continuing.
ESP8266: We Don’t Need No Stinking Servers
Now what if we wanted to use these tokens to send email directly from project on a Raspberry Pi without needing a server in the middle? It turns out that once we have the client ID, client secret, and refresh token, we no longer require the server and domain name we’ve been using so far, and a mail-sending application, e.g. PHPMailer, can be installed on a computer anywhere with Internet access as long as it is configured with those values.
Things get a little more complicated when we try to do this on an ESP8266. OAUTH2 requires that we use SSL, and access tokens regularly expire and need to be refreshed. Thankfully, [jalmeroth] generously wrote a proof-of-concept and published it on GitHub. If provided with an access token, it can access your Gmail account and use it to send an email. It can also directly update/get data from Google Sheets, but I didn’t test this. However, if the access token was expired, it couldn’t detect that, although it did include working code to actually request a new token, but not parse it out and use it.
In an attempt to add to the functionality of that proof of concept, I forked the project and made a few changes. First, I changed to order of operations in the code to make it check if the current access token was valid before doing anything else. Second, Google API was responding ‘400 Bad Request’ if the access token was invalid, and everything but ‘200 OK’ responses were being filtered out by the code. Finally, I wrote a couple of JSON parsers that check the reason for the ‘400 Bad Request’ and extract and use the access token returned by Google API when a new one is requested.
It works, but it’s hardly reliable – not surprising considering I’ve never really used the Arduino platform before. Notably, the SHA1 fingerprint for Google API fails often. Checking from my local machine, the SHA1 fingerprint varies between two signatures there too. It would be fairly easy to check for either of them, or just keep trying, but I’d rather understand what’s going on first. (Is it just a CDN or something else?) Or perhaps I should rewrite the whole application in Lua where I’m more competent.
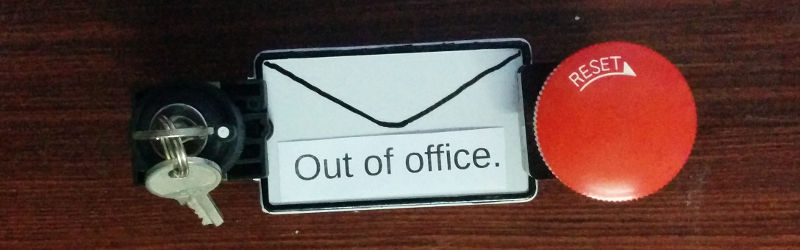
A fun little application built on the above was to place a button on my office that sends an email to my phone. I don’t want people to contact me at that email address frivolously, but do want to know immediately if someone is waiting outside my office. The big red button is for normal requests, but urgent requests require lockpicking. If it’s urgent it better also be interesting.
Finally, did you know that Hackaday provides an API for accessing hackaday.io? It uses the simpler OAUTH (not OAUTH2) authentication, so should be more straightforward than the above to implement on the ESP8266. Have any of you used it?


OAuth is just so complex, I would suggest for most people who just want to send a email from a microcontroller to create a new gmail account for your toys, set the less secure bit, and use tried and true smtp libraries for this. I don’t see a big security difference between having to pass a secret token to your app or a username/password.
OAuth is not terribly complex, the OAuth 2 workflow is designed to handle integrations into whole sets of ecosystems while the data owner retains access control to individual services. While it doesn’t seem like the best fit your use case, it fits software as a service perfectly.
The sheer number of steps and confusing back-and-forth of obscure hashes, tokens and secrets is precisely why nobody likes going the “secure” route if given the choice. It just seems so ridiculous to undertake these convoluted measures in order to do something as basic as sending an email.
I didn’t want to mess with a second account, and anyway I could not get an ESP to send email reliably by going directly through gmail even with the extra security turned off. I then remembered that I had a local (exposed only to the LAN) Postfix server, which is configured as a relay to gmail. Since it’s just on the LAN I don’t have/require TLS, or any authentication. So, the ESP can connect to it without issue. Postfix then connects to gmail to relay the messages.
Obviously not a solution if you’re handing the device off to someone else, or don’t want to setup a Postfix relay (really not that hard). But for devices on your LAN it’s not a bad way to go. SMTP2GO offers a free(ish) SMTP service that does not require TLS, but obviously it would not ideal if you care about security.
How exactly is SMTP less than reliable, and since when, and why would I even bother to tie myself from yet another provider, gmail, just why? A case example would be great.
Read again. Its not SMTP which was called unreliable, but PHPs ‘mail()’.
Mail function is not unreliable. The mail function works as expected.
Most often than not what happens is the server people are using the mail function from isn’t set up properly to send mail, or the DNS isn’t configured correctly fro MX records and that leads to mail being rejected. It has nothing to do with the function itself. I reliably used the mail function for basic mail sending from 2003 to 2007 when I started using SwiftMail.
My experience has been that spam filters have a tendency to object to mail@yourdomain.com sent from a mail server on some VPS in the developing world (where I live). To be clear we’re not talking about spam — just stuff like contact forms on webpages, alerts generated by some sensor that someone specifically wants, or tests sent to myself from some one-off project.
So paying for Google Aps for Business, with OAUTH2 (or SMTP if you decide to go that route) offered me better deliverability. Php mail() did in fact have issues. If you’re interested in further reading on the issues it can have, as I recall the PHPMailer described some of them in its documentation.
For a GUI gmail reader client I used Ruby, Gtk2, and IMAP. The SMTP setup is almost identical to the IMAP part, so it should be pretty easy.
It is cross platform and runs in the tray. I wrote a similar one in 2002 for yahoo mail that used Perl.
Maybe the problem is only with PHP’s mail()
What I like about using IMAP/SMTP is that if I wanted to switch to hosting my own email, I could just use a normal email server setup and keep the same client.
If you use your ISP mailserver for outbound you usually don’t even need to auth
“Google documents how to interact with their API with OAUTH2, so why not just use that instead of putting my username and password in plaintext in a bunch of prototypes and test scripts?”
Because Google’s documentation sucks ass. It’s bloated and often hard to follow.
That’s Google products and services in general, although dumbing things down for the lowest common denominator is missing.
Yes, I’ll grant you that.
To be fair though, a lot of big products that change quickly have awful documentation. A particular frustration of mine is the Facebook documentation.
Is it just me, or is there something wrong in how complex it is.. just to authenticate with OAUTH.
Have a look at the quickstart tutorials that google has on their page. hundreds and hundreds of lines of code.. just to log in.
I miss the good old username and password..
Thanks though for the writeup!
Yes I have to deal with their documentation daily, and every time I have to I want to find the person(s) who wrote them and choke them…
Oauth is a complex beast, the point is that you don’t put usernames and passwords where someone can get it. Just an ID and a secret with permission to access what is needed for the application. If someone steals the secret you can revoke the secret and create a new one with no need of worrying if the majority of your account was compromised because you lost access to your password.
Genuinely when someone doesn’t understand afterward its up to other people that
they will help, so here it happens.
There are so many nice mail providers out there with a working SMTP setup. Why gmail? Why extend The Monster’s power?
They are already too big for their own (and our!) good.
gmail from our favourite internet overlord. use protonmail
Or just use sendgrid or mailgun to send the mail using json over https.
Using OAuth is difficult when compared to starting a dishwasher. It is about as difficult as driving a car safely. Given the number of cars surviving the daily commute it is doable.
Thanks for a very good description. You have outlined the whole tricky and risky business. The pc based password approach is inadequate, but oauth2 is an overly complex alternative with no shortcuts.