TL;DR — Don’t use silicone to pot electronics.
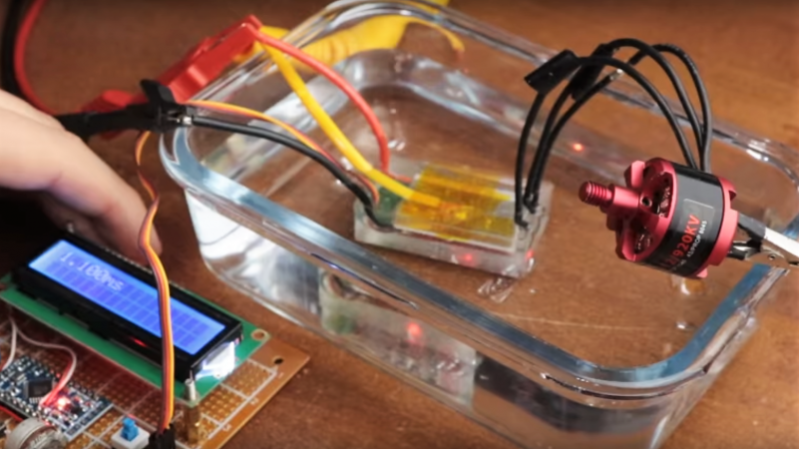
That’s the conclusion [GreatScott!] comes to after trying out several methods for waterproofing electronics. His efforts stem from a recent video in which he discovered that water and electricity sometimes actually do mix, as long as the water is distilled and the electronics in the drink are relatively simple. He found that the main problem was, unsurprisingly, electrolytic corrosion, so he set out to experiment with various waterproofing coatings. In a series of careful experiments he goes through the pros and cons of both conformal coatings and potting compounds. The conformal tests used simple clear nail polish on an ESC board; that worked pretty well, but it was a little hard to reach all the nooks and crannies. He also tried potting with a thick black silicone compound, but that ended up never really curing in the middle. A final attempt with legitimate two-part epoxy potting compound sealed up the ESC tight, although we doubt the resulting brick would perform well on a quadcopter.
If you want to explore potting a bit further, check out this introduction to the basics.


And now we need an article on properly potting your pot.
I would like to point out that you cannot make a thermocouple the we he did. You cannot twist them and you most certainly cannot solder them! A TC needs to be one junction so the only proper way to make one is to weld the two metals. Twisting you make multiple junctions and you do not know what you are actually measuring and by soldering you are introducing more metals that means that the TC reader lookup table is not accounting for. It really grinds my gears.
Multiple junctions won’t be a problem, as long as they’re all at the same temperature. And soldering also won’t be a problem as long as everything is the same temperature, because the coefficients for both junctions (metal 1 to solder and solder to metal 2) add together.
I think an experiment may be in order!
Isn’t it always :D
The fact it grinds your gears only demonstrates your ignorance. I solder them al the time and it works just fine.
It works fine as long as both soldered junctions are on the same temperature. This will normally be the case of course since they will be close together.
Main problem with soldering is that the solder may weld in high temperature applications, but this is obvious of course.
https://hackaday.com/2015/07/31/hacker-creates-thermal-probes-by-welding-with-a-pc-power-supply
FTFY
My biggest problem when it comes to waterproofing is where to find hobbyist-price connectors for connecting and disconnecting wires, sensors, etc. It seems like the standard choices on Mouser or Digikey are $7 – $$$. Is there a better source for waterproof connectors than those? Or will my wallet just have to suck it up?
When space and weight is not a factor the cheapest, most reliable thing I’ve found is to run the cable and connector inside the box through a waterproof cable-gland. Like running coax into a plastic outdoor enclosure, then connect everything inside the case. Nothing metal is exposed to the elements to corrode.
It’s a little bulky for ROV’s or drones though ;)
I run a big Christmas light show with lots of pixels and other DIY display elements. I and many of the other Christmas Light Show junkies have standardized on the Chinese made round connectors with 2 or more pins like this: http://a.co/hyMQ9r0. If you’re not in a hurry, you can get them under $1 a pair from China or if you need them quick, Amazon and plenty of eBay dealers in the U.S. and U.K. resell them with fast shipping.
I ran an experiment putting a set in a bucket of salty water with an ohmmeter attached and let it sit for a week. No current leakage.
This style: http://a.co/4D4oLGk is also readily available and cheap, but I have found water can ingress on the back side where the wires go in. I have fixed that by adding a little silicone around the wire in each hole which also doubles as a strain relief.
Nice finds! Thanks
Is that just for the SELV, <50V power, or do you take AC power outside to?
I've just started with a few sets of lights and Arduino time clock controller and of course want to go further. I love lights! Any tips for the future?
Are you not legally required to disclose referral links?
We’ve been building chains of DS18b20 temperature sensors for underwater deployment for a while now:
https://edwardmallon.wordpress.com/2015/03/01/using-ds18b20-sensors-to-make-a-diy-thermistor-string-pt-1-the-build/
and we use DIY underwater connectors to link those chain segments to the loggers:
https://edwardmallon.wordpress.com/2015/01/29/a-simple-diy-underwater-connector-system/
We have not taken those connectors deeper than ~30m yet, but they have lasted >2 years on deployment with no failures at the connectors.
Hi Ed, nice build.
I understand the wires are fixed with the cover cap. So when you turn to screw it, the wires will get twisted.
Is that correct? So you must have enough wire length to cope with the twisting don’t you?
The connectors Ed uses have an internal rubber cone washer, and the rotating outer part simply applies pressure to the back. There is no twisting of the wires internally at all.
Thanks
I didn’t noticed that
Seems like he used regular air-cure RTV instead of some platinum cure silicone. Most RTV you buy in a tube puts off acetic acid as it cures. You can find NSF rated ones that won’t leach it after it cures but they still might cause issues to the parts inside.
No air cure (called condensation cure for some reason) silicone caulk should be used as a potting compound. The ones that smell like vinegar have acetic acid and yes, in this case, acid means corrosive. It’ll do a number on the electronics even if you smear it on thin enough to cure.
The ones that don’t smell like vinegar typically use some sort of alcohol as the curing agent to evaporate.
It’s called condensation cure because ‘condensation’ is a specific type of chemical reaction. There are a handful of named condensation reactions but so far as I can tell the RTV variants aren’t named after anyone.
You can’t use silicone caulk as potting compound… well, unless you make oogoo by adding cornstarch.
You know, like in this old HaD article: https://hackaday.com/2010/10/11/oogoo-a-home-made-sugru-substitute/
From the instructable describing oogoo I learnt that it is the moisture (water) which cures the silicone. So, perhaps the cast should be repeatedly submerged in water after each covering of electronics with a new thin layer of silicone, then dried and process repeated, to speed up the curing?
Silicone rubbers are typically surprisingly heavy. Around 1.2 or so specific gravity. Epoxy is going to generally be around 1.15 or so, so the epoxy is actually going to be lighter but not by much compared to the silicone. What about using a urethane foam?
Also, silicone is a great barrier but for potting purposes, one needs to bear in mind that silicone is very porous to water vapor over a long period of time. That can be advantageous when you need the item to breathe some but might not be desired when you are trying to seal things in against any moisture. Also, silicone tends to both not want to stick to things and many things can inhibit it’s cure, particularly when using two part silicones.
Seal? Like aquariums?
Moisture in the form of vapor. Not literally holding back liquid water, which silicone is quite capable of doing. Especially when adhered to silica glass.
The core concept here is that silicone is considerably permeable to water vapor over time.
For use on a quad-copter, I would probably waterproof boards by painting with or dipping in runny boat-building epoxy. Maybe two or three coats. There’s no need to cast a big block.
I have used Acetone and ABS, Seemed to work really well for circus that don’t tend to heat up much and even better you can clean the circuit off if you need to repair it for some reason.
What about using Corrosion X
Flite Test did a review about 4 years ago and it seems to work for them. https://www.youtube.com/watch?v=s4z8QMgTEA4&t=569s
I don’t think I would rely on those two to develop any protective methods for my electronics, they really don’t understand the failure mechanisms involved. When he shows the motor with exposed windings then states that it’s fully sealed… Well, you make the call….
I used hot glue to seal a hole on top of ceramic bathroom sink. Cooled down hot glue seems hydrophobic, so if I needed to waterproof electronics I guess I’d try using that. It is readily available and if you need to repair a board, you know you can melt it with soldering iron to get through to the component, and later you can reseal it with a hot air tool.
One can even get weatherstripping in a glue stick form.
I seal R/C sailboat batteries (NiMH) with PlastiDip — 3 coats do a great job keeping them waterproof. Haven’t tried it with electronics though…
How does the battery vent? (charging it can cause free oxygen to form, which has to be vented, otherwise it pressurises the cell)
I use plastidip on small pcbs without issue
I’ve spent over 30 years professionally researching conformal coatings and potting compounds for protecting hi-rel harsh environment electronics. I’ve worked with about everything out there, urethanes, silicones, acrylics, Parylene and I can tell you from that experience that the best material that you can pot electronics in at home is – wax. Paraffin wax is hydrophobic, cheap, readily available, easy to work with, REMOVABLE, and forgiving. It also does what very few other methods will do, fill voids and be a true conformal coating. With the temperature high enough the viscosity drops low enough to get under most SMT components and you can apply it thick enough to cover all the difficult surfaces, being the corners and edges of the device leads where nothing sticks and almost all conformal coatings leave unprotected (exception being Parylene).
The other option for home use is roof cement or another form of tar, for the same reasons. I wouldn’t recommend this unless it’s a one-time use application that you don’t care to fix and need to bury the device underground or under water. Not likely that you’re going to clean that stuff off enough to do a repair or recovery of the electronics, but it will last forever outside.
Wax. That makes perfect sense. My grandmother sealed preserve jars with it. She was onto something…
Would you recommend paraffin wax for electronics in marine environments (not necessarily immersed, but exposed to salt air, heat, cold, etc)?
Are you looking to rework or modify the electronics? If not then try the asphalt-based roof cements.
There’s just the problem of it’s low melting temperature…modern electronics can tolerate relatively high operating temperatures (70-80°C), which I imagine would cause normal parrafin wax to soften significantly.
but it should be possible to “dissolve” (not sure if it’s actually dissolving) LDPE in wax, making it harder
Agreed. I love the stuff, BUT- it’s vacuum-deposited and a bear to rework.
There’s a Hack-A-Day worthy project, creating a DIY Parylene coating machine. That ought to be a challenge to the community.
So why do some electronics (such as cellphones) die so quickly in water? Corrosion takes time does it not? I’ve seen cheap DC motors turn propellers in pool water just fine without any protection at all. I’ve see what are essentially LED throwies attached to fishing lures and dragged through lakewater shining all the way. I’ve even seen computer motherboards and expansion cards washed and dried in a dishwasher (without any soap) and come out clean, shiny and still fully functional.
So… what is it that kills cellphones?
Cellphones die quickly because they’re unprotected electronics open to the environment ( you didn’t think the USB and earbud connectors were sealed, did you) and they’re POWERED. Any powered electronics will fail to work unprotected under water or with condensation on the circuit. Washing boards in a dishwasher is just fine, they’re not powered going through the wash cycle and as long as they’re dry when power is applied ( baking after washing is recommended ) they work just fine.
The difference is a cellphone is usually turned on when it gets wet.
The water (actually, the impurities in the water, like tiny amounts of salt or dust) conducts electricity.
So your battery (at ~4.V) is suddenly dumping all of its power through your main processor, designed for ~1.1V.
The voltage kills the chip, phone dies. (doesn’t have to be that chip, could be any part of the cell phone)
If the system was totally unpowered (battery removed, capacitors discharged, etc) then yes, washing it would not kill it, so long as no impurities are left behind after drying.
Usually galvanic corrosion will open circuit some thin traces . That’s my experience on automotive stuff anyways
An example: A powered capacitor can form dendrites when wet. See: https://m.youtube.com/watch?v=ogfV0qmvzGI
This is why it is important to disconnect the battery fast if your phone gets wet.
You’re correct, dendritic growth is what kills wet, powered electronics. Metal contacts (leads, solder joints) + water + power all create an electroplating cell. Metal bridges the gap between oppositely polarized conductors resulting in an electrical short.
Contaminants on the board and/or in the water help the process along, but I’ve grown bridges in the lab on perfectly clean boards ( unable to register anything in an Ionograph ) with 18+ Megohm deionized water across 2 pins of an SOIC. The lab record was 5.6 seconds but the process typically takes a lot longer.
Glycerine will cure silicone both fast and entirely through. You just mix like a drop with the silicone(yeah, ti’s gonna introduce air bubbles if you’re not careful so be prepared to deal with that), and then you have about an hour before it will be 100% cured. There may be a bit of shrinkage if you use too much glycerine so experiment first.
In the ROV (Remotely Operated Vehicle) business, we use ScotchCast 2130 for potting boards and connections and stuff. I’ve used the stuff to 5000msw.
Does anyone know good options for waterproofing a flex circuit that won’t crack or separate from the board when flexed repeatedly?