We’ve always been interested in fluidic logic and, based on [soiboi’s] videos, he is too. His latest shows how to use silicone and a vacuum to build a multiplexed dot matrix display. This is a fascinating look at how you design with air instead of electrons.
Just like a regular display, it isn’t efficient to control each element separately. Usually, it’s better to multiplex such that 16 “pixels” need only row and column air valves. Just as you might use transistors, the project uses “air transistors” to build logic gates.
Silicone bakeware has become a staple in many kitchens due to its flexible, yet temperature-tolerant nature. New research from Canada shows it could be causing trouble for your liver and lungs, however.
The siloxanes that make up silicone bakeware can target “the liver through oral exposure, as well as the liver and lungs through inhalation exposure.” The fat content of the food being baked is also a factor as these compounds are lipophilic, so higher fat foods will absorb more siloxanes than lower fat foods.
Don’t throw out all your silicone yet, though. The researchers say, “the results showed a consistent decreasing trend in migration levels across consecutive weekly baking sessions, with no increase after the seven-month interval.” So, that dingy looking silicone mat you’ve used a hundred times is safer than a brand new, brightly-colored one.
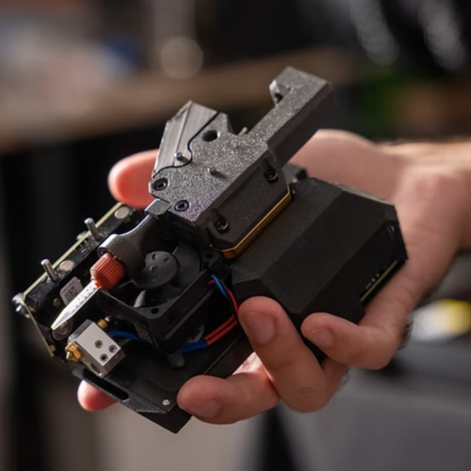
[Prusa] have a number of announcements, and one of the more unusual ones is that liquid printing is coming to the Prusa XL. Specifically, printing in real, heat-resistant silicone (not a silicone-like plastic) is made possible thanks to special filament and a special toolhead. It’s the result of a partnership with Filament2, and the same process could even be used to print with other liquids, including chocolate.
Look closely and you will see the detail in the nozzle, which mixes the two-part formula.
The process is as unusual as it is clever. The silicone is a two-part formula, but there is no reservoir or pump involved. Instead, there are two filaments, A and B. When mixed, they cure into solid silicone.
What is unusual is that these filaments have a liquid core. Upon entering the extruder, the outer sheath is cut away, and the inner liquid feeds into a mini mixing nozzle. The nozzle deposits the mixed silicone onto the print, where it cures. It isn’t clear from the demo where the stripped outer casing goes, but we assume it must get discarded or is possibly stowed temporarily until it can be removed.
Liquid-core filament is something we certainly didn’t have on our bingo card, but we can see how it makes sense. A filament format means the material can be handled, fed, and deposited precisely, benefiting from all of the usual things a filament-based printer is good at doing.
What’s also interesting is that the liquid toolhead can co-exist with other toolheads on the XL; in fact, they make a point of being able to extrude silicone as well as the usual thermoplastics into the same print. That’s certainly a trick no one else has been able to pull off.
There are a few other announcements as well, including a larger version of their Core One printer and an open-source smart spool standard called OpenPrintTag, a reusable and reprogrammable NFC insert for filament spools that gives you all of the convenience of automating color and material reading without the subtle (or overt) vendor lock-in that comes with it.
Watch a demo of the new silicone extruder in the video, embedded just under the page break. The new toolhead will be 1,009 USD when it launches in early 2026.
Over on their YouTube channel [Science Buddies] shows us how to embed LEDs in soft robots. Soft robots can be made entirely or partially from silicone. In the video you see an example of a claw-like gripper made entirely from silicone. You can also use silicone to make “skin”. The skin can stretch, and the degree of stretch can be measured by means of an embedded sensor made from stretchy conductive fabric.
As silicone is translucent if you embed LEDs within it when illuminated they will emit diffuse light. Stranded wire is best for flexibility and the video demonstrates how to loop the wires back and forth into a spring-like shape for expansion and contraction along the axis which will stretch. Or you can wire in the LEDs without bending the wires if you run them along an axis which won’t stretch.
The video shows how to make silicone skin by layering two-part mixture into a mold. A base layer of silicone is followed by a strip of conductive fabric and the LED with its wires. Then another layer of silicone is applied to completely cover and seal the fabric and LED in place. Tape is used to hold the fabric and LED in place while the final layer of silicone is applied.
When the LEDs are embedded in silicone there will be reduced airflow to facilitate cooling so be sure to use a large series resistor to limit the current through the LED as much as possible to prevent overheating. A 1K series resistor would be a good value to try first. If you need the LED to be brighter you will need to decrease the resistance, but make sure you’re not generating too much heat when you do so.
Have you ever finished up a bit of code and thought that typing “git push” in a terminal is just not a satisfying finish? So did [penumbriel], so he built a big red button he could smash instead.
This is a very simple hack: an Arduino sits inside a 3D-printed case that holds a big, red button. The case itself is very sturdily made to withstand a good satisfying smack: it has thick walls, brass insets, and rubber feet to protect the de The code for the Arduino is very, very simple: it spoofs a USB HID using the standard keyboard library, and automatically types out “git push” whenever the button is pressed. Or smashed, because you know you’re going to want to slam that thing. So far, so good– very innovative for 2006, right?
The detail that made this project stand out in 2025 was the technique [penumbriel] used for lettering– we’re always looking
With a simple soap-and-water mask, the cured silicone peels right off, leaving a clean label.
for new ways to make a good front panel. In this case, the letters were printed as a valley and filled with silicone adhesive. To protect the top surface of the print, soapy water was used as a mask. The silicone would not adhere to the wet plastic, so all [penumbriel] had to do was peel it off after it had cured, leaving solid white inside. It’s a neat trick, and a great way to use up an old tube of silicone before it goes hard. You could also use it for injection molding, but this is a great use for the dregs.
This might go well next to the programmer’s macro pad we featured a while back, but it really needs to stay as a big red button for maximum satisfaction.
For most of us, mirrors are something we buy instead of build. However, [Unnecessary Automation] wanted to craft mirrors of his own for a custom telescope build. As it turns out, producing optically-useful mirrors is not exactly easy.
For the telescope build in question, [Unnecessary Automation] needed a concave mirror. Trying to get that sort of shape with glass can be difficult. However, there’s such a thing as a “liquid mirror” where spinning fluid forms into a parabolic-like shape. Thus came the idea to spin liquid resin during curing to try and create a mirror with the right shape.
That didn’t quite work, but it inspired a more advanced setup where a spinning bowl and dense glycerine fluid was used to craft a silicone mold with a convex shape. This could then be used to produce a resin-based mirror in a relatively stationary fashion. From there, it was just necessary to plate a shiny metal layer on to the final part to create the mirror effect. Unfortunately, the end result was too messy to use as a viable telescope mirror, but we learn a lot about what didn’t work along the way.
The video is a great journey of trial and error. Sometimes, figuring out how to do something is the fun part of a project, even if you don’t always succeed. If you’ve got ideas on how to successfully spin cast a quality mirror, drop them in the comments below. We’ve seen others explore mirror making techniques before, too.
They might call it Levity, but there’s nothing funny about Rapid Liquid Print’s new silicone 3D printer. It has to be seen to be believed, and luckily [3D Printing Nerd] gives us lots of beauty shots in this short video, embedded below.
Smooth, and fast. This bladder took 51 minutes according to the RLP website.
Printing a liquid, even a somewhat-viscous one like platinum-cure silicone, presents certain obvious challenges. The Levity solves them with buoyancy: the prints are deposited not onto a bed, but into a gel, meaning they are fully supported as the silicone cures. The fact that the liquid doesn’t cure instantly has a side benefit: the layers bleed into one another, which means this technique should (in theory) be stronger in all directions than FDM printing. We have no data to back that up, but what you can see for yourself that the layer-blending creates a very smooth appearance in the finished prints.
If you watch the video, it really looks like magic, the way prints appear in the gel. The gel is apparently a commercially-available hydrogel, which is good since the build volume looks to need ̶a̶b̶o̶u̶t̶ ̶5̶0̶0̶ ̶L̶ at least 125 L of the stuff. The two-part silicone is also industry-standard and off-the-shelf, though no doubt the exact ratios and are tweaked for purpose. There’s no magic, just a really neat technology.
If you want one, you can sign up for the waiting list at Rapid Liquid Print’s website, but be prepared to wait; units ship next year, and there’s already a list.