Here’s a weird topic as a Fail of the Week. [Pete Prodoehl] set out to make a bolt the wrong way just to see if he could. Good for you [Pete]! This is a great way to learn non-obvious lessons and a wonderful conversation starter which is why we’re featuring it here.
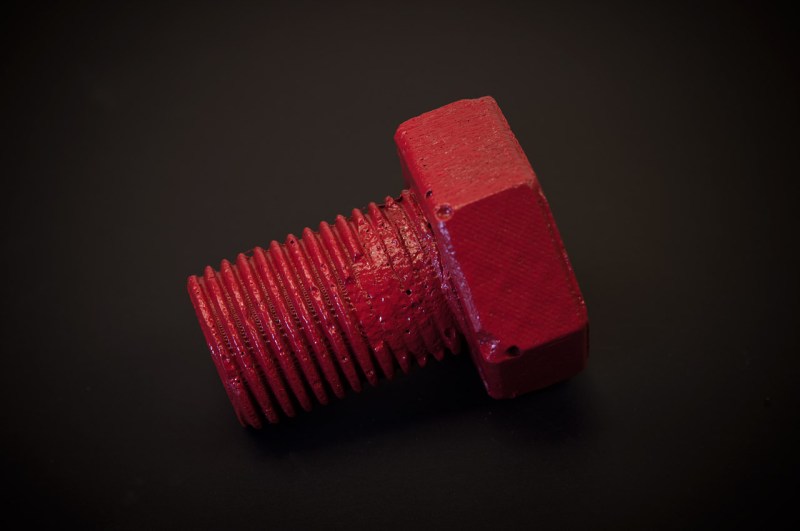
The project starts off great with a model of the bolt being drawn up in OpenSCAD. That’s used to create a void in a block which then becomes two parts with pegs that index the two halves perfectly. Now it’s time to do the casting process and this is where it goes off the rail. [Pete] didn’t have any flexible filament on hand, nor did he have proper mold release compound. Considering those limitations, he still did pretty well, arriving at the plaster bold seen above after a nice coat of red spray paint.
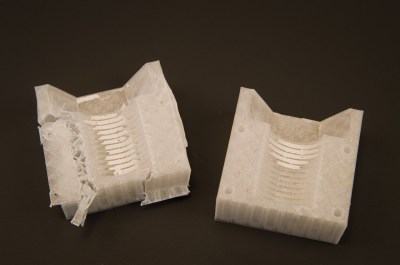
He lost part of the threads getting the two molds apart, and then needed to sacrifice one half of the mold to extract the thoroughly stuck casting. We’ve seen quite a bit of 3D printed molds here, but they are usually not directly printed. For instance, here’s a beautiful mold for casting metal but it was made using traditional silicon to create molds of the 3D printed prototype.
Thinking back on it, directly 3D printed molds are often sacrificial. This method of pewter casting is a great example. It turns out gorgeous and detailed parts from resin molds that can stand up to the heat but must be destroyed to remove the parts.
So we put it to you: Has anyone out there perfected a method of reusable 3D printed molds? What printing process and materials do you use? How about release agents — we have a guide on resin casting the extols the virtues of release agent but doesn’t have any DIY alternatives. What has worked as a release agent for you? Let us know in the comments below.


http://lcamtuf.coredump.cx/gcnc/ch4/
Guide to resin casting
http://www.nashua.edu/paradisem1/Machinery%27s%20Handbook%2027th/27_Thread_09A.pdf
Guide to threads
Threads are kind of complicated when you drill down and not easily “just printed” with FDM printers (or any for that matter) as a negative and positive equals it just works correctly. Does OpenSCAD fully model threads? Can the printer’s resolution handle the resulting output?
I’d certainly chase the cast threads with a tap and die to clean up any stairstepping or other artefacts. But cast threads are very rarely worth making with any technique. They’re pitiful compared to cut or rolled threads.
I’ve printed plenty of threads both with PETG and PLA on my Prusa i3 MK2S and it wasn’t even difficult. The screws and bolts aren’t very sturdy, but printing some screws in various neon-colours or such does add a nice bit of flair to projects.
My Prusa i3 MK2S works great for printing nuts & bolts. OpenSCAD is just modeling software so you want a library that can generate good models for this situation. There are a few out there, I have used https://www.thingiverse.com/thing:193647 to create very durable and snug wing nuts and bolts for securing litter pans to a ferret cage. It can be a little slow, but works well.
If you do it right, I’ve printed CS camera lens threads which work great (about 0.8mm pitch) with a not greatly tuned printer. So the limitation is not the printers.
Polyvinyl alcohol for release I believe..
Why would you ever want a plaster bolt?
Never mind my negativity, it’s good to experiment and i’m looking forward to HaD’s best practices for 3d printing molds.
It’s a great mental image, though. Torquing down a bolt only to powderize the head and leave the threads all clogged with cement. And here I thought aluminum engine blocks were touchy.
As the linked blog post says, for “art” and just for the heck of trying it. That alone is good enough for me, and it turned out not half bad.
The most obvious (at least to me) method would be to 3D print the bolt blank with the appropriate O.D. for the thread pitch
(look up in any machinist handbook) and then simply run it through a die for the desired threads. Being plastic, this would be a very easy and, I daresay, foolproof method of creating threads that actually work 100% of the time.
Just a thought
????This.????
if you run a standard die over 3d printed threads, be sure to use soapy water as a lubricant, lots of it.
the small amount of heat created, ends up sticking the parts together and generally destroying the plastic part.
i chased threads on hundreds of plastic parts, and found this method worked great
Why? Printing the threads is not a problem on any reasonable quality printer.
If you have to machine the piece after printing, what was really the point of printing it to begin with? Hard to imagine a bigger waste of time/tech than using a 3D printer to produce a plain plastic cylinder.
If you want to do it with machinist tools, then turn down a block of plastic to the proper O.D. on lathe and run it through the die. But if you’ve got that kind of gear, you probably wouldn’t be trying to print the bolt in the first place.
Well, I have never had a problem doing it this way and, there is a big difference between owning a die set, ($30) and having a lathe. (Thousands) The threading process takes all of maybe 35 seconds, a lot less time than cleaning up the printed threads. or the threads from a cast part. Oh, and running a blank through a die is not machining. If your way works, great keep at it. I just suggested what I do to help others that might not be as lucky as you.
Apart from validity 3d printed bolts, last time I check, filament cost equals silicone volume/price ratio.Why have one sacrifice mold if you can have one that last 100 bolt molds? With that many polymer bolts you can even make butter armor!
… which is not as silly as it sounds – hint: non-newtonian/shear thickening fluid
And after you die on the battlefield, the invading army can spread your armor on their toast and pancakes.
Maasai Seal of Approval (TM)
“made using traditional silicon ”
silicone
I like PTFE mold release spray. I have had very good success with LPS brand. It is good for plaster and silicone molds.
I often go meta-mold: I print a disposable pla mold to cast a reusable silicone mold. Which then gets used for epoxy with talcum, or agar, or whatever castable material a project calls for
agar?you doing freaky biology stuff?
To the “author” is traditional silicone tin condensation cure, or platinum cure 2 part, is it neutral or acidic?
The proper way to do this is print the positive or bolt you want. Coat it in a PVA or other mold release, I then usually spray it with Mann ease release 200.
Mix up a good two part platinum cure silicone with high elasticity and elongation to break. Dragon Skin from smooth-on would be best for this (bolt) purpose as you can do a one part mold as it has a very high elongation to break. Proper mixing procedure is to measure out part A and B in a container mix well then put that into a second container to mix again. This is because unmixed parts will be stuck to the side of the original container. You will then vacuum degas obviously in a vacuum chamber.
Find a container that about doubles the widest distance on your part.
Dunk your bolt slowly into the silicone until it is nearly submerged. (may have to superglue a string to the top)
When it is cured simply peel back the dragon skin. You can pretty much turn the mold inside out as it is that stretchy. Your 3d printed part can be used to make another mold as it will be completely fine.
just yesterday, i visited a newish startup company. they are using 3d printed molds to make injection molded parts. having great success at it . they guy told me on average they get a few hundred parts from each mold. the molds are way cheaper than machining them on the HAAS VM3 they have on hand.
they also build large volume 3d printers, with a 2x2x3.5 FOOT volume
What is the name of the startup?
Reminds me of those glass bolts they used in Colditz to hide down a well and escape at the right time.