The security conference LayerOne 2018 took place this past weekend in Pasadena, California. A schedule conflict meant most of our crew was at Hackaday Belgrade but I went to LayerOne to check it out as a first-time attendee. It was a weekend full of deciphering an enigmatic badge, hands-on learning about physical security, admiring impressive demos, and building a crappy robot.
Hello Conference Badge
Immediately upon checking in to the conference, attendees were handed a populated circuit board, a battery, then herded onward so other people can get checked in. This is sheer luxury compared to tales of years past, when attendees were given a blank PCB and a bag of parts. “What does the badge do?” is part of the fun here and served as an excellent icebreaker for us to talk to each other and compare notes. Several previous LayerOne badges were documented on Hackaday.io, but not this one. (Yet?)
The ESP32-WROOM-32 on top tells us it is a networked device. There were only four LEDs on the board, but there is a speaker & microphone module telling us the badge is an aural showcase and not a visual one. There are five controls for human fingers. Three were fairly straightforward: power switch plus “BOOT” and “RESET” buttons. They were accompanied by a button labelled “DO NOT PRESS” (yeah, right) and a button labelled with our first hint: “MR MEESEKS”
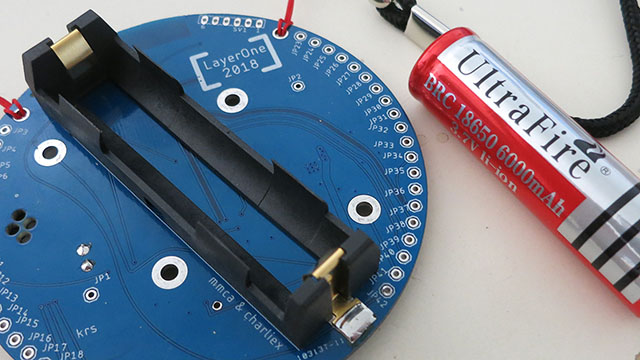 Since this is a security conference, some attendees decided a mystery networked device with audio recording capabilities is not something they wanted to wear around their neck. Their badge hack to create a 100% secure IoT device is to not install the battery at all: a 18650 cell that proudly wore its eyebrow-raising name “UltraFire”.
Most of us who chose to install our battery were rewarded with illuminated LEDs. Some were then followed by an audio clip of “I’m Mr. Meeseeks, Look at me!” This announcement would randomly punctuate conference proceedings for the entire weekend.
Those who wanted to dive into the badge headed straight to the Hardware Hacking Village, but there were many other parts to the conference. The largest room was dedicated to security talks given throughout the weekend as well as the Saturday night dinner and game night. One room ran the conference capture-the-flag competition. There was a room dedicated to IoT devices, and a “chill-out” room with games where people could take a break from all of the above. Sadly, I could only be in one place at a time so I chose to check out the lock-picking village.
Lock-Picking Village
 LayerOne’s Lock-Picking Village invites people to play with physical security devices. Not all of us would learn to defeat them, but we all learn enough to know how far to (not) trust them. Half of this year’s room was dedicated to physical locks. A pin tumbler lock fundamentals class presented twice a day gave complete beginners enough to start using basic tools on training locks laid out on tables. Then we could look at the display of high security / esoteric locks to see how their designers have tried to make lock-picking difficult.
The other half of Lock-Picking Village was dedicated to tamper-evident seals. These simple devices are not intended to prevent access since it’s easy to cut them apart. Their purpose is to show evidence such tampering has occurred. LayerOne attendees are challenged to defeat their purpose: open them up without leaving evidence of tampering. A wide range of such seals were on hand for people to choose the level of difficulty they wished to tackle, starting with what was basically a fancy zip-tie and onward to increasingly clever contraptions.
The Lock-Picking Village was far more beginner-friendly than expected. The whole room was tremendously fun and educational even for someone who only worked up to a 4-pin lock and left significant evidence of tampering when I opened up my tamper-evident seal.
Hardware Hacking Village
Back in the hardware hacking village, the word on the badge is that it connects to a WiFi AP at the event and, through it, Amazon’s Alexa. The “I’m Mr. Meeseeks, Look at me!” audio notifies the device is online and ready. Sadly something couldn’t gracefully scale to the entire conference, so badges were getting knocked offline. Their effort to reconnect explains the frequent and random notifications throughout the weekend.
 The event organizers foresaw that there would be people who would miss the experience of soldering their own board or miss the presence of blinking LEDs. So an add-on kit was offered for sale to build a blinking LayerOne logo. Made of tiny surface mount parts, it was a challenge that people took on with varying degrees of success. Some staffers were on hand to offer much-appreciated guidance.
 HHV also hosted a few other events including panel discussions, the demo party, and Hebocon: the crappy robot competition. As a first-time attendee I came unprepared and didn’t think I could participate until I noticed the build-up to Hebocon. People were pulling parts out of bins and hot-gluing them together into simple contraptions. Most of the competitors were built within the hour before competition began so, with 40 minutes to go, I decided to hack one together. With zero time for testing and polish, it was a robot that would intimidate its enemies with the fearsome Tindie blinking badge… before driving itself off the arena.
 By the end of the weekend many conferences badges sported the official blinking add-on. But since you can never have too many LEDs, I modified my Tindie badge to tap into the conference badge power rail and sit alongside the illuminated LayerOne logo.
In addition to the Github repository, the organizers promised more information to come for those who wish to continue working on their badge. It’s a great device with audio peripheral and battery power management already on board, plus ESP32 pins brought out to through-hole solder points all around the perimeter. LayerOne 2018 badge is a great foundation for further hacking and I look forward to the promised future release of documentation. Until then, the badge will have to speak for itself.
“What is your favorite color?”
“My favorite color is seafoam.”


Nice! Wish I could have attended.
The ssid the badge wants to see is “badgenet” with no security or password. Until I figure out how to change it.
Great article! It was my first LayerOne and I had an awesome time. I’m very happy to see that you’ve shared the LayerOne experience with Hackaday readers. I look forward to next year!
Using probemon.py I discovered the badge is looking for ssid “badgenet” and does not need a password. It works at home now. I was informed the badge could be connected to your own Amazon account, instead of the default one which appears to be located in UTC+0. Waiting for more details and source code so I can start making changes.