Strap on the jeweler’s loupe and lay off the caffeine for a few days. You’ll need to be at your peak for the SMD Soldering Challenge at this year’s DEF CON (number 26 for those counting).
It’s exciting to see that a Soldering Skills Village has been added to the conference this year. It will be in the same room as the Hardware Hacking Village. After all, who doesn’t want to solder at a conference? This soldering challenge is a great way to ring in the new village, and will take place in eight heats of six people for a total of 48 contestants. If you want to compete, make sure you get to the village right away and sign up for a slot!
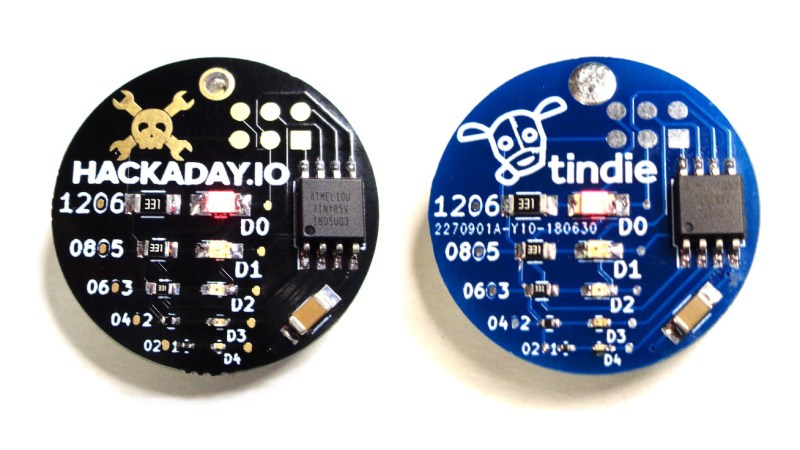
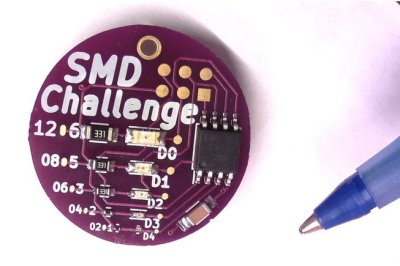 A familiar board is being used for the contest. It’s the SMD Challenge board which MakersBox developed. You can check out the Hackaday.io project page and even order one from their Tindie store if you like. The contest will be scored based on time, completion, functionality, precise orientation, and quality of the joints.
The SOIC ATtiny85 is a snap to place on the board, but things get harder with each step. To successfully complete it you need to solder both a resistor and an LED in 1206, 0805, 0603, 0402, and 0201 packages. Those oh-two-oh-ones are basically grains of sand… good luck with that! We’re really excited that MakersBox rolled some custom Hackaday and Tindie boards (pictured above) for this contest which we’re honored to sponsor. It sounds as if the winners will be announced during Hackaday and Tindie’s traditional Breakfast at DEF CON which is happening at 10:30am on Sunday in the HHV.
We plan to spectate during some of the heats and if you’re at the con you should too! For those participating, here’s our advice. Practice soldering the smallest of parts ahead of time (watch some videos on it at the very least). Bring a multimeter to test the diode polarity because you won’t be able to see the symbols on the smallest parts. You may even consider bringing some custom tools; this surface mount “clamp” comes to mind, you’ll just need a much smaller version.
If you have advice of your own, we’d love to hear it in the comments below!


needs more QFN
0402 is a PITA. At 55 and my eyes not as sharp up close (need magnifying glasses) that’s the best I can do. 0201 is not something I would use in my projects (nor 402 anymore). Kudos to whoever can work on that size.
It’s chasing all of us.
Even with a magnifying glass I have trouble seeing the arrow on 0603 LEDs. I generally just problem them with the meter to figure out polarity.
That’s no problem :)
Even if you can see the markings, I find it is best to test since SMD LED markings don’t always follow the same standard.
With my eyes and hands, I went back to through-hole for as much as possible.
I use a benchtop microscope along with two soldering irons to get 0402 parts on and off. They make tweezer soldering irons too but I just don’t own one. I put down a drop of flux, center the part with some fine tweezers, then solder both ends at the same time so the part centers itself on the pads. I’ve never done 0201 but I think I could probably get them on with my setup.
FM-2023 tweezers make 0402 really easy and fast to place. Although I avoid them unless necessary, 0201 is much easier with tweezers than with an iron in my experience.
I’m over 40 as well and I have zero problems doing 0402 all day. It’s just no hard if you’ve done enough 0603 before. 0201 is where it starts getting harder, but even then I can do 01005 with a microscope no problem. I haven’t tried 008004 yet though!
“You must use at minimum our soldering iron and solder. You are welcome to bring any other tools you may need.”
This… seems game-able. It’s a hacking conference, after all. Use the iron and solder for the ATTiny, bring paste and a griddle for the remaining parts. Satisfies the rules to my eyes…
Do it!
I dare someone to wheel in a wood fired pizza oven to do it.
This article doesn’t say, but I gather from comments above that this is to be done with an iron, which I guess is a challenge. Personally, I regularly assembly boards with 0402 components using a vacuum pickup tool that I built myself (12V pump, solenoid valve, flexible hose, syringe, blunt syringe tips, and a momentary switch – it’s not hard) and a toaster oven I’ve hacked to be at least roughly temperature controlled. I shy away from 0201 because none of my pickup tips are fine enough, but given the right magnification and the right tool it’s not exactly rocket science. OSH Stencils will do you a stencil for a few dollars that’s good for a few boards, or plenty of people will do a stainless one for a few tens of $ if your run is more than that; in this day and age, who on earth is assembling surface mount boards with a soldering iron?
And I should add that, while I’m young enough that my eyes have only started to deteriorate in the last few years, I’ve also had eye problems from birth that kind of outweigh age-related factors. I use an 8x head-mounted magnifier and a USB microscope, both of which were only a few $ off amazon.
I’m sorry, but i don’t quite see how your life story and experience has anything to do with your question or comment. It just seems narcissistic..
Anyways a lot of people still using soldering irons with surface mount components. Even professionals.. Its just naïve to assume they are outdated.
I use an iron for smd repairs where it is just a component or two. That said, I do have my limits in which that is applicable.
I often don’t want to bother ordering stencils for an initial prototype or something that I’m only going to make a couple of.
Also, when it’s a fairly big board, sometimes it’s nice to be able to assemble it a logical section at a time and test, rather than doing the whole $100+ of parts at once, and then smoking them all because you made a mistake on the pcb layout.
Sure, I wouldn’t want to do a production run that way, but for a prototype, the soldering iron works fine.
Even when I’m doing a prototype, I don’t use a soldering iron for pretty much anything except through-hole joints anymore. Even without a stencil. Paste and hot air are so much better it’s crazy. QFNs are just stupid-easy with hot-air and paste. And a hot-air rework station is dirt cheap: the 975DW+ on Adafruit works fine – it’s not my workhorse (I’ve got a $5-10K device for that thanks to work) but it’ll do.
I’ll choose QFNs over QFPs because they’re so easy. Just lay down a line of solder paste along the pins, place the part under a scope, heat it up until you see the chip pull into place under tension, and put light pressure with a metal pick on the top of the part to push out excess solder under the chip and then drag the solder off the joints using the pick. *Way* higher success rate in soldering than QFPs.
Of course, the iron’s still around with a very fine tip to break the occasional bridge or clean up a joint a little, but the hot air’s the workhorse there. And SMD passives are *way* easier.
Well, if that works for you, great.
I don’t have a great paste dispensing setup, so maybe that’s a factor, but from the boards I’ve done with a syringe and hot-air or toaster-oven, I thought it was a bit of a hassle, certainly not “so much better it’s crazy”.
There are situations where I’m sure it would beat hand soldering hands-down (my last board had an LGA,), but there’s plenty of situations where it doesn’t.
It’s another useful method, and that’s a good thing to have, but hand soldering is also very useful, and often overlooked.
A lot of people assume that they need some special methods for doing fine pitch.. “flood and wick” comes to mind as one of the most persistent, ridiculously bad, ones that keeps coming up, and it shows a simple misunderstanding of the capabilities of hand soldering.
“very fine tip” irons are another. (relatively wide chisel tips are usually my go-to)
Many people try some soldering “hacks”, mess up their boards, then bodge around with toaster ovens and paste, without ever learning how to properly hand solder an IC.
I’m kind of surprised that there is no place for 01005 there :)
Bring it… video or it didn’t happen! :-D
I think that footprint is even too crazy for Mike Harrison to take on.
I have a friend that sent me a picture of a component he soldered. It was a capacitor of the size smaller than 01005 (0402 metric, I think it’s 008004 or something in imperial). Now THAT’s a challenge for you!
Should be mandatory tool included:
https://vuec.co.uk/images/uploads/sem-tme-wel.8100uc.jpg-99195.jpg
So what is the application of soldering guns?
1950s perf boards with 2-3 components per inch?
It seems automotive except they crimp that stuff, and plumbers use torches to solder Cu.
Covet the tip in 0102s and hope one sticks
0201*
or simply outsource:
https://c1.staticflickr.com/1/483/19395952422_8c675808cf_b.jpg
Hey, thats me. :) this is persuading soldering: “join, or else I will be using this” ;) I was building the festival charger station here. 32 5v 1a chargers soldered together with two rods who would fit a shuko style power socket. Of course the live parts were covered with a nice white tube for safety. Its at hack42 i made this.
Actually I’ve done some sub-millimeter soldering with such soldering gun, since I didn’t have anything else at hand. It was broken PCB traces, and I wound few rounds of copper wire on tip of soldering gun and that made ~0.5mm soldering tip. It can’t be used many times but those few traces were successfully fixed using that hack.
Circa 2010 I witness with my remaining eye(lasers are fun!) smartphone repair with one of this. I got Fallout flashbacks to this day.
My technique is to not trying to hold the component still but rather push it gently from the side into the pad. When i move my hands I don’t tremble. That and timing, I remove the tip just in time for the solder to solidify when the component gets to the pad and sticks. Then solder the other pad and reheat the first again as it is often a cold joint.
Bringing an SMD clamp? Those were included at Toorcamp :)
https://i.imgur.com/np7mA1d.jpg
Not that I’m an expert on SMD soldering/rework or anything… but in my experience I find the quality of the tweezers every bit as important as the iron. My old boss left behind a set of these odd plastic ones made of some kind of magic un-meltable material, and once I got my grubby paws on them the speed and standard of my work improved greatly! The components neither stick to them nor ping off into the abyss when I blink. Definitely nicking them when I leave :D
https://en.wikipedia.org/wiki/Polyether_ether_ketone
This can be practice for some new parts coming: 01005. Yes, that is the manufacturer’s specified size for ceramic capacitors. A possible follow on part is 008004. :)
reverse component order for bonus points!
For a basic blinky, an ATtiny13a would be sufficient for the job, and it costs less than half of a t85. Same footprint as the t85, so it’s an easy substitution.
0201? that’s it? ezpz.
But I don’t like that you need to use their iron and solder. Who knows where that tip has been. (Though the rules say “iron” it doesn’t say “tip” so maybe I should bring some common tips…)
… and here I completed it a while ago… and brought it with me to DEFCON.
Then got the cert of completion.
place and put in oven for 30 seconds lol
I made a video on assembling 0402 stuff : https://www.youtube.com/watch?v=tauPcOFXGoQ I think, with the right tools, and lots of practice everything is doable (but good eyesight is also great thing to have).