There is an interesting multi-effect available for all you musicians out there. It’s the Turnado from Sugar Bytes. It’s a real-time effects unit that takes advantage of a computer’s horsepower to add reverb and ring mods to whatever audio you feed into it. There’s flanger and a phaser. If you feed a drum loop into your computer, there’s a stutter function which means you too can become a Soundcloud rapper.
Unfortunately, this multi-effect runs on a computer. That means you have to deal with the user interface of a desktop or laptop — GUIs, a mouse, and keyboard. Maybe a touch screen if you’re lucky.
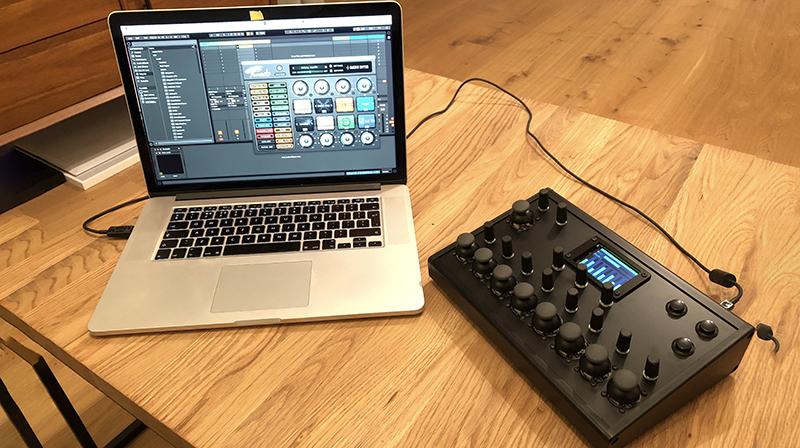
We just wrapped up the Musical Instrument challenge in the Hackaday Prize, and if there’s one thing musicians like it’s a physical interface for all their weird gadgets. That’s what makes the Turnado Hardware MIDI Controller from [Liam Lacey]. It’s a hardware interface for a computer-based software tool.
On board are nine independent joysticks, more than that many encoders, a few buttons, and a display to have everything make sense. All of this is controlled by a Teensy, and it is mostly a plug-and-play solution for controlling Turnado. It’s a great project that makes a great software tool even more useful, and we’re glad to see it make the final cut for the Musical Instrument Challenge in this year’s Hackaday Prize.


This unit looks so good. Well done.
In wonder why the “y” from the joystick was left out only leaving “x”. I would have multiplexed the encoders to ensure there were enough analogue input pins to read the “y” values from the joysticks.
Some tools that may help with panel work –
Step drill. Leaves a fairly clean finish.
Nibbler. A nibble then file will give clean straight edges so you don’t have to use bezels.
Also, you can mix the template and decal into one image and transfer it to the metal sheet. Color Laser toner sticks well to acrylic paint. Paint the sheet. Let it dry properly so it doesn’t soften. Preheat it to about 40 to 50 degrees Celsius. Tape your decal/template to it and run it through a laminator. Then two or three coats of clear acrylic to stop it from chipping. It may be better to just use a paper template and drill before the decal so you don’t mark the decal when drilling.
Hi RÖB,
Thanks for the great feedback and suggestions.
I did use a step drill, however it possibly wasn’t a great quality one and/or my hand drilling skills aren’t up to scratch yet (using a pillar drill would have been preferable). I was consider using waterslide decal paper to apply a decal (which I’ve had success with in the past), but in the end I really liked the plain minimal look of the device without one. However your decal suggestion sound like it would produce more pro results than waterslide paper.
There are two reasons why I omitted the X axis from the joysticks:
1. There is nothing obvious or logical in Turnado that could be controlled by the second axis. Ideally I wanted to use mini lever or ‘pitch bend’ wheel controls (which only have a single axis) instead, but I couldn’t find any affordable off-the-shelf versions of these.
2. I did consider using muxes so I could connect the Y axes seeing as they’re there, however I wanted to keep the circuit as simple as possible so that I could get the controller working in time for the end of the contest.
I would love to see a chart of all the input methods (digital, debounced, analog, capsense, magnetic, what else?), and which ones are understood by which HID control device projects (the ubiquitous teensy keyboard program, various arcade button boards, etc), and which software stacks (autohotkey, what else?) can map those to useful things in which programs (obviously a lot of DAW software understands these, probably flight sims too, but what else?)…
Sort of a “how to get there from here” for your desired software and the input you’d like to build for it.
Really nice controller, but this is NOT a musical instrument. This should have been submitted for the Human Computer Interface challenge, that would make sense.
FYI touchscreens absolutely suck for controllers of any kind, without the haptic feedback, you have to constantly look at it…
I saw a great approach to this on a high-end digital audio editor in the 90s,. Whenever you touched an onscreen button, a small solenoid under the screen snapped, producing both a tactile and audible confirmation.