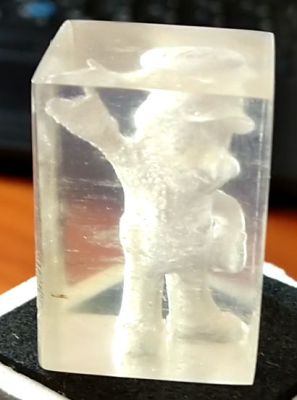
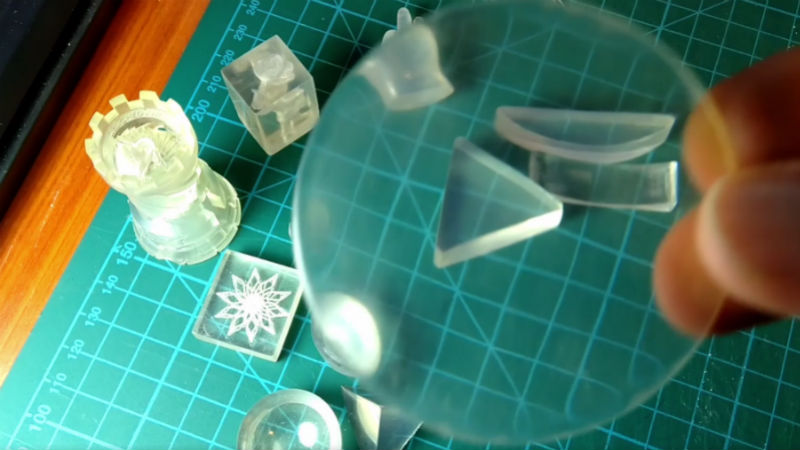
We’re no strangers to seeing translucent 3D printed parts: if you print in a clear filament with thin enough walls you can sorta see through the resulting parts. It’s not perfect, but if you’re trying to make a lamp shade or decorative object, it’s good enough. You certainly couldn’t print anything practical like viewing windows or lenses, leaving “clear” 3D printing as more of a novelty than a practical process.
 But after months of refining his process, [Tomer Glick] has finally put together his guide for creating transparent prints on a standard desktop FDM machine. It doesn’t even require any special filament, he says it will work on PLA, ABS, or PETG, though for the purposes of this demonstration he’s using the new Prusament ABS. The process requires some specific print settings and some post processing, but the results he’s achieved are well worth jumping though a few hoops.
According to [Tomer] the secret is in the print settings. Essentially, you want the printer to push the layers together far closer than normal, in combination with using a high hotend temperature and 100% infill. The end result (hopefully) is the plastic being laid down by the printer is completely fused with the preceding one, making a print that is more of a literal solid object than we’re used to seeing with FDM printing. In fact, you could argue these settings generate internal structures that are nearly the polar opposite of what you’d see on a normal print.
The downside with these unusual print settings is that the outside of the print is exceptionally rough and ugly (as you might expect when forcing as much plastic together as possible). To expose the clear internals, you’ll need to knock the outsides down with some fairly intense sanding. [Tomer] says he starts with 600 and works his way up to 4000, and even mentions that when you get up to the real high grits you might as well use a piece of cardboard to sand the print because that’s about how rough the sandpaper would be anyway.
[Tomer] goes on to demonstrate a printed laser lens, and even shows how you can recreate the effect of laser-engraved acrylic by intentionally putting voids inside the print in whatever shape you like. It’s a really awesome effect and honestly something we would never have believed came off a standard desktop 3D printer.
In the past we’ve seen specialized filament deliver some fairly translucent parts, but those results still weren’t as good as what [Tomer] is getting with standard filament. We’re very interested in seeing more of this process, and are excited to see what kind of applications hackers can come up with.


I have another method. If you print in vase mode and then coat the inside and outside in xtc-3d will be transparent. I think 3 shelled hollow models will work also. The design choices for vase mode are limited but there is more than just vases that can be made. For Christmas try ornaments, tree topper, or snowman. Look for a model that does not have overhangs and comes to a point on the top. I made sword blades on my delta.
Oh neat, it’s kinda like putting cellophane tape on fogged glass to make it transparent.
After ~1000 grit, it may be easier to move to a polishing paste. You can then use a power tool for the polishing and even by hand it seems to work faster on plastic than high-grit sandpaper.
I was thinking something similar. More in the hacker fashion of using an every-day common item rather than buying the specialty stuff I was thinking automotive rubbing compound or better yet even toothpaste.
I polished a laptop with magnesium casing once and used whitening tooth paste, i think it was the last step. Didn’t get completely perfect but still pretty good. But i didn’t clear coat and it didn’t take long for the magnesium alloy to start oxidizing. https://slashhome.se/p/gallery/?f=gallery/Computers/IMG_2885.JPG
I’d rather print a mold with regular settings, smooth it and pour the object from silicone/epoxy/polyester etc.
That is a pretty useful idea, however not every object can be created from a mold, and converting an existing “thing” to a mold involves a few more design steps.
One other point, to produce optically clear results, you could use plain cheap white toothpaste (or ceramic cooker hob cleaner, which is silica based) followed by Brasso metal polish as your polishing media.
This works for acrylic watch glasses and restoring scratched CDs, both of which require near perfect results, so it should be plenty good enough for this application. Diamond lapping pastes also work on acrylic and even glass.
Glass needs a lot more polishing effort, and harder polishing media to produce an optically perfect result. Even with diamond lapping paste it takes a while, for obvious reasons. Cerium Oxide powder (also obtainable on ebay etc) is often used as a final grit on optical glass.
Diamond lapping paste can be obtained in various grit sizes in small dispensing syringes, relatively cheaply on ebay and all the usual alternatives. It is great for shining up a variety of metal and ceramic objects (wrist watch cases for example).
I played around with it a couple of years ago but in my experience the time it takes to print to get truly clear is a bit excessive. https://community.ultimaker.com/files/file/82-ht-clear-experiment/
Limonene is also very good to smooth and inscrease transparency in ABS
Use a really hot hot-end and print glass.
MIT did it:
https://news.mit.edu/2015/3-d-printing-transparent-glass-0914
What about acetone vapor?
With acrylic glas they use heat to polish. Whoud this work with ABS and PLA?
I would try flame polishing as a final touch. It can really clear up sanded acrylic parts (or destroy them if you screw up). Might work here too..?
I have tried it and it didn’t went well. I can identify two phenomenon that appear under heat:
1. The infill lines become visible. the light seems to refract in a different way.
2. Miniature bubbles that weren’t visible expand and are now visible.