If you’re into amateur rocketry, you pretty quickly outgrow the dinky little Estes motors that they sell in the toy stores. Many hobbyists move on to building their own homebrew solid rocket motors and experimenting with propellant mixtures, but it’s difficult to know if you’re on the right track unless you have a way to quantify the thrust you’re getting. [ElementalMaker] decided he’d finally hit the point where he needed to put together a low-cost test stand for his motors, and luckily for us decided to document the process and the results.
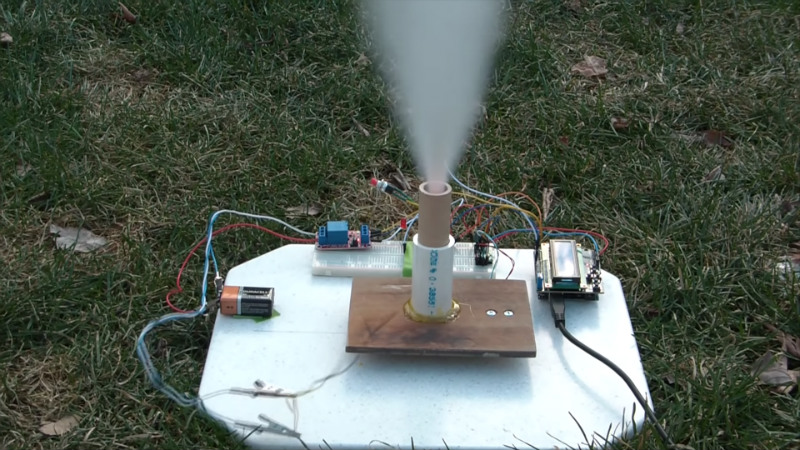
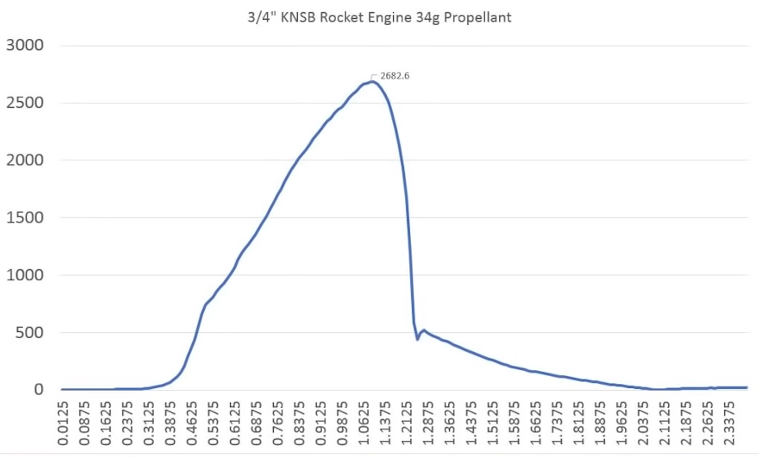 The heart of the stand is a common load cell (the sort of thing you’d find in a digital scale) coupled with a HX711 amplifier board mounted between two plates, with a small section of vertical PVC pipe attached to the topmost plate to serve as a motor mount. This configuration is capable of measuring up to 10 kilograms with an 80Hz sample rate, which is critically important as these type of rocket motors only burn for a few seconds to begin with. The sensor produces hundreds of data points during the short duration of the burn, which is perfect for graphing the motor’s thrust curve over time.
Given such a small window in which to make measurements, [ElementalMaker] didn’t want to leave anything to chance. So rather than manually igniting the motor and triggering the data collection, the stand’s onboard Arduino does both automatically. Pressing the red button on the stand starts a countdown procedure complete with flashing LED, after which a relay is used to energize a nichrome wire “electronic match” stuck inside the motor.
In the video after the break you can see that [ElementalMaker] initially had some trouble getting the Arduino to fire off the igniter, and eventually tracked the issue down to an overabundance of current that was blowing the nichrome wire too fast. Swapping out the big lead acid battery he was originally using with a simple 9V battery solved the problem, and afterwards his first test burns on the stand were complete successes.
If model rockets are your kind of thing, we’ve got plenty of content here to keep you busy. In the past we’ve covered building your own solid rocket motors as well as the electronic igniters to fire them off, and even a wireless test stand that lets you get a bit farther from the action at T-0.
[Thanks to Baldpower for the tip.]


Careful on your purchases for building your own rocket motors, I’ve seen reports that it can attract unwanted Homeland Security attention.
False. According to FAA rules (governing body for hobby rockets) you are allowed to create anything. You only need licensing if the body of the rocket is metal, obtaining more than 150,000 ft in altitude. They appear to be relaxing the self guided option if it is no more than 5 degrees off vertical. Check your local certifying NGO such as Tripoli Rocketry Association.
Nice. Instead of nichrome wire for ignition, he can also use small value resistors, 0 – 10 Ohms.
I used filaments of steel wool for mine. Even cheaper. Tease out a few strands, then wrap one or two onto two pieces of copper wire. You can use some tape to hold the leads in place pretty well. Once you make one or two, it’s easy and relatively quick.
Additionally, seperate the two leads with a tiny ball of wadding/paper and use a sharp pencil to stuff it up in the nozzle . There’s a bit of an art to it, but once you get there you get close to 100% ignition rates.
“hundreds of data points during the short duration of the [build], which is perfect for graphing” Burn?
Really nice project and fantastic for physics/physical science class. (Almost disqualified due to “Hey what’s going on guys”)
Tip: For hole center to center, find diam of one hole, hit the ‘zero’ button and measure from outside edge to outside edge of the holes. The zeroing will subtract one hole diam from the final reading, which will be center to center distance (if holes are the same size). And thanks for sharing about your cold willie?
Well, I got the first two letters right at least. Fixed.
We did ours with a PIC long before Arduino. https://www.youtube.com/watch?v=oBQrAKT-HdY
Thanks for the great article on my build!
can you provide the code for this project