Build Your Own Anechoic Chamber

For professional-level sound recording, you’ll need professional-level equipment. Microphones and mixing gear are the obvious necessities, as well as a good computer with the right software on it. But once you have those things covered, you’ll also need a place to record. Without a good acoustic space, you’ll have all kinds of reflections and artefacts in your sound recordings, and if you can’t rent a studio you can always build your anechoic chamber.

While it is possible to carpet the walls of a room or randomly glue egg crate foam to your walls, [Tech Ingredients] tests some homemade panels of various shapes, sizes, and materials against commercially available solutions. To do this he uses a special enclosed speaker pointed at the material, and a microphone to measure the sound reflections. The tests show promising results for the homemade acoustic-absorbing panels, at a fraction of the cost of ready-made panels.

From there, we are shown how to make and assemble these panels in order to get the best performance from them. When dealing with acoustics, even the glue used to hold everything together can change the properties of the materials. We also see a few other cost saving methods in construction that can help when building the panels themselves as well. And, while this build focuses on acoustic anechoic chambers, don’t forget that there are anechoic chambers for electromagnetic radiation that use the same principles as well.

Thanks to [jafinch78] for the tip!

Continue reading “Build Your Own Anechoic Chamber”

A Lecture By A Fun Guy

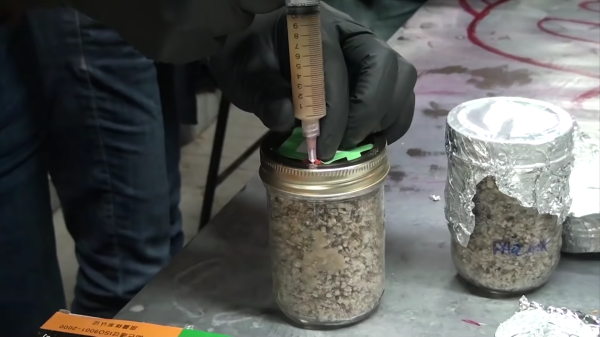
Many people hear “fungus” and think of mushrooms. This is akin to hearing “trees” and thinking of apples. Fungus makes up 2% of earth’s total biomass or 10% of the non-plant biomass, and ranges from the deadly to the delicious. This lecture by [Justin Atkin] of [The Thought Emporium] is slightly shorter than a college class period but is like a whole semester’s worth of tidbits, and the lab section is about growing something (potentially) edible rather than a mere demonstration. The video can also be found below the break.

Let’s start with the lab where we learn to grow fungus in a mason jar on purpose for a change. The ingredient list is simple.

  • 2 parts vermiculite
  • 1 part brown rice flour
  • 1 part water
  • Spore syringe

Combine, sterilize, cool, inoculate, and wait. We get distracted when cool things are happening so shopping around for these items was definitely hampered by listening to the lecture portion of the video.

Continue reading “A Lecture By A Fun Guy”

Lessons Learned From A 1-Day RTL-SDR Enclosure Project

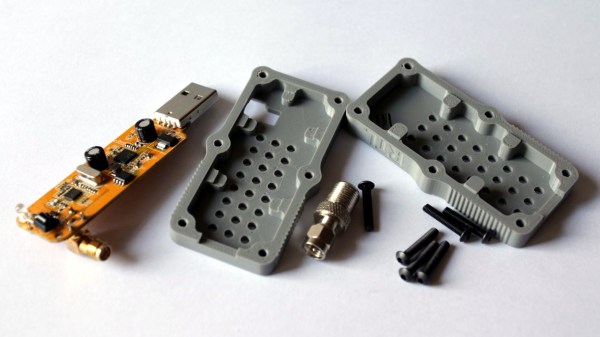
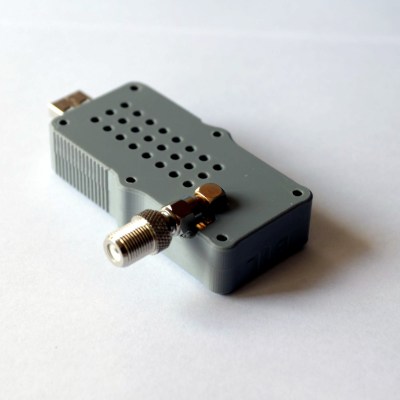
[ByTechLab] needed an enclosure for his R820T2 based RTL-SDR, which sports an SMA connector. Resolving to design and 3D print one in less than a day, he learned a few things about practical design for 3D printing and shared them online along with his CAD files.

The RTL-SDR is a family of economical software defined radio receivers, and [ByTechLab]’s’ enclosure (CAD files available on GrabCAD and STL on Thingiverse) is specific to his model. However, the lessons he learned are applicable to enclosure design in general, and a few of them specifically apply to 3D printing.

He started by making a basic model of the PCB and being sure to include all large components. With that, he could model the right voids inside the enclosure to ensure a minimum of wasted space. The PCB lacks any sort of mounting holes, so the model was also useful to choose where to place some tabs to hold the PCB in place. That took care of the enclosure design, but it also pays to be mindful of the manufacturing method so as to play to its strengths. For FDM 3D printing, that means most curved shapes and rounded edges are trivial. It also means that the biggest favor you can do yourself is to design parts so that they can be printed in a stable orientation without any supports.

This may be nothing that an experienced 3D printer and modeler doesn’t already know, but everyone is a novice at some point and learning from others’ experiences can be a real timesaver. For the more experienced, we covered a somewhat more in-depth guide to practical 3D printed enclosure design.

[ByTechLab]’s desire for a custom enclosure was partly because RTL-SDR devices come in many shapes and sizes, as you can see in this review of 19 different units (of which only 14 actually worked.)

Vintage Plotter Turned Fruit Spectrometer

Fruit can be a tricky thing: if you buy it ripe you’ll be racing against time to eat the pieces before they turn into a mushy mess, but if you buy the ones which are a bit before their prime it’s not always easy to tell when they’re ready to eat. Do you smell it? Squeeze it? Toss it on the counter to see if it bounces? In the end you forget about them and they go bad anyway. That’s why here at Hackaday we sustain ourselves with only collected rainwater and thermo-stabilized military rations.

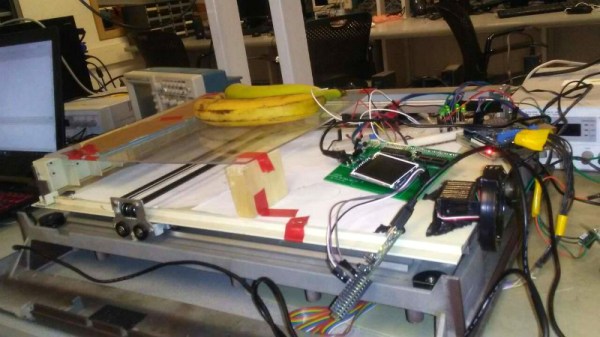
But thankfully Cornell students [Christina Chang], [Michelle Feng], and [Russell Silva] have come up with a delightfully high-tech solution to this decidedly low-tech problem. Rather than rely on human senses to determine when a counter full of fruit has ripened, they propose an automated system which uses a motorized spectrometer to scan an arrangement of fruit. The device measures the fruit’s reflectance at 678 nm, which can be used to determine the surface concentration of chlorophyll-a; a prime indicator of ripeness.

If that sounds a bit above your pay grade, don’t worry. The students were able to build a functional prototype using a 1980’s era plotter, a Raspberry Pi, and a low-cost AS7263 NIR spectral sensor from SparkFun which just so happens to have a peak responsivity of 680 nm. The scanning is performed by a PIC32MX250F128B development board with an attached TFT LCD display so the results can be easily viewed. The Raspberry Pi is used in conjunction with a Adafruit PCA9685 I2C PWM driver to control the plotter’s stepper motors. The scanning and motor control could be done with the PIC32 alone, but to save time the students decided to use the Raspberry Pi to command the PCA9685 as that was what the documentation and software was readily available for.

To perform a scan, the stepper motors home the AS7263 sensor module, and then passes it under the fruit which is laying on a clear acrylic sheet. Moving the length of the acrylic sheet, the sensor is able to scan not only multiple pieces of fruit but the entirety of each piece; allowing it to determine for example if a section of a banana has already turned. The relative ripeness of the fruit is displayed to the user on the LCD display as a heatmap: the brighter the color the more ripe it is.

At the end of their paper, [Christina], [Michelle], and [Russell] note that while the scanner worked well there’s still room for improvement. A more scientific approach to calculating how ripe each fruit is would make the device more accurate and take out the guess work on the part of the end user, and issues with darker colored fruit could potentially be resolved with additional calibration.

While a spectrometer might sound like the kind of equipment that only exists in multi-million dollar research laboratories, we occasionally see projects like this which make the technology much more accessible. This year we saw a compact spectrometer in the Hackaday Prize, and going a bit farther back in time we even featured a roundup of some of the most impressive spectrometer builds on Hackaday.io.

Continue reading “Vintage Plotter Turned Fruit Spectrometer”

Arduino-Powered Rocket Test Stand

If you’re into amateur rocketry, you pretty quickly outgrow the dinky little Estes motors that they sell in the toy stores. Many hobbyists move on to building their own homebrew solid rocket motors and experimenting with propellant mixtures, but it’s difficult to know if you’re on the right track unless you have a way to quantify the thrust you’re getting. [ElementalMaker] decided he’d finally hit the point where he needed to put together a low-cost test stand for his motors, and luckily for us decided to document the process and the results.

The heart of the stand is a common load cell (the sort of thing you’d find in a digital scale) coupled with a HX711 amplifier board mounted between two plates, with a small section of vertical PVC pipe attached to the topmost plate to serve as a motor mount. This configuration is capable of measuring up to 10 kilograms with an 80Hz sample rate, which is critically important as these type of rocket motors only burn for a few seconds to begin with. The sensor produces hundreds of data points during the short duration of the burn, which is perfect for graphing the motor’s thrust curve over time.

Given such a small window in which to make measurements, [ElementalMaker] didn’t want to leave anything to chance. So rather than manually igniting the motor and triggering the data collection, the stand’s onboard Arduino does both automatically. Pressing the red button on the stand starts a countdown procedure complete with flashing LED, after which a relay is used to energize a nichrome wire “electronic match” stuck inside the motor.

In the video after the break you can see that [ElementalMaker] initially had some trouble getting the Arduino to fire off the igniter, and eventually tracked the issue down to an overabundance of current that was blowing the nichrome wire too fast. Swapping out the big lead acid battery he was originally using with a simple 9V battery solved the problem, and afterwards his first test burns on the stand were complete successes.

If model rockets are your kind of thing, we’ve got plenty of content here to keep you busy. In the past we’ve covered building your own solid rocket motors as well as the electronic igniters to fire them off, and even a wireless test stand that lets you get a bit farther from the action at T-0.

Continue reading “Arduino-Powered Rocket Test Stand”

Scott Swaaley On High Voltage

If you were to invent a time machine and transport a typical hardware hacker of the 1970s into 2018 and sit them at a bench alongside their modern counterpart, you’d expect them to be faced with a pile of new things, novel experiences, and exciting possibilities. The Internet for all, desktop computing fulfilling its potential, cheap single-board computers, even ubiquitous surface-mount components.

What you might not expect though is that the 2018 hacker might discover a whole field of equivalent unfamiliarity while being very relevant from their grizzled guest. It’s something Scott Swaaley touches upon in his Superconference talk:  “Lessons Learned in Designing High Power Line Voltage Circuits” in which he describes his quest for an electronic motor brake, and how his experiences had left him with a gap in his knowledge when it came to working with AC mains voltage.

When Did You Last Handle AC Line voltages?

If you think about it, the AC supply has become something we rarely encounter for several reasons. Our 1970s hacker would have been used to wiring in mains transformers, to repairing tube-driven equipment or CRT televisions with live chassis’,  and to working with lighting that was almost exclusively provided by mains-driven incandescent bulbs. A common project of the day would have been a lighting dimmer with a triac, by contrast we work in a world of microcontroller-PWM-driven LEDs and off-the-shelf switch-mode power supplies in which we have no need to see the high voltages. It may be no bad thing that we are rarely exposed to high-voltage risk, but along the way we may have lost a part of our collective skillset.

Scott’s path to gaining his mains voltage experience started in a school workshop, with a bandsaw. Inertia in the saw kept the blade moving after the power had been withdrawn, and while that might be something many of us are used to it was inappropriate in that setting as kids are better remaining attached to their fingers. He looked at brakes and electrical loads as the solution to stopping the motor, but finally settled on something far simpler. An induction motor can be stopped very quickly indeed by applying a DC voltage to it, and his quest to achieve this led along the path of working with the AC supply. Eventually he had a working prototype, which he further developed to become the MakeSafe power tool brake.

Get Your AC Switching Right First Time

The full talk is embedded below the break, and gives a very good introduction to the topic of switching AC power. If you’ve never encountered a thryristor, a triac, or even a diac, these once-ubiquitous components make an entrance. We learn about relays and contactors, and how back EMF can destroy them, and about the different strategies to protect them. Our 1970s hacker would recognise some of these, but even here there are components that have reached the market since their time that they would probably give anything to have. We see the genesis of the MakeSafe brake as a panel with a bunch of relays and an electronic fan controller with a rectifier to produce the DC, and we hear about adequate safety precautions. This is music to our ears, as it’s a subject we’ve touched on before both in terms of handling mains on your bench and inside live equipment.

So if you’ve never dealt with AC line voltages, give this talk a look. The days of wiring up transformers to power projects might be largely behind us, but the skills and principles contained within it are still valid.

Continue reading “Scott Swaaley On High Voltage”

Dexterity Hand Is A Configurable Prosthetic Hand

One of the interesting benefits of the 3D printing revolution is the dramatic increase in availability of prosthetics for people with virtually any need. With a little bit of research, a 3D printer, and some trial and error, virtually anyone can build a prototype prosthetic to fit them specifically rather than spend thousands of dollars for one from a medical professional. [Dominick Scalise] is attempting to flesh out this idea with a prosthetic hand that he hopes will be a useful prosthetic in itself, but also a platform for others to build on or take ideas from.

His hand is explained in great detail in a series of videos on YouTube. The idea that sets this prosthetic apart from others, however, is its impressive configurability while not relying on servos or other electronics to control the device. The wearer would use their other hand to set the dexterity hand up for whatever task they need to perform, and then perform that task. Its versatility is thanks to a unique style of locks and tensioners which allow the hand to be positioned in various ways, and then squeezed to operate the hand. It seems like a skilled user can configure the hand rapidly, although they must have a way to squeeze the hand to operate it, or someone will need to develop an interface of some sort for people without needing to squeeze it.

To that end, the files for making your own hand are available on Thingiverse. [Dominick] hopes that his project will spark some collaboration and development, using this hand as a basis for building other low-cost 3D printed prosthetics. There are many good ideas from this project that could translate well into other areas of prosthetics, and putting it all out there will hopefully spur more growth in this area. We’ve already seen similar-looking hands that have different methods of actuation, and both projects could benefit from sharing ideas with each other.

Thanks to [mmemetea] for the tip!

Continue reading “Dexterity Hand Is A Configurable Prosthetic Hand”