Sometimes you get an epiphany for a project that will change the world. A simple device, on a custom circuit board with inexpensive parts that will disrupt the status quo and make you a billion dollars in no time. Then there are the times where you need to throw scraps of copper at a prototyping board and strangle nine-volts out by any means necessary.
This is about the latter. In one of our Hack Chats, [Morning.Star] shared a couple of images wherein a barrel connector was needed, but there was no time to wait for one in the mail. Necessity birthed the most straightforward solution which did not involve shredding a power adapter’s plug. There is no link, [Stuart Longland] aka [Redhatter] screen-capped the image exchange and reminded us on the tip line.
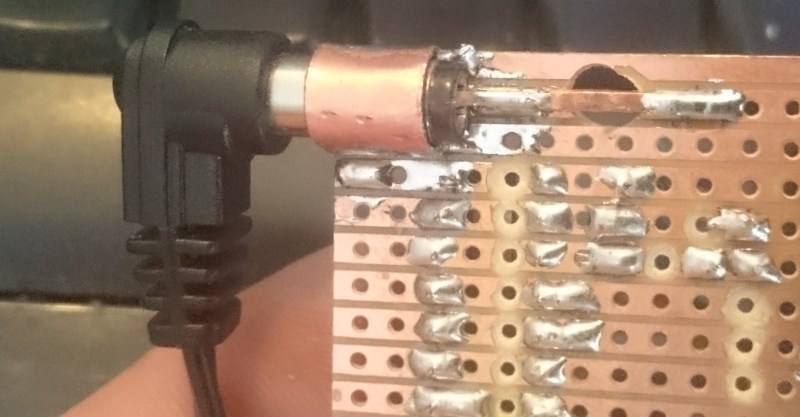
Chances are you’ve faced this problem yourself. Everyone has a box of old wall warts somewhere, exhibiting a wide range of barrel connector sizes. If you can’t take the easy route of cutting off the connectors, what’s your go-to trick? Alligator clips are a horrid approach, and there aren’t really any clear winners that come to mind. [Morning.Star’s] hack is actually quite respectable! It appears to be a roll of copper (perhaps from tubing?) bent for a bit of spring tension on the outside of the barrel. The inside is contacted by thick copper wire with a kink to again provide spring action.
So, spill the beans. What’s your barrel connector trick and does it work reliably?


Strip the middle of some stranded wire, un-twist, insert barrel. Re-twist.
Works for a while..
Here’s a lazy trick from my friend. Got a loose barrel jack? Re-arch the flattened contact that tensions the plug. It’s usually a thin leaf spring (or several) inside the jack. Finagle something thin like a small blade under the springy contact, pull it up and out, and get the arch shape back. The hardest part is finding a pry tool that’s small enough to slip under the contact yet stiff enough to actually pry with.
Crochet hook?
(I keep on in my tool box for similar uses)
Crochet hooks are the most essential, unsung tool. I keep a bunch of them around, but the super teeny tiny ones are the one I reach for the most often.
Crochet hooks are essential for so many things. I have a handful of the super tiny ones, and reach for them constantly. They’re way stronger than you’d think, and for hooking things and pulling wires through… nothing works better.
That is where good quality dental tools come in super handy. I picked up a bunch at a liquidation place that work perfectly for things like that because they are very thin but made of very strong steel.
My electronics tool box also has a dental mirror (plastic handle).
Piano wire in different diameters. Sharpen to non slip probes with red probe handle, bend into “dental” tools with any shape imaginable. Bend out loose octal tube sockets in old amps, loose Molex sockets too. A must have tool.
I’d have probably cannibalised a socket from another scrap piece of kit, but this….this is A Hack, and a good one too!
What I would like is to know the right connector to plug the oscilloscope probe into (a 10x one, not a BNC connector), I’ve seen a couple of videos of people using some kind of connector, but I coulnd’t find anything in DigiKey or the like.
https://i.stack.imgur.com/cbLXI.png
http://www.edn.com/ContentEETimes/Images/00PCB/cclad1f3.jpg
This is an excellent and easy way to probe sensitive or high speed signals! I recommend using this kind of wire bent probe hooks, we use them very often at work. And no need to buy any components for probing..
Yeah, I kinda did that, but it’s not very solid (i.e. it broke easily).
i usually just get my connector kit and crimp on whatever connector i have in the most abundance at the time. in my case, right now, that would be barrel jacks. though ive used molex connectors and dupont modular housings and crimp pins as well.
The tip side could be one of the female pin of old DB9/DB25 connector.
Measure the probe tip diameter and take a look at digikey: Product Index > Connectors, Interconnects > Terminals – PC Pin Receptacles, Socket Connectors
For ground connection, I have used the female contact of those old PATA Molex power connector. You might have to unwind the contact a bit to fit the metal part of probe cartridges.
Alternatively, could use a spring from old ball point pen for ground connection except you solder it on your PCB. :)
https://hw-by-design.blogspot.com/2018/07/scope-probe-ground-spring.html
Might want to try the scope manufacturer. Also sometimes you might find a part number in an app note of a eval board of some power or high speed circuits somewhere that uses the proper part.
I have modded an old RCA Composite cable into a connection.
I don’t have any pictures, but I just stuff wire strands in until it is full, heat-shrink some tubing around the bundle, then remove and tin it for a perfectly-sized center pin. For the sleeve, I just tightly wrap wire flat around it until it is completely covered, then would slide the pin in and cover the whole thing in hot glue. (I haven’t used hot glue yet; usually I just tape everything in place because I am just doing a temporary fix.)
Come on! It’s called a “hack” because you “hack” off the connector and splice the wires.
It’s like you guys aren’t even trying :-)
Dual row DIP headers make a good SD card socket for breadboarding. One row are the connectors and the other row supports the back of the SD card.
Also HAD! I don’t like the T&Cs of Akismet so I don’t comment now without using a false email address so I don’t see followup comments.
Ironically your choice for anti-spam harvests email addresses and provides them to other organizations and that will no doubt result in commenters being SPAMed on their email addresses.
I just solder headers directly to a micro SD card adapter, drop it in the breadboard, and insert a micro card.
Ditto. Lord knows I have enough of them.
I have sandwich bags full of connector shells and plug ends. I chop the plug off every dead appliance I see and somehow never have enough of those or barrel jacks. I guess like most it’s just jamb the inside full of wire, wrap the barrel, and tape/heat shrink to hold.
Same here. I’ve also been known to chop the plug end off my wall-warts and ubiquitous cheap USB power cables put some other connector pair in the middle (e.g. a pair of 100mill header pins on the power recipient end and matching header socket on the power supplying end) along with color coded heat shrink and then encapsulate the whole mess in a larger clear heatshrink tube with internal adhesive. As a bonus careful swizzling can allow polarity reversal for those rare but annoying devices that buck the ring-negative tip-positive convention. The downside is that you do have to be careful not to reverse the polarity when you don’t mean to since most devices get unhappy with prolonged shorts through their clamp diodes).
Speaking of prolonged shorts through clamp diodes, for those of you too young or insufficiently clumsy to have had the experience, watching your MCU turn into an incandescent lamp through the windowed CERDIP package produced an indescribable blend of awe and terror (and a strong incentive to knock off for lunch as that chip package will take a good while to cool).
If ever I do happen across an inverted barrel, it’s getting chopped off for being ridiculous!
Every router, boombox, toy, answering machine, etc. usually yields one of the mates to that big box store we all have called Walwart Mart. Seems that the Chinese have simplified the choices of barrel sizes to about 2 or 3 certainly less than years past of eastern and Japanese competition. My smaller store-age is for AC wall warts only, they tend to let out magic smoke out of most other things they inadvertently get plugged into.
I use the real thing
You could hack together a crude coax connection by having the cable center conductor form the pin on the male part.
Oh wait, that’s called an F connector.
F’n connector!
The “best” barrel jack trick I have was accidentally discovering that my Dymo LabelWriter 400 Turbo that takes 24VDC uses exactly the same connector as the vast majority of 12VDC devices. For shame, Dymo! Also shame on Western Digital for providing zero protection on the 12V line in their MyBook hard drives. The internal USB to SATA adapter survived because it has a *very robust* 12 to 5 volt circuit and passes that protection on to the drive’s 5V input. Fortunately the 12V shunt on the drive shunted (permanently) instead of blowing open.
Years ago I built a dual 2600 to TI-99 joystick adapter into a DB25 connector and shell. There’s room to plug two molded DE9 joystick plugs into a DB25 side by side. I used the insertable pin style connector and superglued a trapezoid of wood into the middle to make two sockets. Inside the shell I soldered small diodes to the pins, going by taking apart and ringing out a pair of TI Wired Remote Pinky Pinchers*, to make dual sticks work correctly. To connect to the computer I used 9 separate wires to a DE9 and shell, with the wires bound up in electrical tape. Might have used shrink tube but far as I can recall the tape was more likely.
Why use a DB25 instead of separate DE9’s? Money! Would have cost $2 or $3 more to build. I did have to saw the screw ‘ears’ off the sides of the DE9 on my homebuilt joystick but small nothing to pay to be able to use it and the cheap thrift store sticks I had.
*One must be careful to not ‘choke down’ on the super stiff OEM TI-99 joyless sticks when playing fast twitch games like Tombstone City or you will pinch your pinky finger between the sharp bottom edge of the stick and the controller body. Finally getting pinched one time too many was the inspiration for building the adapter. So was the ludicrous price for 3rd party stick adapters, especially when I found out how simple they were.
I just cut the end off, and put on a screw terminal to barrel adapter. I cut a little before the plug so I can make the opposite adapter if I ever need to use it. Proper power connectors are just something you should keep a bunch on hand of, just like you’d have a stash if various resistors.
2.1mm is pretty much a standard now. It’s usually used for 12 and 5volts, sometimes up to 24, and occasionally -9. But mostly 12.
3.5mm seems to be used for 5 and sometimes 9v, with 2.5mm being used mostly for 5. Occasionally you’ll see random bigger sizes, but the hassle of trying to use different barrel connectors to prevent mistakes is usually more trouble than just building your circuit to handle a wide input range.
JST-PH-2 seems to be the universal lithium battery connector, or sometimes other low voltage batteries. And of course now everything runs on microUSB or USB C, which kinda suck in some ways.
PLCC to DIP using some discarded breadboard and cat 5 wire because I was cheap and poor while doing a Sampo DVD player hack back in 2002. Shame this place dont allow direct image uploads.. ;)
Before I stopped being lazy in that particular way. I used an adapter kit from Radio Shack. It had one of each commonly found size. Just snap the male-female you need together and instant adapter. Haven’t seen anything like it in awhile and unfortunately loaned mine out so long ago I don’t even remember to whom.
I once made the male version of a barrel connector using two segments of a broken telescoping antenna. I filled the gap with masking tape and used that connector for years. It worked so well that I saved it afterwards. I’m pretty sure I still have it somewhere in a junk drawer.
Hmmm, considering the number of telescoping antennas my daughter broke when she was younger…
I have a small stock of new and sawn-off barrel jacks, so I usually have the right thing on hand. When I don’t and it’s a one-off project or hack, I usually solder a two pin header on the board, and then use a 2-socket molex female on the wall wart DC wire.
Last year I made an external franklin dipole antenna to extend the range of my then new ADSB SDR receiver. I couldn’t find in my backwoods the N male connector required by the SDR dongle, so I made a “temporary” one with a 15mm of common 1/4″ copper tubing, which ID happened to fit the OD of the coax plus shielding.
Saw planes at the theoretical maximun of about 350Km. Will not even touch the “connector”.
http://tinyurl.com/y72kc9gv
I can’t remember any barrel hacks other then striped wire, the occasional needle to replace the center pin on a broken port, lots of foil. However if you expand on this as a “port” hack I have one in which I had an AGP video card slot that got some mashed pins one time while trying to put a new video card in. Upon examination about 4 or 5 pins got mashed flat inside the socket, flat to the bottom, but from only one side while inserting a new video card. The pins alternate in a wide-narrow narrow-wide format so bending them back with something was going to be a problem because they would likely break if mashed again and also the deformation made them spring back to a shape that they wanted to intrude into the socket space and get mashed again if anything got inserted in the slot, since this was the only high speed port for a video card failure was not an option.
With my a heavy weekend of video game playing on the line, I reached for an aluminum soda can and cut a shim out that would rest on the pins and push them gently back into the proper place and then fitted the card into the socket as the shim kept the pins from entering the socket. Then using a pair of pliers, pulled the shim out of the socket and let the pins fall back under spring pressure to touch the card. This worked and I left that card and socket alone until the system died years later. Around that time I used soda cans a lot like duck tape. Even replaced a broken leg to my roommates dresser with a few mashed flat and duct taped together. He and I still keep in touch after more then 15 years, and he still has the soda can leg for this piece of furniture he got from his grandmother. I guess if it’s working don’t touch it? Thankfully it was a rear leg and hids easily when the piece of furniture is pushed up against a wall.
I am curious how 3D printers might change this sort of thing these days.