Word Clock Don’t Need No Stencil Font

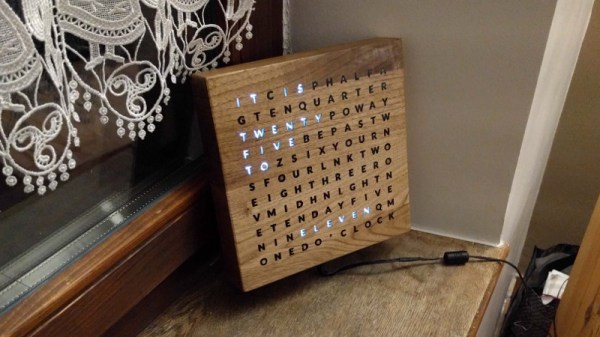
Word clocks use natural language to display the time. They’ve been in vogue in the last 20 years or so, as low-cost digital technology makes them particularly cost effective and easy to build for the average maker. The hardware and software is a solved problem, so presentation is everything. Luckily, [watsaig]’s effort does not disappoint.

The build began with a timeframe of just seven days — a narrow window given [watsaig]’s lack of experience with lasercutting and woodworking. Not content to let that get in the way, it was time to get to work. Wood was sourced from Amazon and designs laid out, before lasercutting began in earnest.
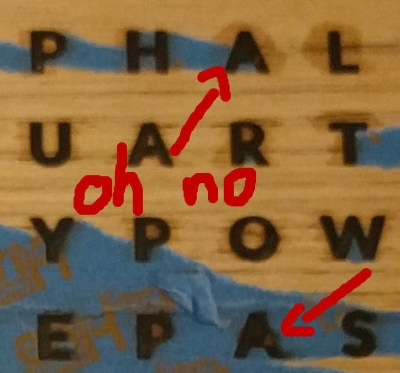
[watsaig] decided to fill all of the letters with epoxy to achieve a flat finished surface that also served as diffuser for the LEDs. To avoid using an unsightly stencil font, the centers (the cut out portion) of letters like O, A, and R had to be placed by hand. Unfortunately his turned out quite badly. When using a squeegee method to work epoxy into the letters, the inserts tended to shift, ruining the face plate.

Undeterred, the clock face was recreated from scratch, and it was determined that a pipette was a far more suitable tool, allowing the letters to be filled with epoxy without unduly disturbing the letter inserts. The final result is visually attractive, finished with a wonderful stain and giving a pleasing glow thanks the careful attention to diffusion and masking. The hidden Happy Birthday message may have been lost in the rush, but it’s the thought that counts, after all.

For a Continental take, check out this word clock in Catalan.

Portmanteau Spewing PunBot

When Python was created, [Guido van Rossum] knew that one day it would be fully realized and take its final form. Clearly, that day has arrived since there now exists a way to send a word query and receive a lengthy list of potential portmanteaus. Some may regard this as merely quaint, but it will be the most important thing to happen in binary until the singularity.

Perhaps we are overpromising a smidge, but it may be fun to spend an afternoon getting your own whimsicalibrated pun resource churning out some eye-roll-worthy word combos. The steps are broken up neatly and explained at a high level with links for more in-depth explanations so a novice can slog through it, but a whiz can wrap it up while the boss is looking the other way.

We truly live in the future, but we may continue writing our own brand of artisanal puns which are number one in someone’s book.

Skeletal Robot Skips The Chassis

With the high availability of low-cost modular electronic components, building your own little robot buddy is easier and more affordable than ever. But while the electronics might be dirt cheap thanks to the economies of scale, modular robot chassis can be surprisingly expensive. If you’ve got a 3D printer you can always make a chassis that way, but what if you’re looking for something a bit more artisanal?

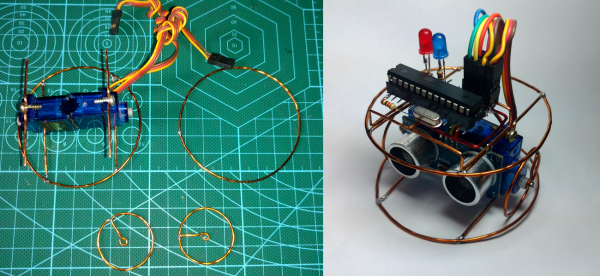
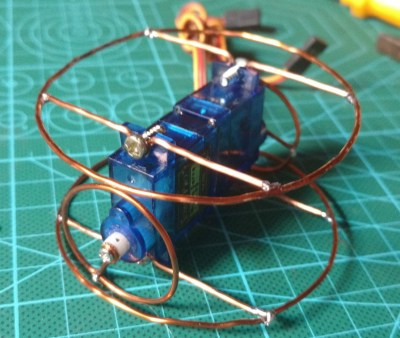
For his entry into the Circuit Sculpture Contest, [Robson Couto] has built a simple robot which dumps the traditional chassis for a frame made out of bent and soldered copper wire. Not only does this happen to look really cool in a Steampunk kind of way, it’s also a very cheap way of knocking together a basic bot with just the parts you have on hand. Not exactly a heavy-duty chassis, to be sure, but certainly robust enough to rove around your workbench.

The dual servos constrained within the wire frame have been modified for continuous rotation, which combined with the narrow track should make for a fairly maneuverable little bot. [Robson] equipped his servos with copper wheels built in the same style of the frame, which likely isn’t great for traction but really does help sell the overall look. If you aren’t planning on entering your creation into a contest that focuses on unique construction, we’d suggest some more traditional wheels for best results.

The brains of this bot are provided by an ATmega8 with external 16MHz crystal tacked onto the pins. There’s also a ultrasonic sensor board mounted to the servos which eventually will give this little fellow the ability to avoid obstacles. Of course, it doesn’t take a robotics expert to realize there’s currently no onboard power supply in the design. We’d love to say that he’s planning on using the copper loops of the frame to power the thing via induction, but we imagine [Robson] is still fiddling around with the best way to get juice into his wireframe creation before the Contest deadline.

Speaking of which, there’s still plenty of time to get your own Circuit Sculpture creation submitted. If it’s a functional device that isn’t scared to show off the goods, we’re interested in seeing it. Just document the project on Hackaday.io and submit it to the contest before the January 8th, 2019 deadline.

Make An Impression At The Bar With A CNC Coaster Plotter

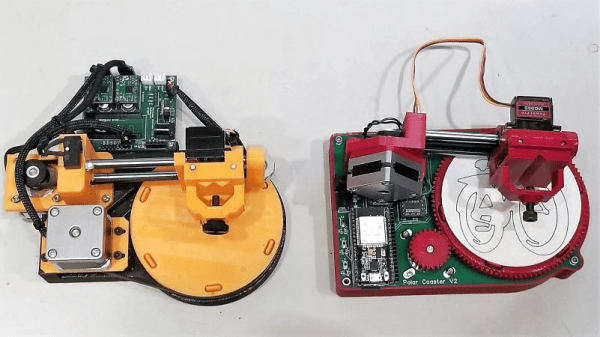
If you’re anything like us, your success with the opposite sex at the bar wasn’t much to brag about. But imagine if you had only had this compact CNC polar plotter and could have whipped up a few custom coasters for your intended’s drink. Yeah, that definitely would have helped.

Or not, but at least it would have been fun to play with. This is actually an improved version of [bdring]’s original “Polar Coaster”. Version 2 is really just a more compact and robust version of the original. The new one has a custom controller for the steppers and pen-lift servo, and everything is mounted neatly to the main PCB. Where the original used a timing belt to drive the platter, the new one uses 3D-printed helical gears, and the steppers have been replaced by slimmer motors. It even has an SD card and smartphone UI, and the coasters look pretty good.

There’s no video of the new one, but you can see its predecessor in action below and imagine the possibilities. Snap a picture and have a line art rendition of someone plotted while you’re waiting for drinks? Just remember not to take any laser engraved wooden nickels.

Continue reading “Make An Impression At The Bar With A CNC Coaster Plotter”

Bottom Of The Barrel Connector: Tell Us Your Socket Hacks

Sometimes you get an epiphany for a project that will change the world. A simple device, on a custom circuit board with inexpensive parts that will disrupt the status quo and make you a billion dollars in no time. Then there are the times where you need to throw scraps of copper at a prototyping board and strangle nine-volts out by any means necessary.

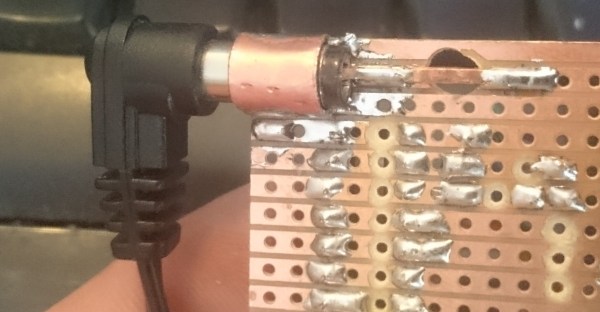
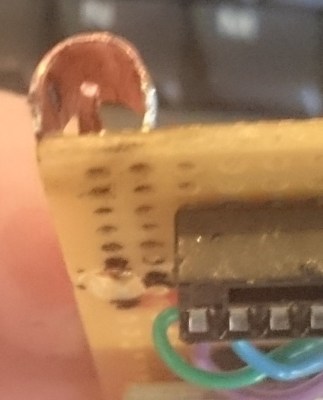
This is about the latter. In one of our Hack Chats, [Morning.Star] shared a couple of images wherein a barrel connector was needed, but there was no time to wait for one in the mail. Necessity birthed the most straightforward solution which did not involve shredding a power adapter’s plug. There is no link, [Stuart Longland] aka [Redhatter] screen-capped the image exchange and reminded us on the tip line.

Chances are you’ve faced this problem yourself. Everyone has a box of old wall warts somewhere, exhibiting a wide range of barrel connector sizes. If you can’t take the easy route of cutting off the connectors, what’s your go-to trick? Alligator clips are a horrid approach, and there aren’t really any clear winners that come to mind. [Morning.Star’s] hack is actually quite respectable! It appears to be a roll of copper (perhaps from tubing?) bent for a bit of spring tension on the outside of the barrel. The inside is contacted by thick copper wire with a kink to again provide spring action.

So, spill the beans. What’s your barrel connector trick and does it work reliably?

A Daring Search For Answers In Soyuz Mystery

If you happened to tune into NASA TV on December 11th, you’d have been treated to a sight perhaps best described as “unprecedented”: Russian cosmonauts roughly cutting away the thermal insulation of a docked Soyuz spacecraft with a knife and makeshift pair of shears. Working in a cloud of material ripped loose during the highly unusual procedure, cosmonauts Oleg Kononenko and Sergey Prokopyev were effectively carving out their own unique place in space history. Their mission was to investigate the external side of the suspicious hole in the Soyuz MS-09 capsule which caused a loss of air pressure on the International Space Station earlier in the year.

That astronauts don’t generally climb out the hatch and use a knife to hack away at the outside of their spacecraft probably goes without saying. Such an event has never happened before, and while nobody can predict the future, odds are it’s not something we’re likely to see again. Keep in mind that this wasn’t some test capsule or a derelict, but a vehicle slated to return three human occupants to Earth in a matter of days. Cutting open a spacecraft in which human lives will shortly be entrusted is not a risk taken likely, and shows how truly desperate the Russian space agency Roscosmos is to find out just who or what put a hole in the side of one of their spacecraft.

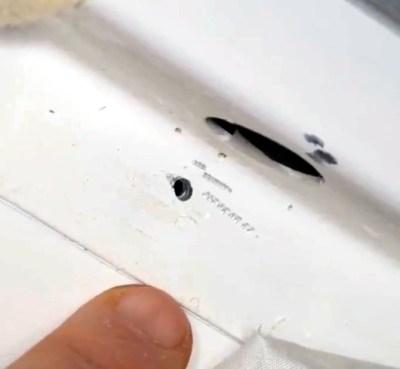
Close inspection from the inside of the spacecraft confirmed the hole wasn’t made by an impact with a micrometeorite or tiny piece of space junk as was originally assumed. It appears to have been made with a drill, which really only allows for two possible scenarios: intentional sabotage or a mistake and subsequent cover-up. In either event, a truly heinous crime has been committed and those responsible must be found. As luck would have it the slow leak of air pressure was detected early and the hole was patched before any damage was done, but what if it hadn’t?

Continue reading “A Daring Search For Answers In Soyuz Mystery”

Bonanza Of Keyswitch Datasheets Fills Our Decks With Clack

Mechanical keyboards use switches of a few different types. But even those types include myriad variations. How’s a hacker to know just exactly what equipment is out there?

For example, if you grab a fellow cube-farmer’s mechanical keyboard (possibly because they clacked on their Cherry Blue’s just one too many times) and angrily rip off a few keycaps to show you’re serious, what do you see? In most cases you expect to see the familiar color and stem shape of a Cherry MX switch or one of its various clones. But you may find a square box around it like a Kailh Box switch. Or the entire stem is a box (with no +) like a Matias switch. Or sometimes it looks like a little pig snout, making it a Kailh Choc.

There is a fairly wide variety of companies which make key switches suitable for use in a keyboard. Many hew to the electrical and mechanical standards implicitly created by the dominant Cherry GmbH’s common switches but not all. So if you’re designing a PCB for such a keyboard and want to use odd switches, you need to check out the Keyboardio keyswitch_documentation repo!

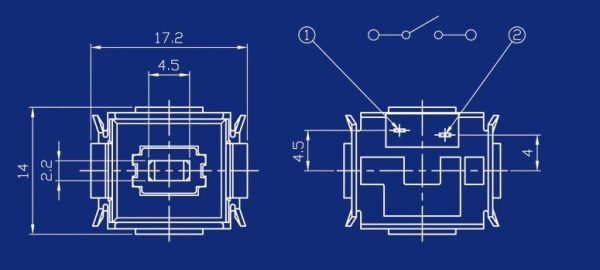
The keyswitch_documentation repo is an absolute treasure trove of hard to find keyswitch datasheets. Finding official information on Cherry MX switches isn’t too hard (keyswitch_documentation has 22 data sheets for MX series switches, and four for ML). But those Kailh Choc’s? Good luck (here it is in keyswitch_documentation). Did you know Tai-Hao made Matias-esque switches as well as weird rubber keycaps? Well they do, and here’s the datasheet.

We’re keeping this one handy until the next time we need data sheets for weird switches. Make sure to send a note if you find something interesting in here that’s worth noting!