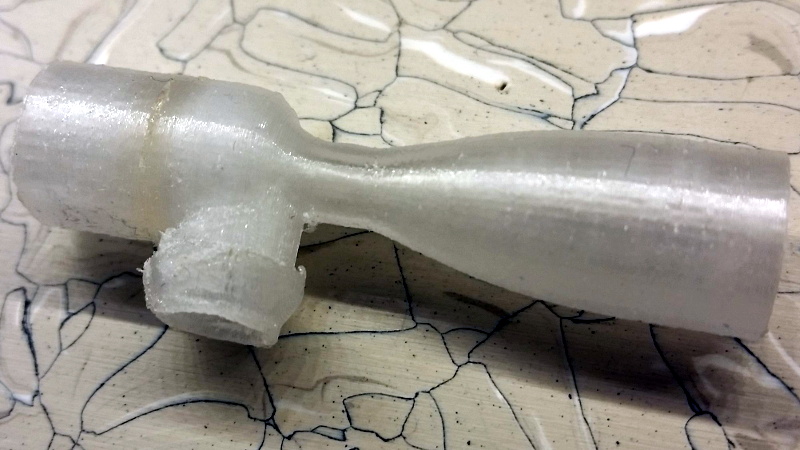
Venturi pumps, commonly referred to as aspirators, are a fantastic way of moving around things which you might not want spinning around inside of a pump, and one of the easiest ways to create a vacuum. According to his research, [Tuval Ben Dosa] believed such a device would be a good way to move corrosive gasses which would normally eat up a blower fan; all he had to do was figure out how to 3D print one to his specifications.
 Put simply: if you take a “T” shaped pipe and pass a fluid (such as air or water) through the straight section, a vacuum will be created on the shorter side due to the Venturi effect. As long as you don’t mind the substance you wish to pump getting mixed into your working fluid, it’s a simple way to bring something “along for the ride” as the fluid makes its way through the pipe.
[Tuval] needed a way to remove the chlorine gasses produced by his PCB etching station, and an aspirator seemed like the perfect solution. He just needed to pump clean air through a Venturi, which would suck up the chlorine gas on the way through, and ultimately carry it outside. But he soon found that while a pump based on the Venturi effect is simple conceptually, getting it to work in the real world is a bit trickier. Especially when you’re dealing with something like 3D printing, which brings in its own unique challenges.
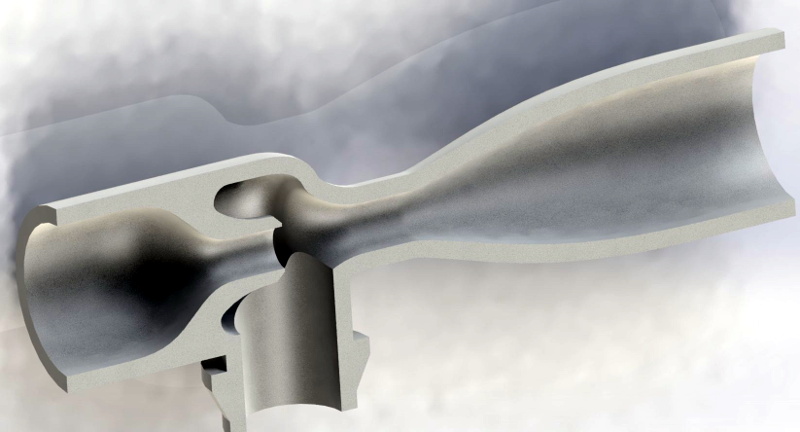
He tried modeling a few designs he found online in 3D and printing them out, but none of them worked as expected. The most common problem was simply that no vacuum was being generated, air was freely moving out of both sides. While [Tuval] doesn’t claim to have any great knowledge of fluid dynamics, he reasoned that the issue was due to the fact that most Venturi pumps seem designed to move water rather than air. So he designed a new version of the pump which had a more pronounced nozzle on the inlet surrounded by a cavity in which the gases could mix.
His modified design worked, and now anyone with a 3D printer can run off their own Venturi device for quickly and easily giving potentially harmful fumes or gases the boot. If this is one of those things you’d feel more comfortable buying than building, don’t worry, we’ve previously covered using a low-cost aspirator as a vacuum source in the home lab.


Another source for buying one cheap – many modern gas engines have one to recirculate crankcase vapors into the engine intake to prevent partially burned hydrocarbons escaping to the atmosphere.
I think that relies more on the fact that the intake manifold is operating under partial vacuum anyhow. Just poking a hole into the crankcase will provide enough suction to do the job.
Nope. Any VW group turbo engine of the past 20 or so years has a venturi effect suction pump. I’d imagine that other manufacturers’ turbo engines might too.
no they don’t afaik this is a VW/Audi thing. they used it to give brake vacuum assistance under throttle conditions when the intake would be pressurised. they did not use it to help evacuate the crankcase afaik it’s the crankcase vapour flow from the crankcase to the turbo inlet that creates the vacuum.
most other manufacturers either use a vacuum pump or simply make the brake booster reservoir bigger rather than that godawefull mess of a pcv system VAG used
Grab a barbeque burner ring and observe how the gas mixing nozzle is built. That’s a venturi pump designed to work with gases.
There’s a small pinhole with a sharp edge that produces a narrow laminar jet for an exhaust, shooting into a relatively wide tube where it eventually turns turbulent and mixes with the gas. If the jet breaks up too soon, it fails to pick up any air from the surroundings along with the jet, and it simply breaks up and the propane goes out through every hole.
Also, for having repaired one gas mixing nozzle in a blowtorch – the sharp edge of the nozzle is paramount. The jet really has to exit straight and narrow, like a laser beam so it throws properly instead of breaking up into turbulence.
The nozzle I had was blocked and corroded, so I just drilled the whole thing out and stuffed the hole tight with tin foil. Then I pushed a needle through from the backside until it just pierced the front face, and carefully sanded the tip flush with the face of the nozzle with 2000 grit paper. Then I pulled the needle out, and that made a tiny sharp-edged hole that would throw the gas jet out, making the torch work again.
Nearly every “air breathing” gas burner works like this, even my (blue flame) lighter.
We’ve been sticking a blowgun tube into the side of a hose (at an angle/tangent to the hose flow) for ages, to accomplish this.
You need to heavily angle the input air nozzle towards the desired direction of gas/material flow.
Using this image as an example of the shape and flow angles:
https://encrypted-tbn0.gstatic.com/images?q=tbn:ANd9GcToPG9ic5UnFWPycFZCFroawipkXMsBl34dea47VICLcTXh_WKUvR7opERxfQ
The top right is the air input.
The top left is the inlet for gas/material to be moved.
The bottom left is where it all exits.
Now let’s remember some details of major importance:
You’ll need to be certain that all the piping and blower motors are safe/rated for the gasses or materials to be in contact with the system.
Be mindful of static buildup or sparking motors, etc.
We don’t want to cause an explosion or fire.
Also, you don’t want the exhaust system to melt or crumble from exposure to what you’re moving.
You could potentially do this with a leaf blower or an exhaust fan and the plumbing bits -IF- everything is safe for contact with the material moved.
If you keep the input fan away from the work space (in your “makeup air” or breathable air location) the fan shouldn’t be exposed to the fumes.
It’s possible that the air velocity was too low.
Occasionally I will need to vacuum out the hopper of our vertical Boy press of a liter of pellets if a technician used more than a job requires. I cut a small hole in a 1” tube and pushed the nozzle of a compressor powered blow gun (angled down the tube). With enough air flow, it pulls the pellets out so fast that it is like the most powerful, fully automatic airsoft gun ever created.
I usually shoot the pellets into a garbage can and it will shred the liner.
Also, it’s builds up one hell of a static charge from the pellets and air shooting down the tubing.
want a cheap one made from metal? get a moped carburator. they rely on the same effect, as some airbrush pistols do aswell.
I’ve printed some hose fittings for vacuum system for my router. Out of the printer they leak like a sieve – need to be painted.
A Venturi pump for air is called an ejector , the ones for liquids are eductors , he just printed an ejector.
Another source for Venturi pumps are grit blasting aparatus. The venturi sucks up more air with the grit with it.
I have used this venturi process (ejector) for pulling vacuum on automotive AC systems.
Used in conjunction with my air compressor.
Works quite well, better with higher cfm, ideally using a rotary compressor with a quality dryer system.