Continuing on the never-ending adventure of how to make a 3D print stronger, [Brauns CNC] is coming at us with a new technique that involves steel-reinforced 3D printed parts.
We’ve seen plenty of methods to create stronger 3D prints, from using carbon fiber filament to simply printing the part in a way that the layers of the print are orthogonal to the direction of force. We’ve even seen casting carbon fiber bars into 3D prints, but of course that will only work with straight parts. [Brauns]’ technique uses steel wire, embedded into the print itself, and from some testing there’s about a 50% increase in strength of the part.
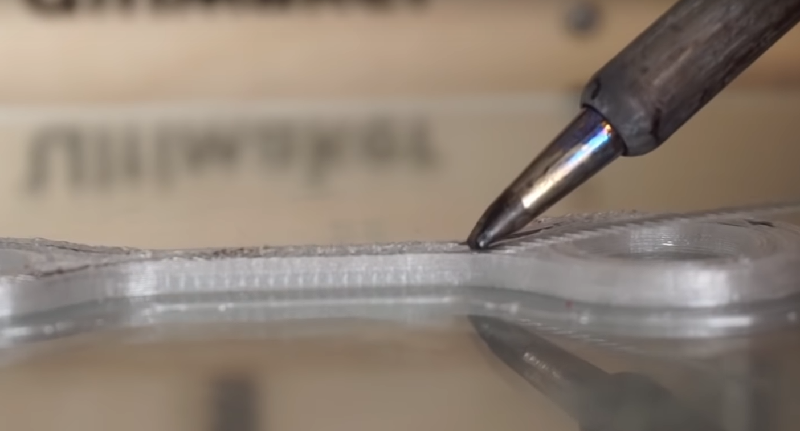
The process of embedding a steel cable into a 3D printed part is simply taking apart the model and putting a channel in for the cable. At a specific layer height, the printer is stopped, the steel cable is embedded with the help of a soldering iron, and the printer continues doing its thing.
There’s a slight amount of Gcode hacking to make this happen, and the process of embedding a steel cable into a print is a bit finicky. Still, if you want stronger 3D prints, there are worse ways to do it, and certainly less effective ways of doing it. You can check out the video for this technique below.


Good idea. Now automate with inspiration from that which came before: https://hackaday.com/2018/11/04/stepper-motor-mods-improve-cnc-flat-coil-winder/
holy frick balls , this needs to happen asap
i was thinking more automated tubing bender and additive welding machine
I use Kevlar thread binding for many repairs, for instance the broken suspension parts of RC offroad buggies, a cracked-in-half pinion from a hand drill, the hooks on a laser printer paper tray, a reflector telescope mount or a pair of sunglass frames. It’s incredibly strong and a cotton reel-sized spool is dirt cheap off eBay or from a fishing tackle store. I reckon it could be embedded in a print just like this steel but many times more of it then a single strand.
It´s strong until it´s exposed to UV
why do you think that ? ASA and PETG work just fine in the sunshine.
Because kevlar is not ASA or PETG? Kevlar degrades noticibly in sunlight. Like, in less than a year in some environments.
So use an opaque filament? That’s not a hard problem to solve buddy
Hmmmm, I’m thinking of the number of times I just throw something away, because an epoxy/superglue repair just doesn’t work/last.
Thanks!
No worries. You will still use the superglue + epoxy though. What the Kevlar binding does is enable broken items with very small surfaces to be rejoined, and not have to rely solely on this tiny glued area for its overall strength.
I drill 1mm holes around the areas to be joined with some holes closer, some further away. Then wth the Kevlar in a sewing needle, proceed to bind. After each loop, tug the thread REALLY HARD – you won’t break it, it’s not cotton or polyester thread – and the thread will make a guitar-string pluck sound. After three or four loops put a tiny drop of superglue to lock the binding taut, then proceed with either more loops or move zig-zag to the adjacent hole and repeat.
After the binding is completed spread superglue over the loops making sure the thread end is glued flat down. I then smother the loops in epoxy, really only to seal it. The comment about UV exposure only really applies if you are going to have it permanently outdoors in bright sunlight, and the repair left unpainted. Kevlar is also moisture-absorbent so that presents possibly a greater problem, if used for underwater repairs where it is once again left untreated.
I have not experimented with it yet, but Vectran appears superior to Kevlar in terms of water resistance and abrasion and a few other properties. This may be why NASA used it for the the Spirit and Opportunity Mars rover landing airbags back in 2004, so that’s a good enough recommendation for me. It is much more expensive than Kevlar though.
I’m pretty sure someone has been down this road before and I just haven’t seen it, but your post gave me an idea that I’m not bright enough to develop, so I’ll throw it out here, and I’ll preface this with the fact that I know little about Kevlar’s physical dimensions or properties. This is just a brainstorm. I am also aware that the Markforged Onyx printers exist, and are out of reach of most hobbyists.
The premise, figure out a way to simply run Kevlar, or other material through the standard hot-end of a 3D printer concurrently with the printer filament. As the hot-end melts the filament, a material like Kevlar with a higher melt point (500C) would be coated and embedded within the filament extrusion. I could also see where some slight mods to the nozzle might be useful. like a slight guide-in notch/ramp in the top of the nozzle body.
Then, probably the real crux of the idea, you have to cut the strand. this would be triggered by the retract. Perhaps a pulse of a ArcLighter at the nozzle tip (1100C), or a mechanical cutter. The ArcLighter ‘arc’ is quite small. the whole contraption could probably be hacked onto a print head. A possible caveat might be controlling the arc if it wants to bridge onto the nozzle itself, or maybe that’s how it would actually work. Some software tweaking may be required (also outside my skill set) that would modify the retract routine that includes Z-lift, cut, return to Z. Ideally the millisecond quick pulse of the ArcLighter would sever the Kevlar fibers without igniting anything else.
That’s a great idea! The Kevlar thread would feed through a tube that has a slot through it in which a sharp highly-tapered blade (eg. Exacto #11) moves across, severing the thread. Even fine Kevlar thread requires a sharp blade to cut. This scheme is similar to things like parachute cord releases and the like in Mars rovers, except they use pyrotechnics to drive the blade.
Something like this, https://www.thingiverse.com/thing:1494026 with 1 running filament, and the other running the Kevlar thread. With the right rates, and some specialized slicing, there is potential for better bridging, and less support. The biggest pitfall I believe would be the cutting of the thread when changing from the piece to the support, or when there needs to be multiple components to the print( ie: multiple objects printed simultaneously, or moving structures like gear bearings).
I wouldn’t use Kevlar here because it has binding issues sometimes, I would also be a little weary of fiberglass for the same reason. The nice thing about braided stainless is that you can benefit from mechanical interlocking.
Also, a good braided stainless steel line has a similar enough strength-to-weight ratio (or specific strength) that going with lower-performance materials doesn’t really get you much benefit. If you want to go lightweight, I would suggest carbon fiber or Spectra.
I think that it is a good idea,but try to get a laser cut profil instead of the wire. :-)
laser cut profile of what material?
Weekness is, that the cable is not connected to itself at the endings.
if you use a thin cable you can wrap it some more times around in the same channel