For those that grew up working with through-hole components, surface mount parts can be challenging to deal with. However, there are plenty of techniques out there that are more than accessible to the DIY set. With the right gear, soldering SMD boards is a snap – just get yourself a hot pan of sand (Youtube link, embedded below)!
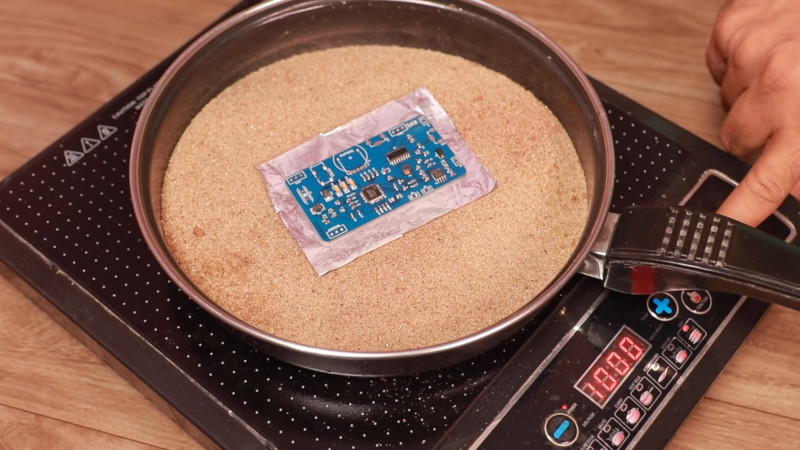
The process starts with a professionally manufactured PCB, and accompanying stencil. All major PCB CAD packages are capable of generating stencil files these days, and many manufacturers will throw in a laser cut stencil for minimal extra cost with a PCB order. The board is first mounted on a stable surface, and has solder paste applied, before components are placed with tweezers. Perfect placement isn’t necessary, as the surface tension of the molten solder pulls components into their correct orientations. The populated board is then placed on a bed of sand in a frying pan, which is placed on an induction cooktop. The board is then heated until the solder melts, and all the components are neatly reflowed. Once allowed to cool, the board is done!
The trick is that the sand helps evenly heat the circuit board, while keeping it a safe distance away from the heat source. Results are good, and the process is far quicker than hand soldering. It’s easy to keep an eye on the process too. Of course, the traditional method is still to use the humble toaster oven, but new techniques are always useful. We’ve seen it done with a Bunsen burner, too. Video after the break.


Does it need to be an induction cooktop or is that just conveniently non-burny?
I’m guessing it only has to be hot “enough” (to melt the solder).
I’ve been doing it with a skillet on a hot plate for years. I sift my sand though otherwise you’ll get uneven heating.
I’ve never used the sand. Just put the board on the cold electric skillet and plug it in. In a few minutes, it’s soldered. Unplug and let it cool.
I’d be curious if the magnetic field generated by an inductive cooktop could create inductive currents in the board/components. I’d sure rather use an electric or even gas stove than an inductive one…
it doesn’t get past the metal pan
Faraday skillet. :-)
8^) nice
As someone who microsolders for a living it’s hard to imagine using anything but a micro pencil and a hakko fr-810b heat station, the sand approach forces you to heat the entire board instead of being component specific which can cause issues with underfilled chips and create much bigger problems later.
But reflowing in an oven is also not part specific at all and seems to be a standard procedure. Of course the oven approach dosn’t have the steep bottom-up temperature gradient as the sandy pan will provide which should be a bit less aggressive for the PCB but other than that, I can’t see much wrong about it.
What issues? What bigger problems?
High load components not having efficient path for heat to wick away?
I’ve been using the sand technique on a gas hob for over 4 years, as documented here: https://entertaininghacks.wordpress.com/2015/03/25/assembling-pcbs-with-surface-mount-components/
The results are good, but I haven’t tried mounting components on the “sand side” :)
Doesn’t the sand hold heat, making it hard to cool the PCB down?
I would have thought so, and I’m sure it takes quite a while to warm up too. I used to use a sand bath for heating something in the lab and it could take an eternity to hit the right temperature and you had to be very wary of it for a good long while afterwards.
In fairness, I’d guess that the hotplate I was using put out less heat than the one in the video, but that sand is still going to be toasty long after the hotplate has been turned off.
Good technique useful for uniformly and rapidly heating flat and unusually shaped dry items, softening thermoplastics before bending into shape, etc. Can be used to pop rice and roast peppers/eggplants that have tough skins.
See hot salt/sand frying: https://en.m.wikipedia.org/wiki/Hot_salt_frying technique useful for uniformly and rapidly heating flat and unusually shaped dry items, softening thermoplastics before bending into shape such as eye glasses frame pieces made from plastic, etc. Can be used to pop rice and roast peppers/eggplants that have tough skins.
See hot salt/sand frying: https://en.m.wikipedia.org/wiki/Hot_salt_frying
Do you have mirrors attached to your keyboard?
Couldn’t the solder paste be applied with a 3D printer?
Never thought of that.
There was a company at makerfaire that sold a 3d printer that printed in conductive solder filiment. Nano3dprint. I am unaffiliated.
I thought 3D printers that printed with that material had already been done though I figured it was old hat by now since every 3D printer is basically just a CNC Cartesian plotter that you can put an extruder for any material that can be extruded on once you figure out the joining aspect of the material.
Solder seemed like one of the first things people would have used it for to me..
you could use a syringe pump instead of a filament extruder
https://www.thingiverse.com/tag:paste_extruder
https://www.vbesmens.de/en/pick-and-place/placement-head.html
https://cirqoid.com/
Hope that gets you started :)
I have been doing it on a metal hotplate without the messy sand. Works just as well. Just let the plate heat up with the PCB on it, wait until the solder melts plus X seconds and take off. Works everytime. Excellent for sensitive parts as it only heats from below and for the minimal time.
Yep, I did the same. Used regular or infra red heater, never induction. I would not want the induction heater that near to the circuits.
I can confirm that it doesn’t work well on a plain hotplate for some boards. I had a board with a couple of pretty chunky SMD components, like an LGA pinned switching module, and some inductors towards one half of the board, and a ton of through hole pin headers on the other half.
Apparently the higher heat conduction of the through-hole stuff is a big issue, because around the same time as the paste started to melt on the largest connections, the epoxy on the other side of the board started to boil out.
Presumably, the sand would insulate well enough to slow down the heating of the much more thermally conductive side of the board.
In my case, I just threw the next attempt in the toaster oven, and had no problems.
My boards go on a thick (2mm) plate of aluminium on top of a hot plate for pre cooking and i finish off with the rework station while still on the hot plate. Then i take off the alu plate and put it on a very big alu plate to suck the heat out. This minimizes the peak of hight temperature for the board
Which manufacturers throw in a stencil for minimal cost? Pcbnew and friends all seem to want $50 or so, on a $5 board order. Just modding a 3D printer to laser cut mylar sheet instead, but would welcome a proper alternative!
I have used regular cardboard and a laser cutter for stencils before. Plastics tend to melt together. Cardboard, like used in business cards cuts cleanly but can only be used a few times. I also found you need to spray the cardboard to seal it, otherwise the cardboard sucks all the flux out of the solder paste.
JLCPCB seems to want about $6 for it, more if you add options.
I noticed that! When I first started with SMD, the solder mask was a $200 item, so I learned to do without it. Might change now that it’s a $6 item. I tried making them myself a couple times.
I’ve used osh stencils in the past with great success to get cheap polyimide film or now stainless steel stencils.
I’ve used OSH stencils as well. Made several hundred boards and only wore out one Kapton stencil. They are the first place I’ve seen that offered steel stencils at a reasonable price.
Quite a bit of a nonsense. Pan and sand..lol.. just use electric heat gun and it is much more closer to the real reflow oven heat curvature. Everything else is just worse variation.
Way back when a pan of hot sand was a standard fixture in every optomitrist shop. Was used to heat up and soften plastice eyeglass frames for custom fitting to customers head.
I’ve only just started doing SMT soldering, had to for an amplifier project of mine as two parts were only available as surface mount. I use the ‘bucket load of flux and drag’ method. Works well for me and is nice and quick for a few components like ic’s.
Could you describe that in more detail please?
Wouldn’t an electric skillet work just as well as a hotplate? My concern is getting the paste on the pc board and then waiting for the preheat temp before placing components on it…or do I have it wrong? Also as mentioned, it seems that cool down time would be very long.
Would a 1500 Watt induction plate work for this? I want to give it a try.