Thermal inserts are a big thing when it comes to engineering with plastic. They make it easy to use threaded fasteners with plastic parts, and they work great with 3D printing too. There’s a bit of a knack to installing them without damaging your workpiece, however, and [John Culbertson] wanted to make using them as easy as possible. Thus, he created a thermal insert press of his very own!
If you’re not using heat-set inserts with your 3D printed parts you’re missing out. Hackaday’s own [Joshua Vasquez] wrote a great guide on thermal inserts which you heat up to securely melt the plastic as they are pushed into a slightly under-sized hole. While it’s possible to install these inserts by hand, using a press means much more consistent results.
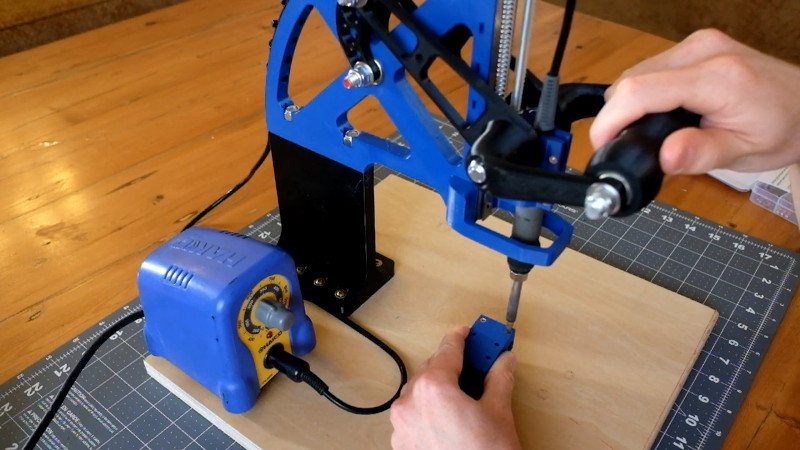
This press relies on 3D printed components in combination with off-the-shelf bearings and fasteners. There’s a linear rail as well, to give the soldering iron a clean, smooth downward motion. This helps make sure that the inserts go in straight and true, first time, every time. We’ve seen other DIY builds before, like this modified arbor press that gets the job done.


I installed the lm8uu linear bearings in my 3d printers x carriage like this, preheated in the oven and cranked em on in using a bench vice, kept the whole thing on guide rods so when it cooled, they were perfectly aligned
Yes, add a linear rail to plastic base that deflects when you apply torque to it. “sure that the inserts go in straight and true, first time, every time”. I guess if true means consistent with the lean all the other inserts get, there you go. Just make sure it’s the same operator, same time of day, same level of sobriety.
Sure add a linear rail to a 1mm thick sheet steel base that flexes when you apply torque – same argument. Pick the material and dimensions to match the load. This seems more than ridged enough for that to be a within 3d printing tolerance true statement.
But sure you go ahead and make you inset tool out of 15mm thick steel I beams better suited to a few tonnes of force from hydraulic rams. Surface grind everything for that almost perfect parallel or perpendicularity. Sure it won’t cost you more than one small fortune in time and effort. (Seriously if anybody does build one with this level of craftsmanship and mechanical overkill I would love to see it – will become one of those tools made by the ancient ones still running 100+ years after it was made)
Actually, you would need to use stainless to make it last 100 years. You could use core ten, but that gets messy with the surface rust flakes. Maybe make it from titanium so that it’s light enough to be portable??? Ooh, make it super crazy exotic and from inconel!! Multi-headed maybe??
I think the idea here is to be better than free hand. Once the plastic starts to melt, it takes very little force to push the insert in. I think you need a hug <3
Unless you try to shove the insert into the plastic while it is still cold there is virtually no torque involved. This clever device will be far more consistent than most people can do by hand.
Watch the video, the entire thing looks flimsy. I think it would have been stiffer if it’s major pieces were made out of laser cut plywood.
Slightly overkill: I love it !
Pfft. Back in MY day, when we assembled our Heathkit H19 ASCII terminals, we sank our thermal inserts freehand with our soldering irons, and we LIKED it. You kids.
damn skippy!
Does the linkage do anything other than look fancy?
It’s not obvious but I believe it prevents what would otherwise be a clockwise (from the camera’s perspective) torque being applied to the Z-motion slide. The down force is applied from the middle of a long lever pivoted at the rear so there’s no rotation moment applied to the slide. Clever!
Okay, I see it now! thanks!
I like it!
A problem I have is the threads of my inserts getting fouled with plastic (especially in the case of blind holes.) Any suggestions?
Sounds like you need a slightly bigger pilot hole to drive them into. If the guide hole is too small there is too much melted plastic with nowhere to go that will force itself into the threads some.
Also helps to use a proper insert tip – they fill the thread space better so it heats the whole thing better and leaves less room for ooze into the threads. (I just attacked with a file a scrapy old tip for my iron to create a better insert tip and it helped a fair bit)
you need a relief at the bottom of your blind hole
Noel Rubin (teknoelogy on Instagram) has designed a sturdier version of this with a depth stop.
Does anyone have a good source for threaded inserts?
It seems the most common ones available through the usual suspects have two sets of “teeth” that are parallel to each other and the thread axis. I’ve found that those pull out of the plastic too easily as you tighten whatever you screw into them.
The thingiverse entry (see link in my post below) has a list of suppliers. The inserts he uses have 3 sets of teeth with gaps between for molten plastic to fill.
This is what he recommends:
https://www.amazon.com/gp/product/B07MWBJB67/ref=ppx_yo_dt_b_search_asin_title?ie=UTF8&psc=1
Wow, and people tell me mine is over-complicated! https://www.thingiverse.com/thing:3186776
Um… the title says I can print my own – where can I find the files?
It’s not in any of the article links, that I can see…
Files are on thingiverse. Search for “John Culbertson Thermal Press” to find it. Maybe put a link in the description?
https://www.instructables.com/id/3D-Printed-Thermal-Insert-Press/
Missed a trick with the 3D prints: rather than the linkage and linear rail, skip the whole thing and print a linear flexure to guide the stage. Stiffer and avoids added vitamins.