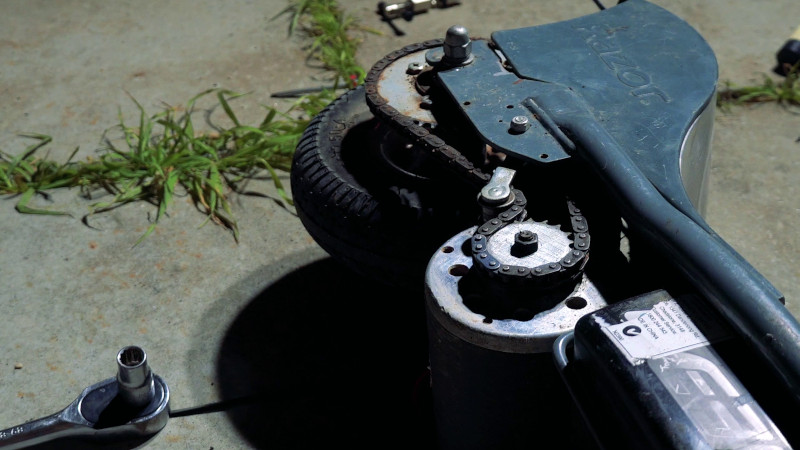
Sometimes, mechanical parts can be supremely expensive, or totally unavailable. In those cases, there’s just one option — make it yourself. It was this very situation in which I found myself. My electric scooter had been ever so slightly bested by a faster competitor, and I needed redemption. A gearing change would do the trick, but alas, the chain sprocket I needed simply did not exist from the usual online classifieds.
Thus, I grabbed the only tools I had, busied myself with my task. This is a build that should be replicable by anyone comfortable using a printer, power drill, and rotary tool. Let’s get to work!
Getting Started
Making a sprocket is easy — print a template, stick it to a metal blank, and cut it out. There’s some post-processing required, but the fundamental concept is little different from any basic woodworking or craft project.
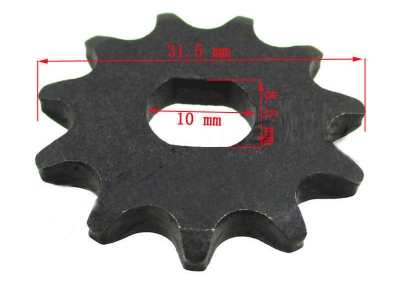
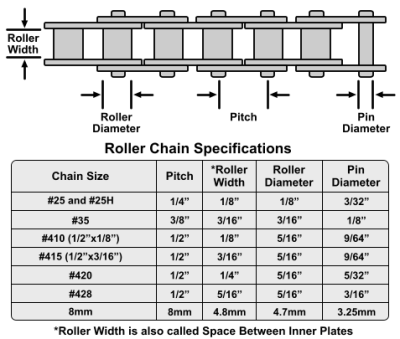
Making a template is easy, using a free piece of software called Sprocketeer 2.0. Sprockets actually have remarkably complex geometry, designed to make chain drives that run as quietly, smoothly, and efficiently as possible. All you need is the pitch and roller diameter of your chosen chain, and the number of teeth of your desired sprocket, and Sprocketeer will generate the outline.
I was producing a sprocket for T8F chain, and a Google search netted me the relevant dimensions: 8 mm pitch with a roller diameter of 4.7 mm. I also knew I wanted a 19-tooth sprocket, in order to hit my desired top speed. Plugging these numbers into the software then netted me a DXF file, which I was able to import into Inkscape. From there, I added on the geometry for the ovaloid mount which I was able to grab from eBay listings images for similar sprockets. With that done, it was a simple matter of printing out the template on a sheet of A4 paper. I was careful to check that the final result was accurately sized before committing to the next stage of the build, something simple to do as I know the exact dimensions of the ovaloid.
That’s Pretty Metal

Next, you’ll need some metal with which to craft your sprocket. Mild steel is a typical choice, with the toughness required for the job while still being cheap and easy to machine. They’re also more likely to wear-in nicely versus harder steels, something which we’ll revisit later.
My choices were limited given I was only looking to make a small sprocket of around 60mm diameter, and 4mm thick. The closest I could find was 75 x 50 mm, in a 3 meter length, at an exorbitant cost. Being resourceful, I found a galvanized post support for just $10 that I could cut up, albeit it was 5mm thick. This would require some further work, but would do the job just fine.
Cut It Up!
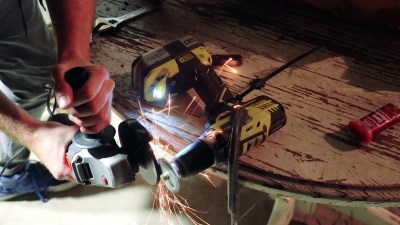
Once you’ve got your paper template, it’s a simple matter of roughing up your metal and attaching it to the surface with super glue. Then you’re ready to start cutting. A good approach is to first rough out the general shape of the sprocket by making long straight cuts with an angle grinder. Once you have a roughly octagonal blank, proceed to start cutting away at the gaps in between the teeth. At this stage, it’s important to be conservative and not cut over the lines of the template. I used the grinder to just take small cuts on either side of the template, resulting in very rough and oversized teeth — refinement comes later.

This is a good time to rough-cut the mounting hole in the center of the sprocket. Depending on how your sprocket mounts, you may need to use different techniques. A power drill is usually a good way to get started. If you’re going for an ovaloid or D-shaped mounting hole, a rotary tool like a Dremel is a great way to machine it out. I started with a 561 Multipurpose Cutting Bit, however as we’re cutting steel, a tungsten carbide bit like the 9903 cutter is a much better choice.
Before proceeding further with cutting the teeth, I needed to thin down the sprocket blank. T8F has a roller width of 4.8mm, but most sprockets are just 4mm thick, tapering down to about 2.5mm to make them mesh smoothly with the chain. My blank was 5mm thick, which simply wouldn’t do. This is a job for a lathe. Thankfully, it’s easy to make your own lathe with just a power drill and a G-clamp.
Start by installing a nut and bolt through the mounting hole of your sprocket. Then, use a G-clamp to mount your drill to a dining table workbench and fit the sprocket in the chuck. Once mounted securely, a ziptie can be used on the drill’s trigger to keep it running at maximum speed. This leaves you with two free hands with which to operate the angle grinder. Using a grinding disc, delicately grind away at the surface of the sprocket blank while it rotates in the drill.
Despite the jerry-rigged nature of this setup, it allowed me to easily machine down the sprocket to an appropriate width. I was even able to neatly taper the teeth, which helps the chain run better when suffering minor misalignments.
Finishing The Teeth
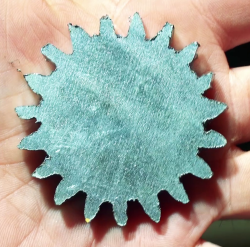
At this point, you should have a neatly machined sprocket blank with ugly, chunky teeth. The angle grinder is simply too crude a tool to finish cutting the teeth, though my father before me has achieved the task. Instead, use a rotary tool. I have had success using the 953 grinding stone, however the 9903 cutting bit is a far better choice for cutting steel. This allows one to slowly and carefully machine away at the teeth without risk of accidentally cutting one off entirely.
After all this cutting, you’ll likely find your template is no longer affixed to the sprocket. Carefully grind away at the teeth, using an existing sprocket as a visual reference. Work around the sprocket, machining away little by little while repeatedly wrapping the chain around to check the fit. The chain needs to be able to smoothly mesh with the sprocket, and slide on and off easily to avoid binding or derailment. The trick to achieving this is to make a nice rounded pocket for the rollers to sit in, while making sure the teeth have a smooth profile that won’t catch on the chain as it slides on and off. Comparing to an existing sprocket is a great way to get an idea of the geometry you’re going for.
During this process, I had to take a lot of metal off the sprocket, and the teeth ended up looking pretty janky. Some of them looked remarkably thin and pointy, and others looked like tiny little nubs. It’s a long way from the ideal chain profiles you’ve seen in the textbooks. However, my experience with other builds of this type had me confident that this would work. After an hour or so, I had my sprocket meshing well with the test chain, and set about fitting it to the scooter.
The Proof Is In The Scooting
If you’ve gotten this far, congratulations! You’ve got a DIY sprocket that may look a little funky, but hopefully meshes well and is ready for testing. Get it mounted up, lubricate judiciously, and enjoy!
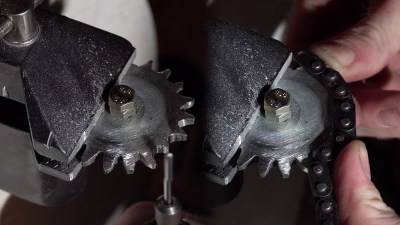
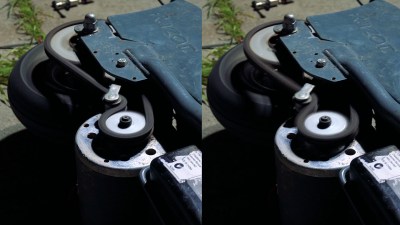
I was eager to test my creation, and set to work. Getting the sprocket mounted involved a little mucking about, as is usual. The mounting hole didn’t fit at first, so I used an existing sprocket as a template and machined things out a little more again using the tungsten carbide bit. The chain also required extension to fit the larger pinion.
Before going for a ride, I propped the scooter up and gave the driveline a test. I revved the motor, and the chain drove the rear wheel as expected. Thankfully, the chain didn’t derail or jam on the new sprocket, so things were looking good. There was some minor skipping, but nothing I was too worried about. With a 500 W motor, an 80kg rider, and with the new sprocket made of mild steel, I was fairly confident that it would wear in nicely and become smoother over time. As the chain was in poor shape, I gave it a liberal lashing of lubricant, with the only thing to hand — 75W differential oil. It stinks like heck, but it’s an excellent chain lube.

To my absolute joy, the new sprocket performs like a dream. Whether accelerating under heavy load or flying along at top speed, the chain only got smoother as I rode on. After doing a few laps of the block, I freshly charged my batteries and set out on a top speed run. Tearing down a nice straight road, I managed to hit 41 km/h, just over my goal. Suffice to say, I was ecstatic.
I’ve now put many more miles on the sprocket, and it continues to hold up well. While it’s likely not as hardy as a commercially manufactured part, it’s a great substitute for that which was not available. My scooter is now suitably quick, and thanks to a little DIY, I was able to beat all my friends in a straight line drag. I’m calling that a successful build!


gotta love the “after the apocalypse” engineering there.
After the apocalypse……but with the power plants still working to power the grinders and drills.
inverters, solar panels, bicycles. Lots of ways to make an item spin. You’d definitely want to run that angle grinder on a inverter you have a spare for. Long term I’m still wondering about batteries
Would it not have been a good starting point to drill 19 x 4.7mm circular holes prior to cutting out the blank?
Its how I would do it – Drill slightly undersized though so you can really fine tune the fit and cut the teeth into the very edge of the hole knowing there is still a bit of extra left. Drilling exact size would be great if using more precise machining setup for the teeth, but with this level of tool you want to creep up on correct size taking more time over it but being sure you have not ended up going too deep. If you drill at size and cut into the hole that round could end up too large very easily with only a small misalignment of the cutting tool or at any of the following shaping steps
You can get away with slightly misalignment holes and then do a bit of filing to make things fit. In the beginning only a few teeth will do the actual work of pulling the chain, and they will wear faster until the load is distributed over all the teeth. For large diameters you can keep the teeth almost square instead of pointy, as long as the chain will roll one and off.
I was thinking the same thing. Hackaday really needs a comment up/down voting mechanism.
This is very much in the “I wish I’d thought of that” territory. Great idea.
I’m currently in the middle of a recumbent trike build, and I’ve been amazed at the precision one can get with some patience and basic tools. Kudos to him for building it himself!
Except your sprocket doesn’t have hardened teeth and isn’t going to last long
Next: How to do heat treating with a few hand tools.
you totally can. manual heat treating normal steel or O-1 is pretty simple man
Indeed. If you have a gas hob and a pan of water (or possibly olive oil) it can be a 5 minute job in the kitchen using tools and materials already to hand.
Though it does depend on the material being a hardenable steel. Case-hardening would add a bit more time and effort, but would be an option with a non case-hardening steel.
Non _quench_ hardening steel, you idiot!
Yes, why I mentioned O-1 at the end. It has to be a hardenable steel, either case or flame hardening. I learned hand hardening in watchmaking school, with just a hotplate for disolving a shell of hydrated lime dipped in denatured alcohol flamed off in boiling water after hardening wrapped in iron binding wire in used hot motor oil. Tempering was done in a brass or copper pan filled with either pure quartz sand or fine brass swarf, over an alcohol flame. Made many cutters and broaches that way.
Basic oil and water quench steel hardening is easy stuff for small tools or simple parts. Air hardening tool steels, however, like A2 or H13- you need a thermocline controlled proper heat treating oven. Most home shops don’t have that kinda equipment, but u can always send it out.
Or you can make a heat-treatment oven: http://bodgesoc.blogspot.com/2014/11/heat-treatment-furnace.html
Worrying about hardness in a project like this is a red herring. The shape is way more important. Only high-speed high-torque sprockets really need to be hardened (or industrial sprockets that need to last 10k hours of continuous use). Aluminum works fine if the impact loads are low (large sprocket or low speeds).
In fact, hardening a handmade sprocket is just going to make it worse. No need to turn the rough surface into a file.
Personally I think that sprocket is fine if OP got the shape close enough. Unless he is regularly commuting on the thing, unhardened steel can have a perfectly acceptable life for a $10 part.
Or once the sprocket is suitably worn in and the chain runs smooth on it then it could be hardened..
Why not use a sacrificial chain, Clover valve lapping compound, and run it continuously until the chain laps perfect to the sprocket? Might only take running in a tub with a motor a day or so to totally lap together, then clean and harden if you want perfect
In the latter 1960’s the timing chain broke on my brother’s Honda Trail 90 when he was 100 miles from the dealer.
Using the tool kit that came with it and bits of wire he removed from a nearby fence, he fixed it well enough (in near freezing weather) to get it to the dealer.
I have made several bicycle rings this way, upto 91 teeth and 20% oval.
It it much easer to mark and drill the centres of the round shape between the teeth first, then cut or saw around them, and use an angle grinder or even hand file to shape the teeth until the chain fits over them. Once the chain fits it will wear out evenly, especially with an odd number of teeth.
I was shocked really, that he did not use the tried and perfected method that you mentioned. A quick google search would have been very helpful to him.
Good advice!
Another way to make grinding easier is to mount the grinder on a sled and push/pull into thework.
Look at DIY circular saw sharpening stations.
I’ve used this for making things like are like cogs but more like a capstan (with poles) but not quite one of them either.
But round and symmetrical.
While this isn’t something I see myself doing, I just wanted to leave a comment and say that this is a really well written article. I only wish all DIY articles were written this well!
I’ve done this, to fix a snowblower. If I could get out of the driveway I would have bought one.
While it’s way too late to point it out now, but the word power should have been used in the headline. Not I was expecting to see a breast drill, files, and muscle powered grinders used.
I have seen this a lot. Hand tool is often used to mean handheld tool.
Well, they are wrong. I can’t find a single definition of hand tool or a store that sells a ‘hand tool’ that includes anything with a motor.
Agreed. I thought this guy was just going to file out a template.
This guy has eletricity and makes things https://youtu.be/V7flR0O-coU but is off grid!
This is a great write up, and impressive that you made it work well. I had a similar task to do when modifying the same scooter but I took the easier road of just ordering a t8f sprocket with the correct number of teeth from Aliexpress and machining out the 8mm D-bore to be a 10mm D-bore using a dremel tool. My motor is different, I believe you have a 10mm double d-bore, but it should be the same basic process. As well, I think I ended up using a chainsaw sharpening bit as the dremel bits were a lot more money. My next build may require an unavailable size of sprocket though, so I think I’ll borrow some of your process. Thanks.
Hi Lewin,
Wow, It was an amazing Handcrafted Electric Scooter, I surly try to make a scooter following your instruction.
How do i make it waterproof? any suggestion from you.
Thanks