Some of you will be familiar with the idea of using a brush as a nozzle wipe on a 3D printer. The idea is that passing the hot end over the brush cleans any stray plastic from the nozzle, ensuring that those plastic bits don’t end up in unwelcome places. [Mark Rehorst] attempted to implement a nozzle brush system in his own printer, but hasn’t so far been successful.
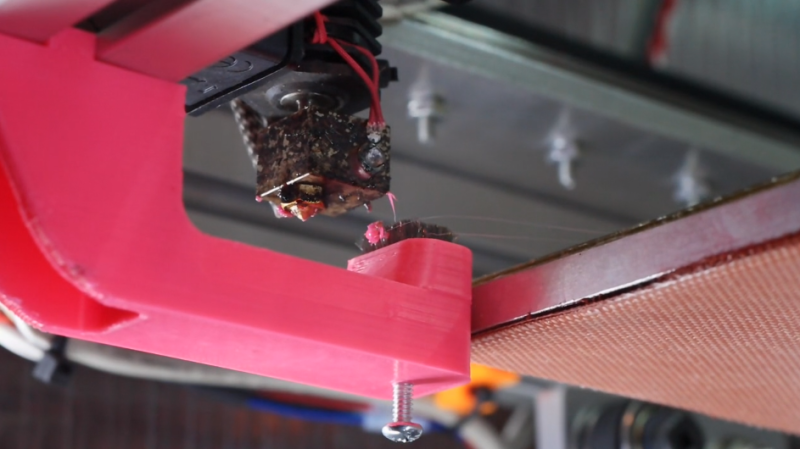
 One of the things [Mark] makes is 3D printed lamp shades and this led to his experiments in setting up an automatic nozzle cleaner. Despite best efforts, the hot ends of 3D printers can occasionally accumulate bits of molten plastic which can sometimes end up deposited on the print. Because the lamp shades are so thin and so big, having a charred blob end up on the print is pretty unwelcome. Having the nozzle automatically wiped clean would be a very handy feature, but is proving to be a troublesome one.
[Mark] based his design on a small, dense wire brush used for cleaning the print nozzle of a Stratasys printer. Sadly, he found no combination of motion or brush height that got the nozzle reliably clean every time. Sometimes a blob would be dislodged, but the hot end would pick it back up again on subsequent passes. You can see it in slow motion from a variety of angles in the video below.
[Mark] suspects that maybe the shape of the nozzle has an effect. The Stratasys printer has a flat and rounded nozzle but the E3D hot end’s nozzle is pointy, so perhaps a new brush design is needed. Regardless, he hasn’t been able to make it work.
Nozzle cleaning brushes have definitely showed up in hobby builds, so if you have had success with them, we and [Mark] would both love to hear how you made it work.


A problem has certainly been identified here: a 3D printer can’t pick the cruft out of the brush.
So why not have the print head walk along the brush so it doesn’t re-encounter the dirt it left behind? You might need a long brush, but there’s plenty of space available next to the bed.
I thought the same, maybe curving the path to maximise the cleaning area.
Possibly a second ‘knife’ or brush to travel over the brush between wipes to shift the larger cruft.
A good idea – could also rotate the brush though a comb to pull out all the debris between wipes so it can clean the brush..
As for better cleaning action could perhaps try a pair of brushes mounted with a slight v shape into each other – to better match the hot end profile. Or just slightly longer brush bristles.
I do wonder if wire wool could be a better solution – as long as its properly clamped and made of long enough strands it aught to be able to rub the nozzle clean without snagging, disintergrating or ending up on the build plate and any debris it picks up will be more likely to fall deeper into the wool or off it entirely on each pass not reattach. Far from convinced the idea will work well, but could be worth a try.
I’ve used brass wool on my hot ends to clean them manually when things have gone wrong and it was effective but by hand and automatic are very different things. Never wanted a wipe myself yet, but when I rebuild my dead printer I might just have to experiment with it now..
I agree. Use a long brush and just make a single pass. Don’t wipe back and forth. You’ll end up with all the blobs at the dirty end where the nozzle enters the brush. Also try to use a silicone sock, it keeps the crap off.
In the same vein making the nozzle area less sticky by socking it with silicone will allow the brush to function.
check out the “design prototype test” YouTube channel he just posted a video of this very thing. Just take his content with a grain of salt.
Maybe it’s not a definitive fail. I’d try a taller brush that touches the bottom more thoroughly, with with a V-shaped groove in the bristles so the nozzle doesn’t push them away. Like ^^^\/^^^. And maybe make it longer.
It’s only a fail if they stop…
I remember one feature of the XYZ Da Vinci printer that I always wanted to implement on another printer: It used a small silicone flap and a piece of spring steel to wipe and “flick” the wiped plastic into a tiny bin. I don’t know how much it would damage a stock e3d nozzle though.
This ^^^. A semi-rigid silicone or rubber / teflon “flap”, that would be raised after the nozzle has left the print area and against which the nozzle would wipe when returning to the print area.
Like the cleaning mechanism of the HP500 / 600 series printers.
Also, some other contraption just to wipe clean the cleaner flaps, to remove leftovers of plastic. That could operate on its own, after the nozzle has returned to the print area and resumed printing.
Wonder if a silicone non-stick spatula would work.
This is the one good feature on the Davinci
that sounds like a good approach. Any chance you know a picture or video somewhere? I cannot seem to find something.
The Stratasys actually has just one line of bristles and a silicone flap behind that. The flap drops into the waste container. It works really well – I can’t think of a time when I’ve ever had a blob make it into the print.
I told Prusa this is what their multi material printer addon needed. Run the printhead over a dump chute, extrude for X time to change colors, then have a wipe as it leaves the chute. Would be far less wasteful than the purge block. Got no reply.
Doesn’t the palette do this too? I’d like to see a purge dump wipe for the prusa but it seems like it can be an open source project.
Stratsys used a spinning brush on some of their printers. I’m pretty sure I read that in one of their patents.
e3d silicone sock on the hotend. If there isn’t a hot ‘sticky’ surface to stick to then no need to wipe. The silicone sock stopped my dirty nozzle problems.
Rotating brush? Maybe bronze-phosphore bore brush for cleaning firearm barrels – should be fairly gentle on the nozzle.
I was thinking rotating high temp silicon beater bar, like from a Roomba. Not sure on the temp tolerance of that material, but the fins are flexible and would shed the plastic if they also passed over a scraper mounted under the beater bar.
Beyond the initial later, I am unsure how you get blobs while printing lamp shades unless they are printing multiple walls. My experience team that they are over extruding in the first place.
Interesting. How about a silicone sock for the hot end to reduce the surface area for the plastic boogers to stick to? The brush might be more effective with less to deal with. Thanks for sharing.
Expanding on the ideas given above: a power driven brush roller with a scraper underneath, so that the debris falls off (ideally, rotate AWAY from the printer bed :) ).
I was thinking something similar. Except maybe just make the brush spin. I would think a small DC motor could keep the brush constantly spinning and then you could even have some sort of comb positioned in/above the spinning brush at about half the diameter of the brush.
I thought a scraper/comb under the rolling brush would better ensure the bits fall down.
Oops – I should have replied to this comment. silicon beater bar, like on the Roombas, should do if the heat tolerance is there.
Isn’t the hot end essentially a “glorified” soldering iron? Why not just use the same old brass sponge material folks use at home or work with their soldering stations? http://thesolderingstation.com/2016/10/17/damp-sponge-vs-brass-sponge/
Problem is, solder will not stick to brass sponge and just falls off to bottom. Hot plastic will stick and successive wipes will pick up those blobs.
Wet sponge maybe?
Yeah, but those blobs of plastic will still stay on top of sponge, besides wet sponge is too soft for this. There should be something clenaing off the brush.
I’ve used the wool to clean a hot end after a print went wrong – the plastic doesn’t stick well to the wool just flakes off as it cools and the wool gets flexed. Will it work well enough in this setting no idea. But it certainly isn’t going to be as bad as you make out for holding blobs. At least not based on my experience cleaning up failed prints – might be some filaments out there that will stick horribly but none of the cleanups I’ve done has the plastic ever stuck to the wool for long.
Something to park the extruder and make it stop oozing all around would be just as nice – I don’t know why this guy has such a mess with his printer (.4 Jhead here, a simple 100mm priming line gets rid of oozing on the nozzle for me) but maybe a parking position with something that cuts the oozing would be better? I’m thinking spring steel with a hole, maybe smoothed perimeter so that it doesn’t do any damage, and you prime there like a Stratasys, then move laterally to cut the oozing and go to print.
i can’t see how he gets those blobs otherwise?
Maybe something line this would work. It’s a bucket that uses a silicone wiper. I haven’t tested extensively but it seems pretty good so far on my Hictop Hero D3.
https://www.thingiverse.com/thing:3863829
4 small dremel sized wire wheels rotating and set close enough together that you could just lower the head into to clean.
Flap attached to outside of the wheels to continuously clean it.
I know it’s complicated and probably dangerous but could you implement some sort of no-touch strategy, like a blast of hot air?
This is why you rinse your toothbrush out after you use it.
The cleaning brush needs a cleaning mechanism of its own, but the simplest thing would be to have a cylindrical cleaning surface that is then cleaned by a secondary comb.
The XYZPrinting DaVinci printers have used a very effective piece of thin sheetmetal to wipe against for years. Maybe ditch the brush and try that instead. It even has a little cup below it that catches the crumbs.
Alas the spring steel on mine broke and I then had occasional problems like the OP. I glued a brass brush in place but that sometimes retained the wiped plastic, only to become restuck on a future wiping pass. I like the idea of a comb to clean out the brush and may have to look into that.
What I can recommend is to polish the hot end clean often and apply a coating of high temp vegetable oil to the bottom surfaces. These will reduce the tendency of plastic to stick to the hot end. Be careful not to drip oil onto the bed !!
Yeah it looked more like a scraper problem than a brush problem to me.
I get it… Instead of fixing his printing problems like over extrusion, too low of a bed offset or the numerous other problems that causes nozzle drag and blobbed up nozzles – just drag the nozzle, which can and will wear out, across an abrasive brush on the regular…
I mean I do wipe my nozzle now and then with a far less abrasive soft cloth after a print, when the nozzle is still at temperature, but to me this is one of those “solutions in search of a problem that already has a solution that isn’t this!” types of situation.
FIX YOUR DAMN PRINTS!
And by the looks of that hot end, he has a lot of problems that he should get after… *face palm*
You have misunderstood completely. My test was flawed.
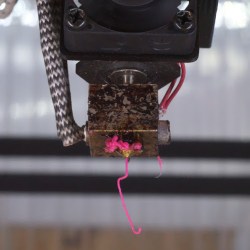
I don’t normally have this kind of blobbing problem. The way I set this test up created the problem you see in the video. I used a 0.4 mm nozzle, and in the time it takes to go from the print to the brush (and the reverse) the plastic oozes from the nozzle, creating the blobs. The blobs you see stuck to the heater block were flicked there like so many boogers by the brush. The whole problem was made much worse by the test itself.
When I make the large prints 500-650 mm tall, 30-40 hours, I normally use a 0.8 or 1 mm nozzle which, counterintuitively, is much less prone to oozing, and use 2 or 3 perimeters to ensure mechanical strength. During the long print time some goo inevitably builds up on the nozzle, chars, and then embeds itself in the print (maybe 3 or 4 blobs). That is the problem I want to solve.
In the automotive industry when we pour urethane in the instrument panel to make it soft touch, our six axis robots have a little head cleaner. It’s super simple, it is just a circular plate that is allowed to pivot on its center point, the plate is mounted to the floor. The plate is covered with white scotch bright pads for cleaning. The robot will come down and touch the plate with the pour nozzle, then make a linear move back and forth. When the robot moves in the linear path the plate spins and is not wiping on the same spot. Think of the Spirograph pattern. After a week of full production we just replace the scotch bright pad and we continue as normal.
I would just make single passes and not go back thru what I just wiped. It looks to me that the back and forth thru the same path just allows the boogers to re attach to the nozzle again. Maybe solve with a vertacle rotating brush. A stepper increments it a step during the process giving a new section to wipe on.
We’re using tweezers by hand. Why not automated tweezers instead of the brush?
Thanks for all the comments and good ideas. I will be trying again after adding a silicone or teflon blade before, after, or both, and some extruder tweaks to try to reduce oozing. I may try the pivoting scotchbrite pad or brush and drive the nozzle around it in a circle.
Why not mimic the Lulzbot extruder wiping? I believe it uses a slightly abrasive cloth “brick” that is long enough that overflow/bits don’t get picked up during passes.
I agree. A bristle brush just doesn’t work. A sponge with a metallic outer, or a coarse-texture cloth wotks best. You need the sponge under it to allow the wiping action to be firmly made
To get a good wipe, you need 3 seashells.
Demolition man reference. Love it. :)
I use a Stratasys brush to clean my nozzle and have no problems cleaning it. I have not changed the gcode for 4 years or so:
G0 X-132 Y-65 F2500
G0 X-132 Y-40
G0 X-132 Y-65
G0 X-140 Y-65
G0 X-80 Y-65
That works every time.
Lucky for me we have a Fortis 900mc at work and the nozzles are replaced regularly. I scavenge the white, non stick, high temp flexible ceramic (I think) skirts from the old nozzles. I can get 3 or 4 smaller ones out of one of these that I machine and fit to a modified e3d nozzle. The shape mimics the shallow angle of the stratasys nozzle and a single pass zig zag over a small SS wire brush wipes the nozzle clean every time. One obvious point is to never go back over where you just had the nozzle go
There is an industrial solution with eg 15cm long and about half cm thick silicon or other soft material wall. Nozzle then cleans itself by using free space on this wall. You can than clean the wall once per day/week (depends on your productivity)
Go back to basics. We used to clean solder tips with damp sponges. Maybe run extruder over sponge, closerly followed by SS brush.
In my office I have an old Cubepro from 3DSystems. That old piece of junk has a spring loaded plastic wiper that it passes to scrape off any hanging filament from the nozzle to prevent it from depositing it onto the print. That’s a solution that works quite well for cleaning the nozzle before starting a print or when switching to a second or third extruder but it doesn’t do anything to stop and clean the nozzle during printing.
http://infocenter.3dsystems.com/cubepro/user-guide/maintenance/adjusting-jet-wiper
How about clean it by hand. Not the end of the world to do something manually.
Simply use a round wire brush on a small motor and spin it when nozzle passes through. Simple TBH.