
When the Miniware TS100 first emerged from China nearly three years ago, it redefined what we could expect from a soldering iron at an affordable price. The lightweight DC-powered temperature controlled iron brought usable power and advanced features in a diminutive package that was easy in the hand, a combination only previously found in much more expensive soldering stations. All this plus its hackability and accessible hardware made it an immediate hit within our community, and many of us have adopted it as our iron of choice.
A surprise has been that it has attracted no serious competitors of a similar type, with the only iron mentioned in the same breath as the TS100 being Miniware’s own USB-C powered TS80. Perhaps that is about to change though, as before Christmas I noticed a new Chinese iron with a very similar outline to the TS100. Has the favourite finally generated a knock-off product? I bought one to find out.
The Budget Pretender
The SanErYiGo SH72 is a temperature controlled iron with a very similar form factor to the TS100. It has a lightweight handle that contains the temperature control electronics, on one end of which is a DC barrel jack socket and on the other a socket to fit any of a range of elements with different tips. There the similarity ends though, because in contrast to the TS100’s OLED display, buttons, and USB port there is only a control knob. And perhaps most importantly, while the TS100 costs somewhere close to £40 ($50), my SH72 cost me only about £8.50 ($11). This is a budget iron then, but is it a lemon or a diamond in the rough?
The iron arrived well packaged in a slim cardboard box, with iron and handle separate from each other. It has a decent printed manual leaflet in Chinese and well-written English. Physically, the handle is a lightweight textured plastic tube about 12 mm (0.5″) in diameter with a moulded grip area near the business end. It’s about 100 mm (4″) long, which is about 5 mm (0.2″) longer than that of the TS100. The control knob is about 10 mm (0.4″) in diameter, and is situated about 20 mm (0.8″) from the end with the DC jack. It has a range of temperatures printed on top of it, but in an extremely tiny font.
The element is not identical to the TS100 unit, but follows a similar format of all-in-one tip and element with contacts brought out to metal bands on a ceramic end piece. It’s secured in place with a screw-on metal collar to which I guess you could attach an earth lead if needed. There are seven different tip styles and I suspect it will be an element originally designed for another iron, I chose the finest point as I will use the iron for SMD work. The whole is noticeably a bit lighter than the TS100, but the extra 5 mm length is not really an issue.
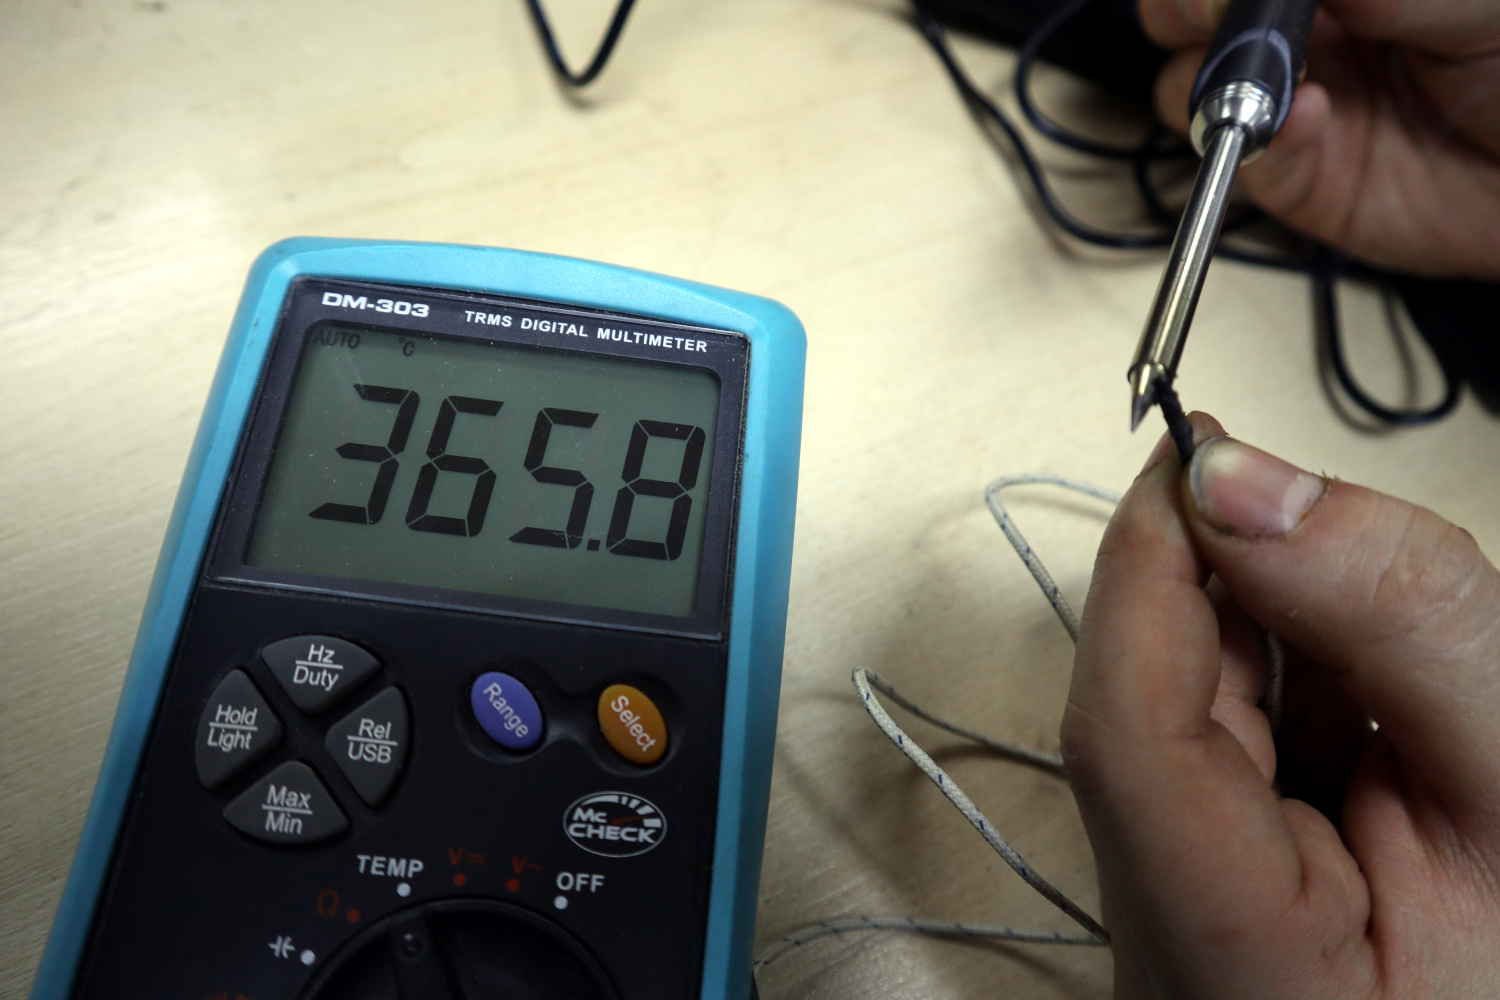
It takes the same power supply as its more expensive rival, so you may even already have a laptop supply with the correct jack and polarity. It will run from 12 V to 24 V supplies, with a claimed power of 65 W at 24 V. My 19 V supply should give it a respectable 40 W. My first act on plugging it in was to take out a thermocouple and measure its temperature. The lowest I could set it was about 200 °C and the highest around 410 °C. It was easy enough to adjust to my desired 360 °C, and on checking the control knob with a magnifier its calibration wasn’t too far wrong.
To put it through its paces, it was applied to a bit of SMD reworking on a scrap board, some soldering on a protoboard project, and some wiring for a hackerspace CNC controller project. What more do you want from an iron of this type, than that it is light weight and easy to manoeuvre into position, heats up quickly, and has plenty of power? In these it delivered admirably, and the experience was similar to using a TS100 right down to the minor annoyance of a slightly inflexible power lead. This is a useful little iron, and easily coped with all the general purpose soldering we had to hand.
Old-School Analogue Temperature Control, But It Works
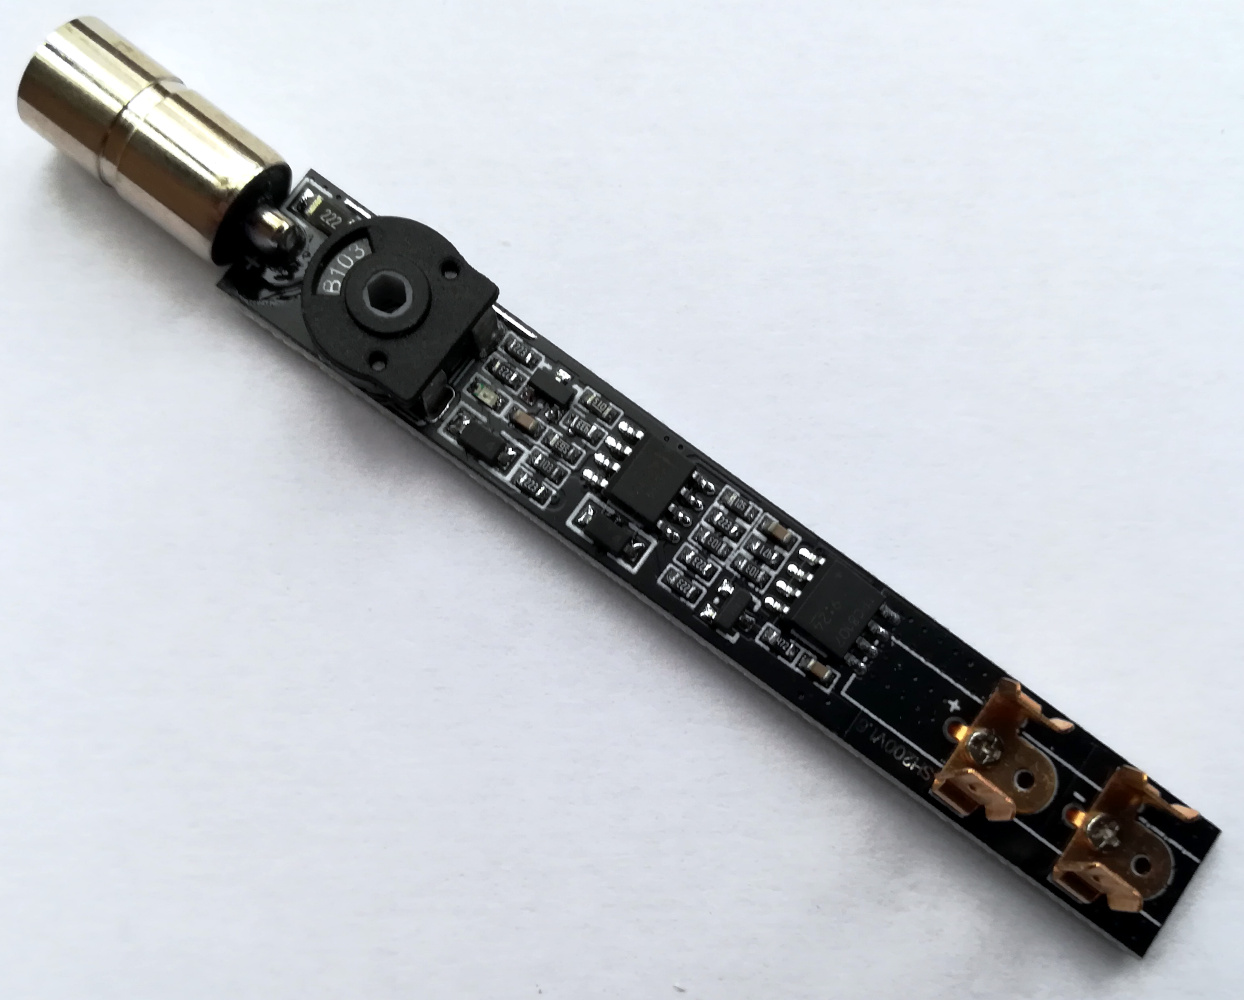
To merely describe an iron’s appearance and put it through its paces is not really a full review though, this is Hackaday. What’s inside the SH72, what makes it tick? I opened it up to take a look. It’s straightforward enough to get inside, but perhaps it’s not designed for repeated opening. The control knob eases out, and the two halves of the case can be parted with some very careful leverage and spudger work. Inside there is a long PCB covered in surface mount components on one side, spring clips for the element at one end, and a DC jack socket at the other, with a large through-hole preset potentiometer into which the control knob locates. The two main semiconductors are a TPC8107 MOSFET and an LM2904 dual op-amp, both in SOIC-8 packaging. At a guess one op-amp is a DC amplifier using the element resistance as a temperature sensor, while the other is a comparator that switches in and out the MOSFET to power the element. It’s a simple but effective temperature controller of the type that not so long ago could be found inside much more expensive temperature controlled soldering stations.
In conclusion, the SH72 looks like a cheap alternative to the TS100, and essentially that’s what it is. It’s a temperature controlled iron of similar size, power, and weight, but that’s all it does. It lacks the more expensive iron’s extra features such as standby temperatures and auto power off that come with microprocessor control, and it’s fair to say that its plastic handle is not quite so durable. It remains a very usable and useful iron though, and in answer to the question posed earlier I’d say it’s a definite diamond in the rough. At that low-budget price it’s unlikely you’ll find anything better, and you can certainly find much worse. Buy one, it won’t cost you much and I don’t think you’ll regret it.


FYI, SanErYiGo sort of translates to 321Go
Fyi it doesnt, actually. Typing saneryi or, San, or, yi, into a translator reveals it to be:
Gibberish
Because that’s not how you write mandarin. Translators do no understand pinyin without the tone marks, if they understand pinyin at all. In the future, refrain from commenting when you know nothing about the subject.
pronunciation guides on numbers in Mandarin disagree with you:
https://www.omniglot.com/language/numbers/chinese.htm
It’s written on the box as SanErYiGo. I’m not a Chinese speaker so can’t comment further than that.
I natively speak Chinese. 321go is likely correct. Try use google translate to pronounce “3,2,1”.
Sure it does! You think machines translate better than humans who know the language? Who do you think made the training dataset?
An LED to show status (ex.: heating, at-set-temperature) would’ve been very useful.
Could it be hacked/added easily?
Make it fade in and out at a real slow rate so you have to stare at it for a solid ten seconds to be sure what it’s doing… like every damn charging light in the last 5 years.
There actually is red color SMD LED on PCB already, and it works :)
You just can’t see it, they didn’t put small hole with lightguide on this thing.
It’s located just between pot knob and the small marker on the body (which points to knob temperature readings).
It’s constant red when powered on (cold), as temperature rises then it starts blinking, when set temperature is hit then it turns off. Look like it’s indicating PWM duty cycle.
That tip/element looks an awful lot like a Hakko T12 clone.
The ‘Super OLED LCD mega soldering 24v version 2 fantastico display’ soldering kits from all the usual outlets use these.
Your going to put your eye out with that..
I dislike this trend of powering everything off the USB port. What’s next, a hot-plate so I can cook stew from my laptop?
That’s silly, USB to power a hot plate!
Place the stew pot on the CPU.
And if you have a fancy dual hot-plate laptop, GPU too.
So, buy this one, it has a DC barrel connector, and it claims to run off 12-24 volt supplies.
(it’s in the article)
Hot plates are so last century, you want a USB instapot or air fryer.
I like my Ronco USB food dehydrator…One strip of beef jerky at a time.
So I tossed that into Amazon, 320 results for “usb hot plate.”
But in fairness, I owned a USB coffee warmer plate 15+ years ago. If we’d had cheap and ubiquitous USB chargers back then I’d have kept it, too, but I didn’t trust keeping it plugged into a computer and I didn’t want to buy a powered USB hub just for that.
Actually though, I’m thinking it would be fun to build a bigger one to test USB-C cables.
A hot plate for stew?? Naaa, run it right through the liquid cooling loop.
But I totally agree on the overuse of USB power.
This isn’t USB powered, nor is the TS-100. The TS-80 is the only iron mentioned that uses USB-C.
What else would you use? USB is our only global standard for a low voltage power connector. Sorry barrel jacks, all you ever gave us was a box in the closet labeled “power adapters”.
And USB-C Power Delivery is the only standard for dynamically chosen voltage I know of. My i7 laptop charges on just one USB-C cable, while also connecting to two screens, keyboard, and mouse over it. We’ve come a long way since USB 2.0
Would this be powerful enough to deal with multi layer boards, such as DC jacks on laptops?
I think so, if it were powered with a DC supply at the top of its voltage range.
I’ve been eyeing one with similar tips that appears to run off of vaping battery packs, and one version with a digital temp gague for around the same price of ~$10
Do you have a link for the battery powered one?
My TS100 is awesome, but quite tiresome to always take my laptop charger, sure I could build a battery pack, but that would be somewhat bulky… And heck, for 10 bucks I won’t complain!
Just search for “wireless soldering iron” on AliExpress. It seems I lied; the tips arent the TRRS style
Just get yourself a 5S or 6S LiPo pack capable of about 6A and use the TS 100. For short use this could even be a small 600mA 10C pack. I did that already with a 4S 5Ah 20C pack, but that’s a little overkill as I already used this pack repeatedly to start my car when it’s battery was flat :-)
About a year ago I bought a nice little USB powered iron that is so similar to this it’s silly.ive been using it for small jobs for – about a year now. it’s like carrying a nice little pen and pencil set around. I run it off a USB charge pack that seems to have the equivalent of 3 18650s inside it ( it will do 2.4 A for charging apple products I assume) . It’s actually a little smaller than this one, has a much finer cord ( it’s usb, I have several to choose from) and for light electronic work is fantastic. I think I paid about 15$ for it on Amazon, I’m still on the first tip and really I couldn’t be happier with it. I have a larger iron for larger jobs. An even bigger “gun” for even bigger things and otherwise it’s my go-to iron for everything else. You gotta love putting the battery pack in your shirt pocket and the iron in your teeth and climbing into whatever confined space….. You get the idea. I’m still looking for something better than that. This one is cool. i like the barrel jack, it means that if I forget my cord there’s one on the laptop. But that still doesn’t Trump USB. There’s one of those too.
Does this SanErYiGo SH72 use the T12 and TS100 tips with any issues?
Was actually about to note the below link with my comments for the Hakko (or clone) sleeve hack as a tip or somewhere and found this article (I’ve been offline the last few months other than free wifi locals): https://www.youtube.com/watch?v=paNIeJaHS7s
Drop’in this link here for those wondering about the tips: https://www.reddit.com/r/hackaday/comments/eupa9k/review_saneryigo_sh72_soldering_iron/
Finally received three of the four ordered (one to butcher for a universal adapter and two for tweezers build).
Made a quick vid to document the T15 tip ticking, though added images comparing the tips (TS100, T12, T15 and SH72) with a pic of the crude mod for the universal adapter spawning.
https://www.youtube.com/watch?v=xPpT-V-lPVo&feature=youtu.be&t=28
Printed 3 different adapters and compared the result with Bakon 950D, TS100 and TS80.
https://www.youtube.com/watch?v=MGnz7gYz3eY
Just found a new contender, the Sequire SQ-D60 A or B models. https://www.youtube.com/watch?v=DcI2TR9hKhc
I bought one. I love it. The whole idea of a microprocessor running my soldering iron always seemed silly to me, and this guy seems to be a perfectly adequate analog controlled iron. It holds its setpoint well, it’s sufficiently accurate, it heats up as-near-as-makes-no-difference instantly, ready to solder by the time you are.
Quibbles – the knob. The text on it is a tiny dark-gray-on-black that’s irritating to try and read, and the knob itself is awkwardly placed such that I’m forever bumping it or otherwise accidentally moving it away from where I want it to be. Annoying.
Improvements, which could be implemented by the manufacturer for a few pennies:
-An indicator LED – or two – would be cheap and useful. One for power on, and one connected across the MOSFET to let you know when the element is on. Depending on the hysteresis of the circuit, the output LED might in fact be variable in intensity, according to the duty cycle of the element – still perfectly suitable.
-A timeout – I’ve seen other chinese soldering irons use a 555 timer to implement a timeout or standby mode. Could easily be configured with a button or something to give you (say) 90 seconds of heat, and then fall back to maybe 100*C standby. Low enough to reduce the risks of accidentally leaving it on, but high enough that it only takes 2 seconds to come back up to temperature.
-a mechanical lock on the dial. Maybe a push-to-turn or a lift-to-turn mechanism.
-readable font on the dial