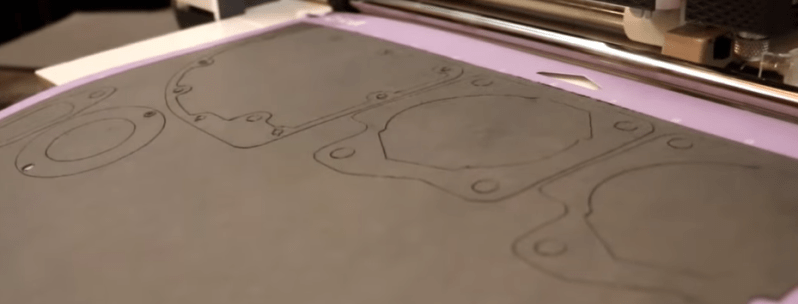
We know it all too well: another smoothly-operating night in the garage easily halted by a broken component. In the late hours of the night, no hardware store will open its doors. And while waiting may reward the patient, creativity may reward those who act now. That’s exactly where [Justin] found himself one evening: with a torn gasket. Not to be dismayed, he turned to his fiancee [Amy] and the two of them managed to design and cut a perfectly fitting replacement gasket on [Amy’s] vinyl cutter in a mere matter of minutes.
In the video after the break, the two step us through their process in detail. By starting with an image of the existing gasket, they capture a reference image. Some light work in photoshop cleans up everything except the resulting gasket they’re looking for. Finally, sizing “by eye” in the vinyl cutter’s software after measuring an existing dimension gives them sufficient precision to remake a duplicate gasket that’s eye-for-eye indistiguishable from the original.
It seems like we often hear about vinyl-cut gaskets in passing or in the comments, but it’s great to see a team post such a fabulous success story putting them to good use. And in case a plain old’ vinyl cutter blade wont do the trick, why not try running it at ultrasonic speeds?


There is another traditional solution to this problem that does not need any special equipment at all. (which most of you probably already know, I am mentioning this for the edification of those who don’t)
You can “tap out” a gasket using a ball-pein hammer. Just hold the gasket paper against the sealing face, and gently tap around the outline with the ball end of the hammer, using the edge of the casting to cut the paper. You want a shearing sort of action, rather than directly in to the corner of the casting. This works with iron and aluminium, but you probably want to be a bit more gentle with aluminium. That said, the students at my old college have been cutting new sump gaskets for the 1916 fire engine this way a couple of times a year for 50 years with no significant damage to the aluminium casting.
I will often glue the paper to the casting with my choice of on-hardening gasket sealant first to prevent it slipping.
Aha, a video showing exactly this.
https://www.youtube.com/watch?v=nvvKu56nHDw
Very cool method.
Also, this is what the video from the article should have been: concise 2.5 minutes of information. How is it possible to stretch out so little content over 10 minutes? This is even worse than those recipe blogs…
thanks for the tip
And use the head of a carriage bolt to punch/shear the boltholes.
But I prefer doing the outside perimeter and big holes with a utility knife — it’s quicker.
These new-fangled metal gaskets, tho… :-)
Some variants:
Instead of gluing with gasket sealant, you can make the boltholes first, and bolt the gasket to the sealing surface.
Use a knife to shear the gasket. Use the knife as one half of a scissors, and the edge of the sealing surface as the other side of the scissors. If the edge is rough, from for example casting remnants, filing them off first may be advisory.
It all depends on the tools you have available, and the sort of gasket material.
I’ve been cutting custom gaskets out of gasket material on my laser cutter for a while, and it works really well. I do something pretty similar to their software process. I find it useful to take a picture of the gasket on graph paper, because that way you have a reference grid of known dimensions, and then as your last step before exporting, once the size is known to be right, you delete out the graph. Inkscape can be a royal pain as regards secretly changing the size of pictures to pixels or something. Plus if you’re bored and overly organized you can engrave the gasket file name and location on a little tag on the edge of the gasket so next time you have to cut one you know exactly what worked last time.
Bonus points for qr-code or datamatrix git commit hash in the tag?
I’ve been doing the same. The graph paper trick is a good one that new to me. Thanks for the tip!
I was pretty excited by the possibility that I will never have to wait for the oddball gasket that nobody stocks and holds up a career. But I realized heat press machine for vinyl won’t make a huge difference after a while because no matter how unusual the pattern was, nearly every job would need to have exhausts or head gaskets, whether solid copper or metal lamellate, and we’d never expect it else.
I never thought vinyl cutters were of any real use before, I stand corrected.
They can be used for a lot of other things:
Stencils for solder past.
Stencils for screen / pad / spray printing.
Stencils for selective blasting.
So this is why I bought a vinyl cutter. Funny story: I’ve used it for a ton of things, including building things from cereal boxes (especially before I had a 3D printer), and now have used it for making shirts and wall decals. Haven’t yet used it to make a gasket. 😜
I remember a vendor at the 2001 powersports convention tried to sell me on a system that used a cutter to make gaskets on demand. You buy the machine, they supply the CADD files as a service. Quite expensive at the time. I was pretty intrigued by the prospect of never having to wait for that one oddball gasket that nobody stocks to be located and delivered, holding up a job. But after awhile I realized it wasn’t going to make that big of a difference, because no matter how rare the model we were working on, almost every job would require exhaust or head gaskets that were either solid copper or metal laminates that this thing could never spit out, so we’d be inevitably waiting for something anyway. In the end I couldn’t justify the expense, no matter how badly I just wanted to have it. Shear cool factor, and all.
If you’re tapping out a gasket, it’s handy to have a selection of various sized ball bearings. Use them for the likes of oil and bolt holes etc