Back when batteries were expensive and low-capacity, it was common to buy a “battery eliminator” that could substitute for common battery configurations. [David Watts] must remember those, because he decided to make an eliminator for all the CR2032 battery-driven gear he has. He got some brass blanks about the size of the battery, and you can see the results on the video below.
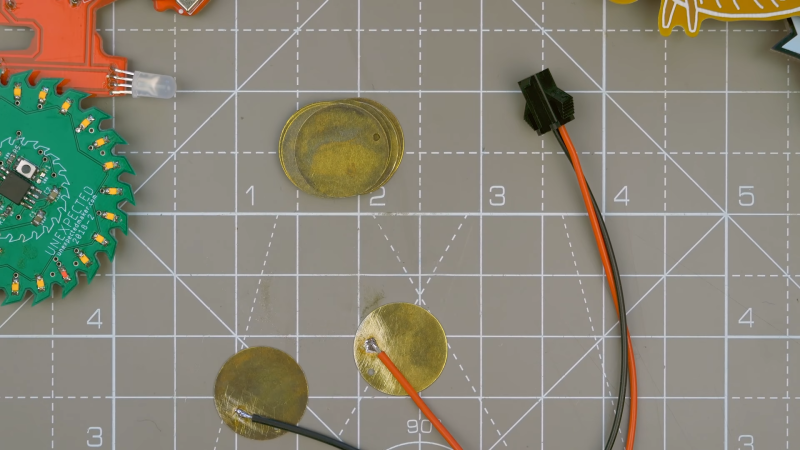
His first attempt seemed to work fairly well, a sandwich of two brass disks, each with a Velcro spacer and wires soldered on to connect to a power supply. The fake battery looks as though it might be a little thick, but it did work once the battery holder was persuaded to accept it.
There is a worry that the disks might touch each other or accidentally the other end of the circuit, but depending on the power supply’s protection a fuse in the line might be appropriate. This would be especially true were the faux battery to be used with anything expensive or important. We love to see people experiment with different solutions, though we might have been tempted to simply solder a connector to the board across the battery holder or after removing the holder completely.
You can still buy eliminators, although usually they are just wall transformers with selectable voltage and a bunch of barrel jacks. However, there are some made with common battery pack sizes and — of course — you could 3D print something like that, too. Just be careful if you roll your own — gear meant for battery use may not handle ripple on the power supply line very gracefully. Or, maybe just print a battery.


For those side-insertion coin holders….why not solder your wires to the interior of the disks?
I wonder why he didn’t hide the solder between the 2 disks instead of having it exposed on 1 side. Also, the wires are kind of thick.
I’d be reallllllllll careful with run of the mill wall adapters, they might need a hundred or two milliamps before the voltage regulates, stuff designed to run off the various 3V coin cells usually isn’t going to be drawing hundreds of milliamps, and the voltage may float to the peaks of the transformer winding, possibly up to 7V, more if it’s a switchable supply and it’s getting linear regulation down from 12V. You might be in luck with more recent switch mode wall warts, I believe there were some around 3V for cellphones before usb mini and micro became ubiquitous. However in that case you might need to pull more milliamps to START the supply.
Oh wait, what’s that Gru?
https://www.youtube.com/watch?v=p2_lJ2bGltE
Yah, doh, stick an incandescent light bulb from a 2 cell flashlight across the supply to draw enough current to either stabilise it or turn it on.
Well if you wanted something to run on a CR2032 with more capacity but you don’t need it to run forever or want to have it portable just connect the eliminator to a duel AA or C or D holder, 3 VDC nice and clean and long lasting.
Though I’ve got this jupiter jack FM transmitter thing I’d wanna wire a 4xAA holder to, to see if it makes it loud enough to be actually useful.
I have a light that runs on four CR2032s. It seems to draw from them in pairs, so I’m thinking about getting an EL223APBP 6v lithium with 1500mah to use instead. I hope it will work, and that the larger battery doesn’t fry the light.
Yes. I once got a nice LCD clock at a fleamarket, a bigger than usual display. When the button cell finally ran out, I was too cheap to buy a new one, so I soldered an AA battery in. The first AA ran for years.
I’m not quite picturing something using a button cell that a cord hanging out would fit. Sticking a battery outside the case makes more sense for most things.
Yup, in most standard alkaline cell vs tiny lithium replacement scenarios you tend to have to worry about them leaking before going flat.
From having replaced batteries in small devices before with a power supply, I’ve learned the hard way (i.e.: magic smoke) that some of those devices rely on the internal resistance of the small primary cell batteries to regulate the voltage coming in. So, hmm… maybe use a current limited source, too! :)
Why not make one out of standard FR4 double sided?
standard FR4 are usually 1.8mm thick, if one of the copper layer is etched out, the thickness usually goes down to 1.6mm.
Two layers of this made exactly 3.2 mm or the thickness of 2032 battery.
The converse of this is to build a pair of discs that fit into a battery holder that holds “regular” cells, usually between the – side of the cell and the spring that it’s meant to contact. Then put a switch across the terminals to turn the power on and off in an application where you can’t do it by other means.
Or just a slice of plastic or other insulator that IS the switch.
I’ve seen the suggestion of using a piece of double sided circuit board inserted between a battery and a terninal, for measuring current drain. That woukd work for ykur suggestion too.
For this I use copper tape stuck onto both sides of a piece of cardstock. Very useful for measuring battery current or (as Michael Black said) adding an off switch for those pesky devices that have a ‘soft’ on/off button and persistent quiescent drain.
Fairly sure I saw one with just splayed out stranded wire each side of thick cardstock, glued down. Worked for that use case, which had a top and bottom contact, rather than side or barrel type anode.
You could make one of those and power it with a small cell that would not get too pissed off if you shorted it out. Something like a CR2032 would be perfect.
Ive got some spare small discs of fairly fine brass screen left over from 4 days ago.
That should work, right?
Uh, why not just solder the wire ends directly to the battery holder?
Uhh why not watch the video?
I’d be worried about the two disks being the same diameter. Some coin cell holder geometries depend on the negative (smaller) terminal being smaller to avoid shorts.
Good catch, yes some of the side sprung holders would definitely have a risk of shorting them if close to same diameter.
Of course Thingiverse has the very thing to 3D print a dummy CR2032 to use with an external power supply.
https://www.thingiverse.com/thing:4095285
What if you dissassemble an cr2032 (I guess the don’t have anything more dangerous than potassium hydroxide and lithuim)
And weld the cables to it. So you can use the side contact of many battery holders.
I have a welding mask that i had to weld cables straight to the pcb to add an AA battery holder.
But my othe welding mask is a little bit more expensive and i prefer not to dissassemble it.
I made something like this years ago but as a test jig. Made a pcb with a couple of headers and was the same size and thickness of the battery. This way I could test the circuit with a lab power supply before deployment.
I work with a computer recycling place. They have a 5 gal bucket filled with cr2032 pulled off boards and stuff. If I ever need any, I just grab a handful and give the owner a couple bucks. Most still work fine.