In our vernacular, bricking something is almost never good. It implies that something has gone very wrong indeed, and that your once-useful and likely expensive widget is now about as useful as a brick. Given their importance to civilization, that seems somewhat unfair to bricks, but it gets the point across.
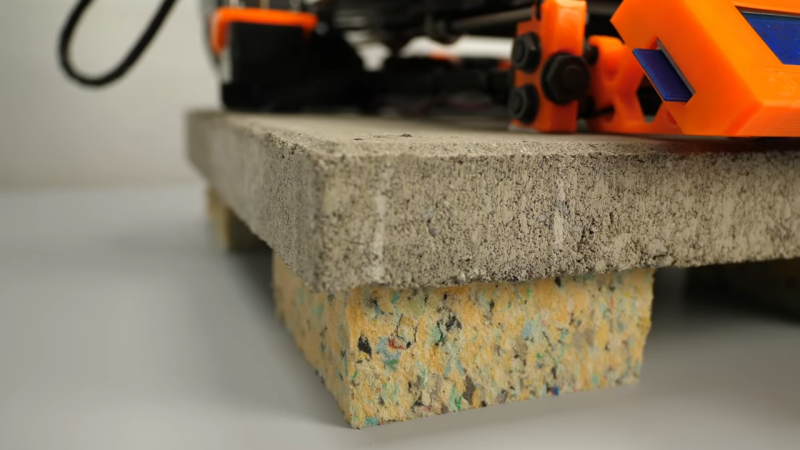
It turns out, though, that bricks can play an important role in 3D-printing in terms of both noise control and print quality. As [Stefan] points out in the video below, living with a 3D printer whirring away on a long print can be disturbing, especially when the vibrations of the stepper motors are transmitted into and amplified by a solid surface, like a benchtop. He found that isolating the printer from the resonant surface was the key. While the stock felt pad feet on his Original Prusa i3 Mk 3S helped, the best results were achieved by building a platform of closed-cell packing foam and a concrete paver block. The combination of the springy foam and the dampening mass of the paver brought the sound level down almost 8 dBA.
[Stefan] also thoughtfully tested his setups on print quality. Machine tools generally perform better with more mass to damp unwanted vibration, so it stands to reason that perching a printer on top of a heavy concrete slab would improve performance. Even though the difference in quality wasn’t huge, it was noticeable, and coupled with the noise reduction, it makes the inclusion of a paver and some scraps of foam into your printing setup a no-brainer.
Not content to spend just a couple of bucks on a paver for vibration damping? Then cast a composite epoxy base for your machine — either with aluminum or with granite.


I’m surprised at the level of quality improvement, with faster higher force machines its obvious but a ‘normal’ 3dprinter I’d have though would be much further into diminishing returns than shown. Good to know! When I get the chance to set up my printers more permanently I shall have to find some good damping solutions.
This still is the best way to play a turntable on less than a concrete floor with people walking around or dancing let alone a heavy bass sound system. For years I used a nice looking fine concrete paver and foam in a elegant stereo setup. It’s essentially a pi filter in mechanical form.
Not watching a video, but squash ball feet are also great at attenuating vibrations, though I would still prefer a concrete slab any day since the squash feet does not stabilize the printer’s base as much.
He goes into the squash ball solution in the video. and just like you said, they dampen the printer somewhat better but allow for a lot more warping and moving around of the frame.
Even if it is a trademark, Sorbothane cut into the right size for the weight of the load is a very good solution.
In Sweden we can buy pucks of the right size to carry for example a 20 kg loadspeaker.
I always mount anything robotic on granite slabs with loctite black max adhesive. You can buy “grade B” /failed calibration surface plates super cheap (you probably dont need an optically flat surface), or to really save money you can go to a granite business and they can cut you a rectangle block out of scraps. They get huge slabs in and cut them down to customer specified sizes for countertops – so they always have large scraps laying around. Gives your project a unique look too.
Next time you’re about to order an aluminum base plate for a project, definitely look into granite – its cheaper and there are tons of benefits to mounting everything on a chunk of MASS.
> It implies that something has gone very wrong indeed, and that your once-useful and likely expensive widget is now about as useful as a brick.
I think it’s more a measure of how good a brick would be performing the function your once useful widget once performed. A bricked smartphone for example, doesn’t make or receive calls any better than a literal brick would.
Also, paperweight, doorstop and boat anchor were favorite things to turn spendy gear into, euphemistically. Boat anchor is probably more for larger pieces of kit though.
The concrete base is nice but why did he put blue cheese underneath the base?
Cheese never goes bad. It just changes names and colors.
I have been using sorbothane feet on granite countertop remnants for this exact purpose since at least 2012. I assumed it was more well known.
This is a brilliant tip, for those of you not already doing so.
I had mild problems with the super-wobbly frame on the A8 until I bought it a paving stone. Putting the thing once-and-for-all on a solid, flat surface makes a real measurable difference in ripple, and a hearable difference in noise.
https://hackaday.com/2017/12/08/how-cheap-can-a-3d-printer-get-the-anet-a8/
I think it’s probably reasonably well coupled with the concrete, but I’ve long thought about epoxying the frame down for extra rigidity, but that’s kind of a one-way street.
Low natural frequency is a great goal for machine isolation: (k/m)^0.5 where k is spring constant (stiffness) and m is mass. As I like to say about any old American car- “like a brick on marshmallows”. For damping, especially in polymers, I think of the “storage” and “loss” terms like a bowl of curly spaghetti noodles after cooking and draining. Polymer chains unwind and slide around. Rheologists call it G’ andG’’, and look at the shape of the curve and crossing points vs oscillating load frequency.
Maybe filling the hollow frame rails with sand, lead shot, etc could help isolate too. Of course, the new quieter drivers nip the noise at the source.
Also good for basic laser/photography and holography experiments. Resolution of “printing’ device determining factor. Doesnt do much for cheap ‘beginners’ printers. On those putting quiet drivers dont change much more then audible noise levels. Getting the right amount of springyness and dampening is a slow custom fitting. Lots of variables. Lots of tuggies. Make stuff u can give away. sure it may look like shit to you but most folks couldnt see the difference in failed test models. They just happy for a free Darth Vader mask keychain junket or a pokemon pencil topper.
I started out by adding a single paving slab, sitting on an inch-thick square of medium-high density foam under my Prusa i3 MkIIIS and I saw instant improvement in print quality and a significant reduction in noise.
Then, based on a comment from a mate of mine, I went even further. I bought a second identical slab, and I used a masonry drill – and a LOT of care – to drill holes through this second slab, in positions that were basically either side of the lowest part of the frame. I then used a set of reasonably long cable ties to anchor the printer to this second paving slab, fixing it down as tight as possible.
I deliberately left the “ends” of those ties loose instead of trimming them off, figuring that if the plastic of the ties did give a bit over time, I could tug ’em a bit tighter. So far that has not proven necessary.
I bought a second slab of the same foam and added that to the mix.
My setup for my Prusa is now:
1. Prusa, cable-tied to
2. A concrete paving slab
3. A square of medium-density foam
4. A second concrete paving slab
5. A second square of medium-density foam
I’m sure there are going to be other variables in play – such as what you put that stack on [a wooden table and a concrete floor will be different, for example] but by tightly fixing the printer to a heavy concrete slab, the extra mass of the slab gives the body of the printer much more inertia to resist the movement of the print head. This in turn seems to give me much more accurate and cleaner prints, with exceptionally fine, sharp alignment of layers.
The only ‘word of warning’ I would offer would be that you do need to pick the size of your slab carefully… and you do need to be particularly careful when drilling through it. I decided to go with patience – it took an age – and not use my drill’s hammer function, because I didn’t want to shatter the slab. I also went outside and put the slab on the lawn, figuring that the slight yield of the soil would be supportive across the whole surface.
Subjectively I got a bigger improvement from the second slab than I did from the first.