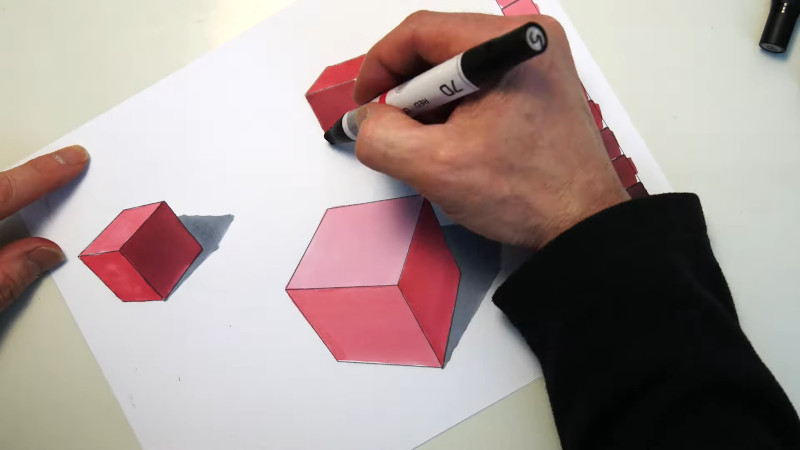
When doing high-end industrial illustration work, smooth gradients add a lot of production value to the final product. However, markers designed to do this well can be difficult to lay your hands on. [Eric] decided to create his own set of custom gradient markers, using commonly available supplies.
Starting with some existing markers that have dried out, the fabric ink reservoir inside is removed. A new one is created using tampons wrapped in heat-shrink, to replicate the construction of the original. Alcohol-based ink is required for smooth gradients, and [Eric] suggests using a heat gun to harvest the ink from a ballpoint pen, if store-bought is not available. The ink is then mixed with denatured alcohol to dilute it and injected into the fabric reservoir using a syringe. Each marker gets a slightly different ink mix to hit a range of lightness values for making smooth gradients.
It’s a tidy way of creating your own gradient markers in whatever color you may find useful. As a plus, the materials to do so are cheap and easy to obtain. We could even imagine 3D-printed marker bodies being an option, though nibs might prove a touch more difficult. We’ve seen [Eric]’s work before too, like this well-illustrated guide to using cardboard in product design. Video after the break.


Pretty sure he said red.
I thought it was .. interesting .. that he chose to do a gradient series in red.
It’s a cool way, but the lighter shades that achieve the lightness by dilution will shift around when the alcohol evaporates from the wick. It’s not gonna be the same value the next day, or the week after that, or when you’re using the marker and it starts to dry out. The darker shades that are done by mixing will stay relatively stable.
As I’ve understood it, the point of the gray gradient markers is that you do the values first, and then fill in with the hue, so you’re basically adding black to whatever color you’re using, but you’re doing it on the paper in two passes instead of mixing the color in the pen. The grayscale inks are pigment base, and the color inks can be solvent base, so they work more like highlighting pens, or they can both be pigment base for a slightly different effect.
Sorry, dye vs. pigment, instead of solvent vs. pigment. Dyes are fully soluble inks, while pigments are in suspension with the solvent. Dyes result in transparent colors, while pigments cover and turn more opaque the more you add.
There’s also white and colorless blending markers that either have only the solvent, or solvent + white pigment, which are used to make gradients:
https://www.youtube.com/watch?v=4LbXuPNGWZ4
So, if you get the white pigments and the black pigments, you can start from a fully saturated base color and do proper gradient markers by adding white instead of diluting, because the ratio of white to base color stays the same when the solvent evaporates out.
I knew there was something not quite right about Eric’s method for the lighter colors. Good explanation and proposed solution. (No pun intended.)
Also, adding a complementary color instead of black will produce a slightly different gradient that works more like natural light for shading.
Yes. I once had a dried out marker and no replacement on a weekend. So I injected some den. alcohol into the marker body with a syringe and needle. It worked for some time, but getting darker and darker with the time. Obviously the original solvent was something different, that evaporated slower.
I had no idea gradient markers even existed! It’s amazing how much work goes into traditional art that you never see on the digital side.
Traditional art, yeah Da Vinci never would have got that smile right without his gradient markers.
I want to say that they are a fairly recent development as I was involved with some higher level design courses immediately before PhotoShop became a thing, and never saw them or heard of them mentioned. If you wanted gradients you did watercolour, pencil, charcoal or crosshatch with a pen.
In some senses, a lot less work goes into traditional than digital. Blending on paper/canvas and brush effects is still something that digital does poorly and it requires techniques that are tedious and slow. Put Bob Ross in front of a computer and he’ll struggle to make one painting in a week.
“I had no idea gradient markers even existed!”
Then, you have got to see Chip Foose or Kindig drawing cars!
They use pencils/markers…
https://www.youtube.com/watch?v=S-B74GGTsXo
very, very nice, this is how the real art looks like when you don’t have mental problems :)
There are refills for the nibs. Many Art stores carry refills for Copic, but there are others. Try here: https://www.jetpens.com/Copic-Sketch-Marker-Nib-Refill-Medium-Broad-Pack-of-10/pd/3431
FYI, I used to use felt tip nibs held in place by a lithograph pencil spring-loaded holder. I would dip it in watercolors. (My favorite brand was Dr. P. H. Martin’s Radiant Dyes or Radiant Watercolors. These were perfect for short-term presentation, but they fade rapidly in sunlight. For more permanence, use Windsor-Newton powdered pigments.) I could get the convenience of markers and the responsiveness of watercolors. Let me re-post a convenient source for those nibs: https://www.jetpens.com/Copic-Sketch-Marker-Nib-Refill-Medium-Broad-Pack-of-10/pd/3431
Well, I had totally the wrong idea when I heard “gradient marker”. I thought it was a marker that was able to change hue, to create, you know, a gradient.
I was sort of wanting to see what a “gadient” marker would look like. Maybe it is a Tennis term…
B^)
https://www.houseofnames.com/gadient-family-crest
https://www.wtatennis.com/players/322576/nicole-gadient
This used to be done nicely with an airbrush.