Cinemas all over the world have become no-go zones with COVID-19 around, but watching the latest blockbuster on the small screen at home is simply not the same. You could bring the big screen home, but buying a quality projector is going to set you back a small pile of cash. Fortunately [Matt] from [DIY Perks] has an alternative for us, demonstrating how to build your own true 4K projector with parts bought off eBay, for a fraction of the price.
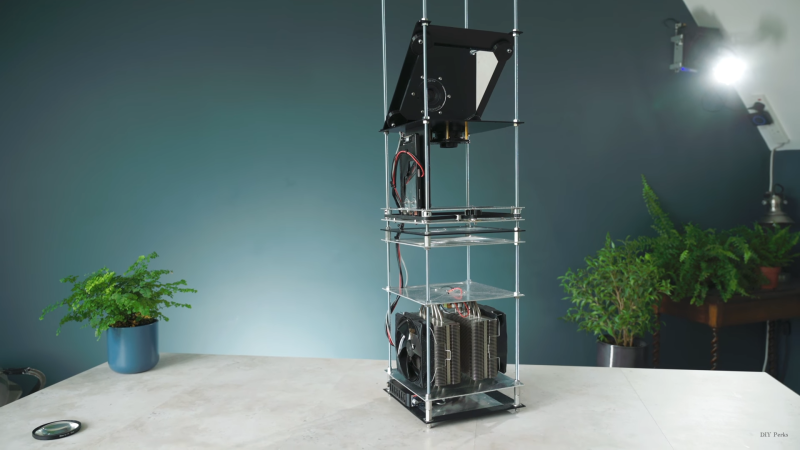
The core of the projector is a small 4K LCD panel, which is from a modified Sony smartphone. [Matt] disassembled the phone, removed the backlight from the LCD, which leaves it semi-transparent, and mounted it at a right angle to the rest of the phone body. The battery was also replaced with a voltage regulator to simulate a full battery. To create a practical projector, a much brighter backlight is needed. [Matt] used a 100W 10 mm diameter LED for this purpose. The LED needs some serious cooling to prevent it from burning itself out, and a large CPU cooler does the job perfectly. Two Fresnel lenses in series are used to turn the diverging light from the LED into a converging light source to pass through the LCD. An old 135 mm large format camera lens is placed at the focal point of light to act as a projection lens. The entire assembly is mounted on a vertical frame of threaded rods, nuts, and aluminium plates. [Matt] also used these threaded rods with GT2 pulleys to create a simple but effective moving platform for the projection lens that allows the focus of the projected image to be adjusted. The frame is topped off by a 45-degree mirror to project the image against a wall instead of the roof, and the frame is covered with aluminium panels.
The video after the break goes into incredible detail on how projector functions and how to build your own down. It definitely looks like a doable build for most hackers. [Matt] will also be releasing a complete PDF build guide in the next few weeks.
Compared side by side, the DIY projector beats a $2000 commercial 4K projector in terms of image sharpness and colour. The DIY version only falls short in terms of brightness, because it uses a lower output light source. It requires a very dark room to see the projected image, but it also means that less active cooling is needed, making it quieter than the commercial projector.
We’ve featured [Matt’s] work before, including a dual-screen laptop and flexible LED panels. His videos are always easy to watch and packed with technical detail, and we’re looking forward to seeing what he comes up with next.


Throwback….who remembers lumenlabs ?
Are they not a thing anymore? Its been a longggg time.
I do… I’ve actually got one of their produced projectors sitting in storage. Can anyone tell me how their ballasts work, to fake out the bulb sensor so I can cram LEDs in it or something?
You have a wire that goes to the ballast from the bulb. It needs to see voltage or it won’t power on the projector.
Okeydoke, thanks. It was supposed to be an open design but I guess schematics etc fell off the net as soon as lumenlab folded. Spent way too much time trying to chase them.
Way back in probably 2007 or so Popular Science magazine (remember that?) Had a guide on how to build something similar.
Google remembers..
https://books.google.ca/books?id=1Q2Bf9Iy1VoC&pg=PA80&dq=projector&hl=en&sa=X&ved=2ahUKEwiT9Mja0pjqAhVDYTUKHaiPCIcQ6AEwAXoECAQQAg#v=onepage&q=projector&f=false
Wow what a blast from the past. Ended up reading most of that issue. Popsci now is just depressing compared to what it used to be.
I could almost swear you folks are watching my YouTube viewing history…
I was amazed at how well it turned out. Defya few steps up from the old “dissect an old LCD monitor and put it on an overhead projector” hack I remember seeing years ago.
It’s google bubbling us all into the same hive mind, the better to sell us nectar.
The monoculture is algorithmic now. We’ve automated ourselves. That’s why we haven’t heard from aliens yet. All of them get stuck on alien YouTube and Twitter and slowly cook themselves
Ima go talk to them, how many times do you think I have to search “Aliens guide to earth” “Alien intro to earth cuisine” “Must sees for visitors from Sirius” etc, before it will let me break through and see their posts?
I posted an article on how to build a projector using an old LCD display and overhead projector on my site Terracode.com back in 2007 or so.
I’ve got on old projector I use at home from time to time and it is nothing more than this – just with a 13” lcd panel I place of the smartphone.
It’s just a big almost empty box.
This build looks really neat all the bits out for every one to see.
You haven’t seen the video I take it. He doesn’t leave “all the bits out for every one to see”, as the article also states:
“the frame is covered with aluminium panels”.
Who said he “left” “all the bits out for every one to see”?
your right, I trusted the article and the image depicted – but it does look pretty neat with out the covering.
Videos take WAY to long to watch just give me the text and the relevent images – much more efficient use of time
I’m curious what the contrast ratio is on his projector, as that plays a big part in image quality when watching movies.
Probably not great. A mobile device lcd isn’t designed to block so many lumens. If you want good contrast you’ll probably want to go the dlp route. I’ve yanked the color wheel out of an old one to further boost brightness and contrast, but obviously it becomes monochrome. It was for concert lighting though, not watching movies, so it was acceptable.
It’s going to be very poor. DLP is where it’s at. I’m waiting on the 4k chip prices to come down a little bit and some Chinese manufactures will start slapping Android on them and sell them cheap. I currently have an XGIMI H1 and it’s awesome, but I’m ready for 4k.
Out of curiosity what would you use 4K for?
I’ve got a nice DLP based projector its only ‘HD’ but cranking up the pixel count wouldn’t ever really improve legibility IMO – the surface texture you project onto has a big impact if viewed up close and from any more normal distance 1080 or even 720 will look just about as sharp as 4K.
If projecting from further away for a bigger screen (where the higher pixel count will improve sharpness noticeably) its just going to wash out the image more easily and probably look paler and worse than a lower pixel count because of it.
Which makes we wonder if there is a point to 4K really? Much like the phone screen he used above it seems like a waste of time trying to push out more detail than can ever be used.
DLP is sadly lacking in contrast compared to LCOS. The JVC D-ILA take can get upwards of 160k:1 contrast ratio. You’d be lucky to see 5k:1 via DLP, residually the 4k chips.
The modified screen from a phone is the best findings.
This part will be cheaper everyday.
Yeah. Mobile devices have really pushed economy of scale onto a lot of very sophisticated and interesting parts.
Amazing work more complex yet easier than I’d have imagined.
I think the article needs a bit of a proof read though!
Too dim to be practical.
That’s what she said.
Nice to see someone consider the optical path in these designs, even if the infographics got the magnification incorrect and the converging path through the LCD is not great. There’s still substantial room for improvement though: only around 10% of the light from that LED source enters the LCD, and likely less than 10% of that makes it out the front: shame about the partial reflector on the rear polarizer. He’ll be doing very well to put 100 lumens onto the screen. He does admit it’s pretty dim.
Jeri Ellsworth described in her AR work how to make a polarized beam splitter with a waveplate to optimize input for a LCD panel — it would help out a lot here.
It’s great to be able to see the pixels to claim it’s a 4k image though! (srsly?)
A quick look at his incomplete BOM puts it well over $500 in parts. Given the amount of work (including aluminum machining) I can’t imagine it’s worth it for such a device. No HDMI in? No keystone adjust? Take a panel off to reach in to turn it on? I’m sure it was worth the effort to get the sponsorship and views, but I can’t imagine actually using it.
Dumb question, what’s the $2000 4k projector? I haven’t shopped projectors in a while but last I looked, native true real for-serious 4k projectors were $5k+ and looked like the standard office meeting room projector, not straight-from-the-death-star-droid upright like the one he showed.
(And am I the only one who would rather my projector NOT be running Android [or probably more likely Sony’s spin of Android, which is surely full of old zero-days.)
Something like this.. https://www.vava.com/products/4k-ultra-short-throw-laser-projector-1
It’s this one: https://www.lg.com/us/home-video/lg-HU80KA-projector
I’m always wondering on how i could build one out of an old lcd pc monitor and my main problem is how every one always use Fresnel lenses on this but here in my country the biggest ones I’ve seen are just credit card size and i would need a 17” one for this. But i understand how the simple ones done for smartphones work using a magnifier, so now my question is would it work on a larger size if i add more backlight for the screen?
By the way he used a 100W LED not a 300W one
Fixed, thanks
Neat idea. I have however doubts about the life time of the phone LCD with that amount of energy absorbed.
In theory it could have pretty good cooling with plenty of air going over it. Not sure I’d trust the air path he made through his aluminium sheets though.
heatpipes doesnt work properly when orientation is upside down.
And no you are wrong.
. Note that most vapor chambers are insensitive to gravity, and will still operate when inverted, with the evaporator above the condenser.
https://en.wikipedia.org/wiki/Heat_pipe
They even use them in space with no right side up.
I’m glad I wasn’t the only one to notice that. This might be a good opportunity for water cooling to move the heat somewhere else, so the heatsink can work properly.
Depends on the heatpipe – some of them work rather well against gravity as its capilary action that returns the cooled fluid to the hot zones anyway.
The more primitive heatpipes really don’t work against gravity its true as they use more gravity assist or even entirely gravity to create the working fluid’s cycle.
With the source he picked I’d think this one would work well – PC’s don’t put their hot zone under the cooler very often its usually set up vertically with some of the heatpipes below the CPU- so the heatpipes in those coolers should not need gravity to work (though Its bound to help).
Seems to me there was a fair bit of light fall off around the corners.
100W of light directly on that LCD, you better add water cooling to the screen or it won’t be an LCD screen for long.
True, that LCD is going to absorb most of the light that hits it, and it might need a bit of cooling, but not much: the optical efficiency is so bad that less than 5 watts of light actually will hit the screen: half what it would get from just sitting in sunshine.
I thought the project was phenomenal, I’m producing a real 4k too, but in the final stages I damaged my LCD :(
(hoping to pass the crisis to buy another one, Brazil)
The insides of the project on how to use sunlight to work the focus are interesting, but I think the topic needs to be further explored, I personally did not understand the lens size logic he spoke about.
My project is based on the South Korean project.
https://www.instructables.com/id/World-First-DIY-Real-4k-UHD-Beam-Projector/
Seems to me there was a fair bit of light fall off around the corners. 100W of light directly on that LCD, you better add water cooling to the screen or it won’t be an LCD screen for long.