Anyone who pokes around old electronics knows that age is not kind to capacitors. If you’ve got a gadget with a few decades on the clock, there’s an excellent chance that some of its capacitors are either on the verge of failure or have already given up the ghost. Preemptively swapping them out is common in retrocomputing circles, but what do you do if your precious computer has already fallen victim to a troublesome electrolytic?
That’s the situation that [Ronan Gaillard] recently found himself in when he booted up his Mac SE/30 and was greeted with a zebra-like pattern on the screen. The collected wisdom of the Internet told him that some bad caps were almost certainly to blame, though a visual inspection failed to turn up anything too suspicious. Knowing the clock was ticking either way, he replaced all the capacitors on the Mac’s board and gave the whole thing a good cleaning.
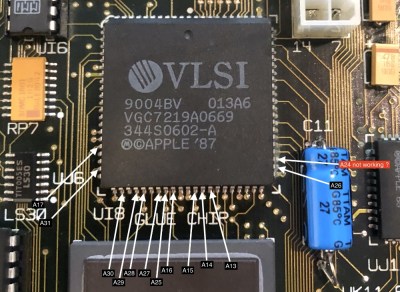
 Unfortunately, nothing changed. This caught [Ronan] a bit by surprise, and he took another trip down the rabbit hole to try and find more information. Armed with schematics for the machine, he started manually checking the continuity of all the traces between the ROM and CPU. But again, he came up empty handed. He continued the process for the RAM and Glue Chip, and eventually discovered that trace A24 wasn’t connected. Following the course it took across the board, he realized it ran right under the C11 axial capacitor he’d replaced earlier.
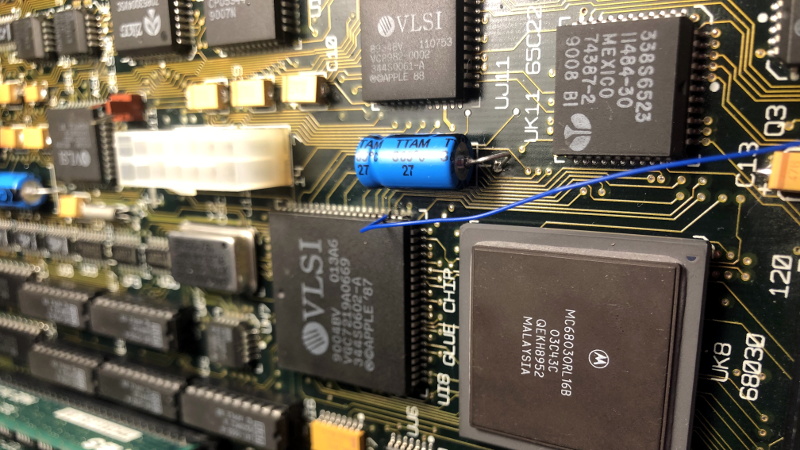
Suddenly, it all made sense. The capacitor must have leaked, corroded the trace underneath in a nearly imperceptible way, and cut off a vital link between the computer’s components. To confirm his suspicions, [Ronan] used a bodge wire to connect both ends of A24, which brought the 30+ year old computer roaring back to life. Well, not so much a roar since it turns out the floppy drive was also shot…but that’s a fix for another day.
It seems like every hardware hacker has a bad capacitor story. From vintage portable typewriters to the lowly home router, these little devils and the damage they can do should always be one of the first things you check if a piece of hardware is acting up.


It’s well known that the liquid leaking from the caps corrodes the vias trough the citcuitboard since the copper here is thinner than the actual track, so it ends up being an invisible break.
It’s known. But checking for such things when your board could have thousands of traces is another thing.
Regarding the SE/30 floppy disk drive it almost always the two small caps at the front that are to be changed. Worked for me on many SE/30 FDD
It looks like the A24 trace is well to the left of the capacitor and there’s a solder drip across two traces to the left of the capacitor’s top lead. Must be a picture after the cap replacement and before cleanup and bodge installed. But to even find this problem and solve it is over and beyond dedication. Gold star!
> Armed with schematics for the machine …
That’s pretty deluxe. How does one procure these schematics?
https://www.apple-schematic.se/board-ids/
When will they invent unleakable caps?
Dip them in varnish before soldering to the PCB. Or mount them to the bottom of the board so when they do leak, the drips fall away from other components.
The new aluminum polymer caps are supposed to not leak and last forever. Time will tell.
Ah, yes, sometimes a bit of wire-wrap wire can turn garbage into gold. I bought a broken Roland JX-3P/PG-200 music synthesizer from someone for $50 in the mid-1990’s, who could not get it repaired. I always wanted to learn how to play the piano and I thought that this would be cheap entry. I couldn’t find the problem (no scope at the time) so I though I would brute-force it by replacing all the (fairly inexpensive) digital chips – I knew that it was a digital section problem. I went through it, using pin-machined sockets, testing as I went along (there were quite a few chips), and UNDER the LAST CHIP TO REMOVE I discovered that a soft drink ate through a trace. Repaired it, then it worked except for a key. That was caused by ANOTHER drink spill. So, both problems were solved with 1″ of wire wrap wire total. Then, I recapped the machine. I’m glad I kept the 100% working synth(still can’t play), because used that combo goes for about $1000 now.
I just replaced the battery backup battery in it today. It still worked for backing up settings, but…20+ years….the old battery still read 3.05 volts and didn’t leak. Pretty incredible.
Bodge wire? I’ve never heard of it or seen it in any store or catalog. What is it?
It is just a price of wire used to bridge two points when one breaks a trace or makes a pcb with a missing trace.
It was sold in 10 meter spools at Radio shack. Now that Radio Shack is gone, the stuff is as rare as rocking horse poo. If you come across some, scap up as much as you can afford!
it’s just wire being used as a bodge (patch). Like a pull up/pull down resistor, it’s just a description of the job being done preceding the component name.
That’s how I understand it. Anyone have proof to the contrary?
It’s fantastic stuff. Conductive, the perfect balance of stiff yet supple and somehow just the right size for the task. Usually a mute pastel colour so it doesn’t stand out too much – a bonus for those of us too sloppy to hide our bodges.
It is getting much harder to find. Old stock Lucas Industries cables or scrapped classic 1990 or earlier British made cars are a great source.
Saab
Nice to see another SE/30 brought back to life. Mine was in such a state from electrolyte damage that chips came loose from the board. I used a conductive silver ink pen to repair breaks in the traces.
Don’t forget the power supply though. Those Mac power supplies also suffer from bad caps.
Note for younger people: it was extremely common to see these wires on brand new products from the factory probably up to the 1990’s. Either circuit modifications were needed after the boards were made, or someone forgot to check the rubyliths (the masks for the boards) to see if any traces had fallen off since the last time the PCB’s were run!
I have an SGI Octane with a few bodges on the GPU. The price list from 2001 shows the system was $31,000 as configured.
In Silicon Valley and most of the US they were called Blue Wires. Unless you worked where they called them Green Wires. Blue was just the most commonly used wire-wrap wire (WWW). #30 Kynar silver plated copper and it was great for this purpose. The Kynar is a high temperature nice slippery insulation and the silver plate is a good choice because silver tarnish is still conductive and is more chemically inert than copper. It was made for bending around pins, but the silver also made it wet with solder really well. Keep some #28 and #26 WWW for higher current fixes or hacking.