[Austin Adee] came into some drill bits. A lot of them actually. But when thousands of assorted sizes are delivered in one disorganized box, are they actually useful? Not unless you’re drilling holes where diameter doesn’t matter.
So two projects were at hand: finding a place to store a few hundred different sizes of bits, and tackling the actual sorting itself. In the end, he used input from a digital caliper alongside a Python script that showed him where to put them.
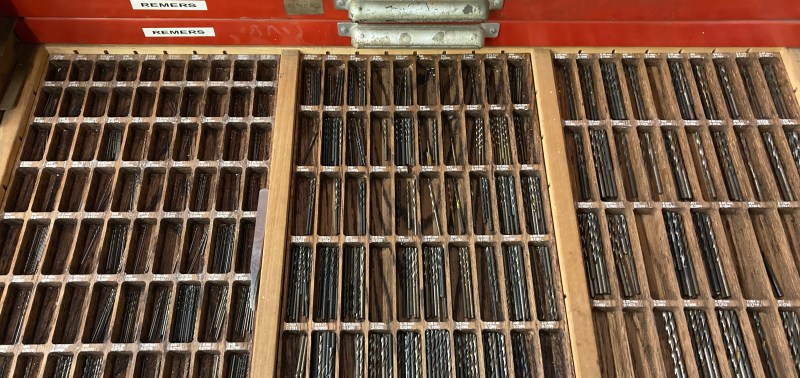
The start of the tray design process was a bit of a research project, establishing the common sizes and how many would fit into a given space. This data was used to spin up the layout for trays with 244 different pockets to hold the bits. The pockets were CNC milled, but getting labels for each to work with the laser engraver was a bit of a hack. In the end, filling in the letters with white crayon really makes them pop, despite [Austin’s] dissatisfaction with the level of contrast.
 But wait, we promised you an epic sorting hack! Unfortunately there’s no hopper, vibration feed, and sorting gantry that did this for him (now if it were perler beads he’d have been all set). Still, the solution was still quite a clever one.
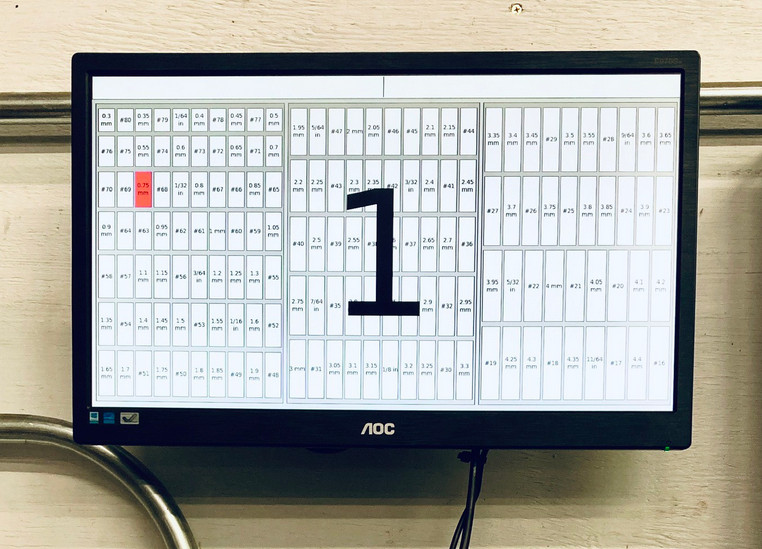
A set of digital calipers with a Bluetooth connection sends the dimension back to a python script every time you press the capture button. That script find the pocket for the nearest size and then highlights it on a map of the drill bit drawer displayed on the computer monitor. In the end the trays fit into a wide tool chest drawer, and are likely to keep things organized through exactly one project before everything is once again in disarray.
[Austin] mentions a lag of up to one second for the Bluetooth calipers to do their thing. For assembly-line style work, that adds up. We remember seeing a really snappy reaction time on these digital calipers hacked for wireless entry.


I’m tempted to say this is is a very boring story, but maybe I should not ;)
No, that would be going a BIT too far.
This is not a drill: back in the hole with you, dad.
My apologies. My wife told me I was a bit rude.
Maybe I should chuck it in for now.
if you rake it back a little, there’s a twist to this story.
Nice, but he went a bit overboard on the partitioning I think. Just looking at the first 3 in the top left, no way are you going to reliably measure random old drill bits with a cheap caliper quickly to within 0.0127mm to be able to hit reliably the difference between “#80”, “0.35mm” and “#79” bits. Just call them all 0.35mm and be done with it.
And end up with holes that are too big or small?? Are you crazy?? ;)
0.005″ is a fairly large dimension for even a cheap set of digital calipers, when you’re measuring a small cylinder it shouldn’t pose much issue at all.
I’ve been in this situation before many times.
This is a very useful hack to me!
I have read this story before (and as Hackaday is my only DIY website I check regularly I’m pretty sure I’ve read here there)
You probably clicked on https://hackaday.io/project/175568-drill-bit-organizer
Yeah I thought I did read it too and then I remember checking out this nice project !
I had exactly the same sinking suspicion, and did a pretty careful search too, but couldn’t find it. Still, that’s the sort of thing that nags at you…
Maybe it was on the “featured projects” slider at the bottom of the page? That picks up cool projects from Hackaday.io and features them, quasi-automatically.
I found it riveting
You can’t rivet without boring.
Ohhh! I just got it – I had never associated riveting as the opposite of boring in any sense other than the normal turns of phrase about whether something is interesting or the opposite. But riveting is filling in the bore created by boring. How did I miss this link?
Maybe because no-one ever hammered it home.
No mention of his misspelling of “reamers”? :)
Someone is pulling your leg HaD. CNC’d the pockets? That is a typesetting cabinet. I have one I got in San Jose in the 1980s and it houses hundreds of different chips, semiconductors, and sockets today.
This is the photo that the government doesn’t want you to see. An image so terrifying, so bone-chilling, that you’ll never go back to your simple reality again.
(No, really. Looks like a typesetting sorter. But he has a well-equipped hackerspace nearby.)
Yeah. I saw that he did rout some sections. But some still look like they have the lead discoloring. Must be stain/grain. Obviously a type cabinet. That style handle was where the font and size were shown. The type drawers are divided by wood strips with brads driven through the bottom. They are not hard to knock out and remove some. I’ll take a couple pictures.
The classic Stanley-Vidmar cabinets beat shelving and binning by 3 to 1 for floor space. These type cabinets are even better for small stuff because the drawers are so thin. Mine has 24 drawers. One of the great surplus outfits you probably recall in Sane Jose/Sunnyvale (and was one in Mountain View? Halted? Haltek?) had a bunch when a news paper got rid of their Linotype. They were not cheap though. I think I paid $400 or $600. I knew that Vidmars were 3 times that and space in Palo Alto apartments was dear.
Like so. https://hosting.photobucket.com/images/i382/Comedicles/TypeCabinet.JPG
That’s beautiful!
A tray with 244 areas for drill bits, this is really amazing organization, especially for me considering I have trouble finding my drill! Good job.
That’s really cool. I really wish it had an arm with an electomagnet that would pick up the bit from a little stationary dish and drop it in the correct place, but that’s a lot more work if it’s not in daily use.
I purchased a 200-drill set from Harbor Freight a couple of years ago, and it’s one of the most useful sets I have.
I make it a point of replacing any drill that I break, with real ones from the local hardware store. It’s got 200 drills up to 0.5″, so it’s usually easy to find a drill within a couple of thou of whatever hole you want. It’s also got the *exact* clearance and tap drills for most screws.
I suspect that you only need 1 drill of each size.
“I suspect that you only need 1 drill of each size”
Unless you lend them to to clowns.
Then you have a clown problem, not a drill bit problem. (Do people really lend drill bits? Maybe big ones I guess… For little ones, free after rebate works for me…)
you need Qty= Denominator of each 1/N size ;) interpolate for sizes between those
(jokey but seriously, 1/8″ and below are a nuisance to re-sharpen and smaller than 1/8″ gets extremely fragile)
hahah what an exciting challenge. i personally was rooting for the binary partition… make a pile of “big bits” and “little bits”, and then repeat. not sure if it would really be any faster if you went the full route but the diminishing returns would be obvious and it’d probably be intuitively obvious when it’s not worth going any further, when the smallest bit in any given pile is similar enough to the largest bit in that pile that you just don’t care.
You’ve just stumbled upon quicksort.
I too think you should collet a day.
Keep the standard sizes easy to use and keep in order. We have a metal drawer display from a defunct hardware store. The numbers bits are from 60 and bigger. Those 80 to 60 are “don’t breathe” stuff. The standard bits are in a display rack. This is upstairs not in the shop. In the shop the standard sets are on a shelf, one set in a fixed in place a “pipe organ” index. The number bit index is in a bottom drawer away form crows only needing a easy bit to fly off with.
A friend has one of those horror fright bit kits. Most of the number bits are gone, as they are too easy to grab. Now other than tapping a few holes with a metric tap I would assume there is a standard set in metric as well to keep within easy reach. Those number sizes are for when the standard sizes aren’t fine enough size graduations, get ’em out only then.
On the other extreme are those those jobber bit kits with 2 or more bits of one size in a row and missing some standard sizes. Ugh!
I was thinking, the next level would be to hook it up to a projector and have it light up the pocket to fill. I may be a fan of yak shaving.
Nice, but it needs 3 things.
1. A flat, backlit plate.
2. A webcam mounted close to the plate with focus adjusted accordingly.
3. Some software that could look at the drill bit placed on the plate, correct for the angle of placement, show the diameter on the screen, and identify the storage location.
Optionally an LED next to each storage bin so-that finding the location does not require converting the screen to real life.
If the LED is impractical, perhaps a voice that tells you the location and size. So your eyes and hands can work on finding “D 3” while your ears keep hearing “D 3”
Agreed. Plus:
1. Electromagnet already suggested
2. Robot arm to move drill from feed tray to optical measurement platform, thence to appropriate bin
Beautiful work with the drawers!
But I can’t help to ask the question: Is there really any point in keeping them all? Wouldn’t it be enough to keep one (or maybe two) of each size, organize them neatly in a pipe organ, be done with it and use the valueable workshop storage space for other things?
how about a slope with CNC’d bit sized slots, smallest at the top and largest at the bottom? Roll them down and they drop through the appropriate slot into a hopper.
Now they are sorted into size, get a few assorted cans of spray paint, and spray the bits in each bin to colour code the bins and bits at the same time. They should then stay organised.
If he measured the shanks that can be a problem since some buts have a slightly smaller diameter shank the the diameter the bit drills.
Step 1 should be a big magnifying lens and light to read what’s stamped or etched on the shanks.
For unknown bits, the flutes need measured and doing that can be tricky. I gently clamp in digital calipers then carefully rotate the bit backwards so it spreads the jaws.
A rig with a keyless chuck and holding the calipers so bits could be held perpendicular to the calipers for best accuracy would be ideal.
This can be a very hard problem to solve accurately on small bits. As [Gregg Eshelman] says, shank dia. may not equal flute dia. I have more than 3 different sized bits with 0.096″ shanks.
Drills smaller than #25 +/- aren’t marked. Paint gets scraped off. Inexpensive electronic calipers’ zeros drift. Over 0.125″ or so the delta size is enough to be reliable.
Holding the bit at exactly right angles to the caliper is problematic. A chuck mounted with the caliper, rezeoing frequently, and a mechanism to always apply the same pressure to the caliper ( a spring pulled to a constant position, for instance) and 3 or 4 measurements on the flutes while rotating the bit would help a lot.
The best solution I’ve found is a micrometer on the flutes. The “click” handle keeps the applied force constant. There is a standard for electrically reporting micrometer readings.
Sometimes the “organ pipe” cases are (surprisingly) drilled such that if you have adjacent sizes you can tell which is which. YMMV.
Magnetized bits attract steel filings which can cause serious pain or damage work.
I’d really like to find accurate optical measurement & pattern recognition software I could incorporate into something to solve this problem as well as sorting e.g. screws and other small subtly different parts.
Stick a projector overhead & align it with the tray so it will illuminate the correct pocket without you having to check the screen.
Projection mapping FTW 👍