No Tool Left Behind With The Help Of Homemade Shadow Boards

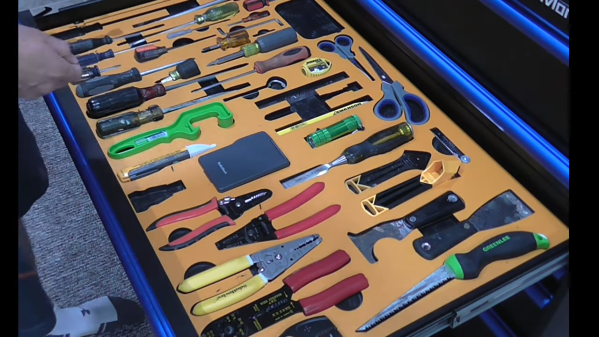
Shadowed tool storage — where a tool outline shows at a glance what’s missing from storage — is a really smart way to keep your shop neat. They’re also super important for cases where a tool left behind could be a tragedy. Think, where’s-that-10-mm-socket-while-working-on-a-jet-engine? important. (It’s always the 10-mm socket.)

But just because shadow boards are smart, doesn’t mean they’re easy to make. That’s why [Scott Prince] came up with this semi-automated method for making toolbox shadow boards. The job of tracing around each tool on some sort of suitable material and cutting out the shapes seems straightforward, but the trick comes in organizing the outlines given the space available and the particular collection of tools.

[Scott]’s method starts with capturing images of each individual tool. He used a PiCam and a lightbox housed, strangely enough, in a storage bench; we’d love to hear the full story behind that, but pretty much any digital camera would do for the job. After compensating for distortion with OpenCV, cropping the images, and turning the image into a vector outline of the tool, [Scott] was left with the task of putting the tools into logical groups and laying them out sensibly. After tweaking the tool outlines and adding finger cutouts for easy pickup, [Scott] put his CNC router to work. He chose to use a high-density polyethylene product made by his employer, which looks fantastic, but MDF would work fine too.

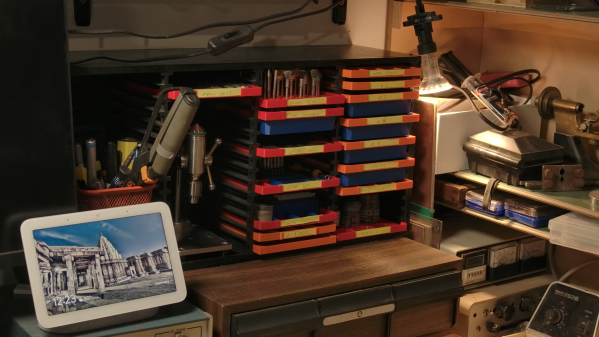
We have to admit to a fair degree of toolbox envy now that we’ve seen what shadow boards can do. We’re a bit torn, though — [Zach Friedman]’s Gridfinity storage system has a lot going for it, too.

Super Simple Scope Shambles Solution

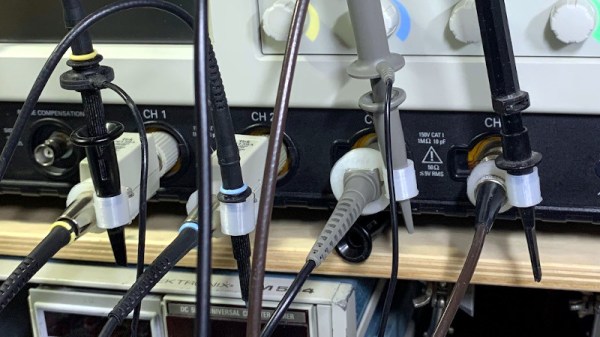
Sometimes the projects we write up for Hackaday require their creators to produce pages of technical explanation, while others need only rely on the elegance of the hack itself. The Scope Probe Caddy from [Tonyo] has probably one of the shortest write-ups we’ve linked to from a Hackaday piece, because its utility is self-evident just by looking at it.

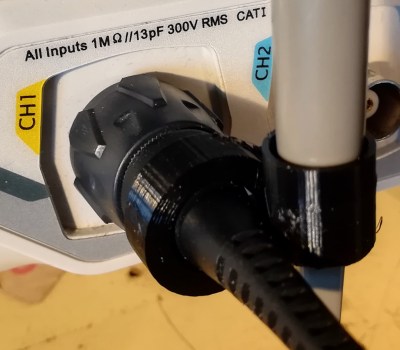
Scope probe connector with 3d printed organiser attached.
The Hackaday Rigol gets the caddy treatment.

It’s likely that everyone who has owned an oscilloscope will have encountered this problem: that multiple ‘scope probes soon manifest themselves into a tangled mess, an unruly octopus which threatens to overwhelm your bench. The probe organizer is an extremely simple solution tot his problem, a 3D printed clip which fits over the probe connector and into which the probe itself can also slot.

The clip comes as an OpenSCAD file, which starts with a range of size definitions for different types of probe connector. The Rigol we have here isn’t among them, but a very quick measurement with the calipers allowed us to enter the size of a Rigol probe connector at 11.5 mm. It’s not often we make something we’re  writing up as we’re writing it, but in this case a quick bit of 3D printing and we too have tidy probe storage. With the addition of a cable tie or a small nut and bolt it’s assembled, and now helps make a Hackaday bench a little clearer.

Once you’ve printed this organizer, you might want to turn your attention to the probe itself.

DIY Laptop Stand: Why Stop At One When You Can Slot Three?

We make the tools we need, and that’s definitely the case with [Marco Schulte]’s laptop stand. It slots not one, not two, but three laptops at once.

For all their portability, multiple laptops can be a bit clunky to manage on a desk, so [Marco]’s solution definitely saves space while keeping things accessible. The laptop in the front can be open for use and easy access, while the two in the back are held vertically and can be attached to external monitors or other peripherals.

Not only does it save space, but the stand provides ample spots to anchor cable ties for securing the inevitable mess of wires and cables that dealing with three laptops brings. It makes for a tidier desk, that’s for sure.

The stand was designed in Fusion 360 and was cut from plywood with a CNC router. Does this design give you any ideas, or would you like to make one for yourself? The design files are here.

No access to a CNC router? No problem if you have glue and some spare boxes laying around! You might be surprised at how sturdy a few layers of cardboard and glue can be.

A New Spin On Empty Filament Spools For Part Storage

Empty spools from 3D printer filament are the kind of thing that begs to be repurposed, and one option is [3d-printy]’s vertical filament spool parts drawer design. The way this solution works is by using the spool to hold twelve vaguely pie-shaped drawers that can be individually unlocked and removed entirely, which makes accessing their contents (or dumping them out) much easier. This method requires the spools to be oriented vertically, so it ends up handling a bit like a Rolodex.

One downside of the design is that it requires two inserts to be installed on the inside of the spool walls, which act as guide rails and lock points for the drawers. Another is that managing a vertical spool can be a bit awkward, given its lack of flat surfaces. Happily, there is an option for a matching stand that not only provides a flat base, but keeps any accidentally-unlocked drawers from falling out and spilling their contents.

The project files are OpenSCAD files, which allows easy customization for different spool manufacturers and dimensions, and [3d-printy] provides measurements for some common ones. Another nice element of this design is that no single part uses more than 30 grams of filament, which makes printing them an attractive way to use up the last bits of filament rolls.

We’ve seen drawer-style storage for filament spools before, but haven’t seen a design quite like this one before. Watch an overview of the drawer design as well as the spool holders in the videos, embedded below.

Continue reading “A New Spin On Empty Filament Spools For Part Storage”

To Lovers Of Small Boxes: A 3D Printable Design Just For You

Print them at 50% scale for a far cuter (and much less useful) result.

[Jacob Stanton]’s design for 3D-printable, stacking and locking boxes is a great example of design for manufacturability (DFM). MicroStacks show how part of good DFM is taking the manufacturing method’s strengths and weaknesses into account. [Jacob]’s boxes are created specifically with 3D printing in mind, which is great design whether somebody is making one, or dozens.

The boxes have sturdy parts that all print without any need for supports, fasteners, or post-processing. In addition, since no two 3D printers are quite alike and some print better than others, the parts are also designed to be quite forgiving of loose tolerances. Even on a printer that is less well-tuned than it could be, the design should still work. The boxes also have a nice stacking feature: a sturdy dovetail combined with a sliding tab means that once boxes are stacked, they’re not coming apart by accident unless something breaks in the process.

The boxes as designed are about big enough to store AA cells. Not the right size for you? One nice thing about a 3D-printable design that doesn’t need supports is that it’s trivial to uniformly scale the size of the models up or down to match one’s needs without introducing any print complications in the process. You can watch [Jacob] assemble and demonstrate his design in the video, embedded below.

Continue reading “To Lovers Of Small Boxes: A 3D Printable Design Just For You”

Finishing Your Projects Hack Chat With Zack Freedman

Join us on Wednesday, February 10 at noon Pacific for the Finishing Your Projects Hack Chat with Zack Freedman!

Try as we might, some of us are much better at starting projects than finishing them. Our benches — or all too often, our notebooks — are graveyards of good attempts, littered with the scraps of ideas that really sounded good at the time and clouded by a miasma of good intentions and protestations that “This time, it’ll be different.” Spoiler alert: no, it won’t.

Trying to pin the cause of this painfully common problem on something specific is probably a fool’s errand, especially when given the fact that some people mysteriously don’t suffer from it, it would appear brain chemistry plays a role. Maybe some people just really like the dopamine hit of starting something new, which gives them the rush of excitement while the idea is still fresh, only to have it wane rapidly as the project enters the churn.

Whatever it is, if you suffer from it, chances are good you’ve looked for a way out at least once. If so, you’ll want to hop into this Hack Chat, where “very serious hacker” Zack Freedman, proprietor of the Voidstar Labs channel on YouTube, will share his thoughts on project follow-through. We’ve enjoyed Zack’s projects for a while now, and covered a few, from his in-your-face (on-your-wrist?) smartwatch to his video editing keypad. He gets stuff done, perhaps in part due to his workshop organization, but however he does it, we’re eager to hear about it. Join us as we discuss the art of follow-through and getting stuff done.

join-hack-chatOur Hack Chats are live community events in the Hackaday.io Hack Chat group messaging. This week we’ll be sitting down on Wednesday, February 10 at 12:00 PM Pacific time. If time zones have you tied up, we have a handy time zone converter.

Click that speech bubble to the right, and you’ll be taken directly to the Hack Chat group on Hackaday.io. You don’t have to wait until Wednesday; join whenever you want and you can see what the community is talking about.

Continue reading “Finishing Your Projects Hack Chat With Zack Freedman”

Sorting Thousands Of Drill Bits

[Austin Adee] came into some drill bits. A lot of them actually. But when thousands of assorted sizes are delivered in one disorganized box, are they actually useful? Not unless you’re drilling holes where diameter doesn’t matter.

So two projects were at hand: finding a place to store a few hundred different sizes of bits, and tackling the actual sorting itself. In the end, he used input from a digital caliper alongside a Python script that showed him where to put them.

The start of the tray design process was a bit of a research project, establishing the common sizes and how many would fit into a given space. This data was used to spin up the layout for trays with 244 different pockets to hold the bits. The pockets were CNC milled, but getting labels for each to work with the laser engraver was a bit of a hack. In the end, filling in the letters with white crayon really makes them pop, despite [Austin’s] dissatisfaction with the level of contrast.

But wait, we promised you an epic sorting hack! Unfortunately there’s no hopper, vibration feed, and sorting gantry that did this for him (now if it were perler beads he’d have been all set). Still, the solution was still quite a clever one.

A set of digital calipers with a Bluetooth connection sends the dimension back to a python script every time you press the capture button. That script find the pocket for the nearest size and then highlights it on a map of the drill bit drawer displayed on the computer monitor. In the end the trays fit into a wide tool chest drawer, and are likely to keep things organized through exactly one project before everything is once again in disarray.

[Austin] mentions a lag of up to one second for the Bluetooth calipers to do their thing. For assembly-line style work, that adds up. We remember seeing a really snappy reaction time on these digital calipers hacked for wireless entry.