Despite the lingering reality that most of us don’t have what it takes to make it to the upper reaches of the Hit Parade, there remain many who still harbour a secret desire to make music. What better way to realise this dream, than by making [Blog Hoskins’] $20 MIDI synth project!
The write-up goes into a staggering level of detail to ensure that it’s accessible at all levels, to the extent that a complete beginner could probably assemble a working synth by following it. For some of the fancier parts of front panel there’s a reliance on a laser cutter, but even without such wizardry the Average Joe with an electric drill could still do a pretty good job.
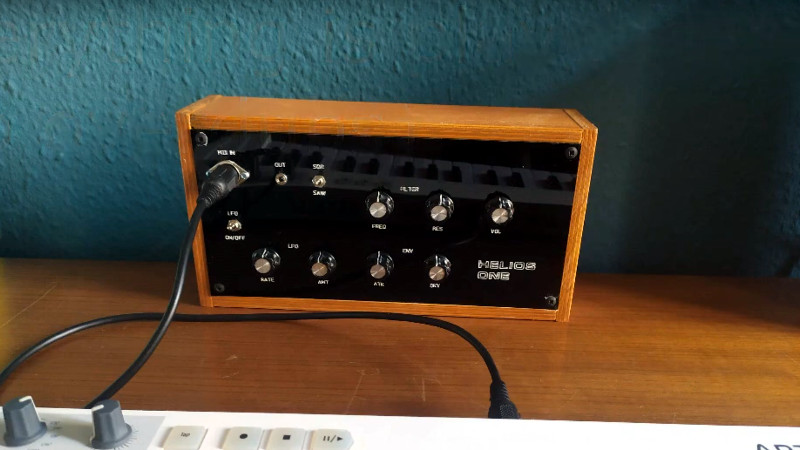
Behind the panel though it’s not short on features it’s a surprisingly simple design. At its heart is an Arduino Nano, surrounded by potentiometers and switches for user control, and an opto-coupler for the MIDI lines. Sadly for analogue synth fans there’s not much else in the way of circuitry, but the point of a build such as this one is to create a playable instrument with the shortest path to usability. A video full fo those glorious synth sounds is below the break.
MIDI synthesisers are a frequent feature here at Hackaday. A recent favourite is this four-voice instrument that uses servos as its active element.


No title pic? Which is a shame because it looks good.
It does look nice. I want one what are we talkin?
All better!
I’m an electronic music noob. I have an inclination to make a device for my children who like playing with a toddler’s keyboard. The gadget I have in mind has a small keyboard style interface but can record short sequences (maybe with different instrument sounds, at least tones and percussion) and combine them to make a track. I don’t even know what search terms to use to find projects to base it on or emulate. Looper? Synth? Keyboard? Please reply with tips on what it sounds like I’m trying to make and any good resources. Thanks
What you are wanting for them is a workstation
Yes! Thank you.
I bought some extra potentiometers for this build and I was wondering if it would be possible to modify it and add some more pots? Buddy’s willing to guide me on that I’d be happy to post videos and pictures so other people can modify it as well. It was plenty of room on my panel for one or two more pots.
Try a Blipbox
I shall, thank you!
Better yet, a Sythnstrom Deluge
> […] can record short sequences
This is called a sequencer, and it’s a common feature in many commercial/consumer electronic instruments. The most common type of sequencer is the step sequencer, which has a number [16, 32, 64, etc] of “steps”, or equal beats. (Typically 16th notes or 8th notes.)
> (maybe with different instrument sounds, at least tones and percussion) and combine them to make a track.
This sounds like a groovebox to me. These have multiple sound sources, usually at least one synth engine, and either a drum machine and/or a sampler. The multiple sound sources are then arranged together with a (built-in) sequencer. They have various interfaces, often with drum pads arranged in some keyboard-like fashion, but they usually can use a separate MIDI controller for a proper keyboard interface.
As for actually constructing one yourself, I’m afraid I’m of very little help. If I had to pick a starting point for that project, I’d probably go with a Pi, but beyond that, I have no clue.
Brilliant, thanks for the explanations to help me along with this quest.
Check out the Korg Kaossolator. Simple to layer beats and synths. Lots of fun.
Jenny – your first sentence captures quite a few of the Hackaday readers, I would bet!!
I’ve had loads of fun playing with the Animoog app from the Moog company. There are MANY sounds included in the base version of the program, and you can alter the sound of any of them quite easily. Search YouTube for some of the excellent tutorials for beginners of Animoog and in less than 30 min you can be having more fun than you imagined.
https://apps.apple.com/us/app/animoog/id471638724
As a knob-twiddling dork with terrible keyboard-playing skills: this is so cool!
I think this is going to be the thing that *finally* gets me to learn to solder; totally do-able even with my modest technical abilities, and the price can’t be beat. Honestly the only challenge is going to be the case, and more to the point the front panel.
I’m actually thinking my partner in synthesis crime should each build one…
I think laser etching stuff is a bit of a cottage industry these days so shouldn’t be too hard to get a real fancy front panel made for reasonable money. Alternatively label everything with dymo tape for gritty authenticity.
When I got to the back side of the panel scene I noticed that some of the pots are wired backwards. I don’t know which way the voltage effect is of course. I have only seen one backwards volume or pot control in my life ages ago. A repairman had replaced the volume pot and looking at it from the backside of the console TV did it wrong. Dad blasted the sound every time he tried to adjust it. The TV was in a Florida vacation house, I happened to have a gun and solder.
On Earth we use clockwise even downunda. I have seen guitar amps with treble-mid-bass order with the EQ but never backwards knob sense. Even though some head-stocks will have this and that when trying to tune, one way is enough. Watch the backwards handlebars bike video, it’s theft proof. We need conventions.
Wiring route convenience at the backside should not determine how the front works. Put radial hour marks for the pointers and number them 0 -10.
sometimes it feels like the hackaday content algorithms (/s) are targeting me– I spend a good ten hours last week researching diy synths and i log in for the first time this week and this is what i find. awesome!
Getting “Bandersnatch” vibes.