
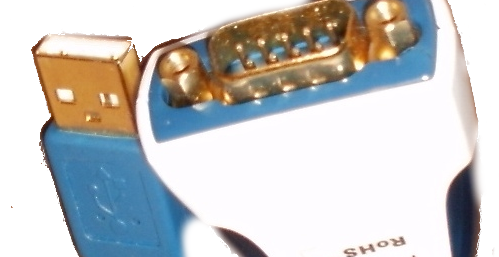
Serial ports used to be everywhere. In a way, they still are since many things that appear to plug in as a USB device actually look like a serial port. The problem is that today, the world runs on the network. Sure, you can buy a terminal server that converts a serial port to an Ethernet port, but what fun is that? In this article, I’m going to show you how to stream serial ports over the network using some available Linux tools. It isn’t perfect, and it won’t work for every case, but when it works it works well.
Everything is a File, Until it Isn’t
At some point in the past, Unix — the progenitor of Linux — treated virtually everything as a file, and all files were created more or less equal. Programs didn’t care if a file was local, on the network, from a tape drive, or arriving over a named pipe.
But things started to change. Even though a serial port is just a file under Linux, it has some special attributes that let you set, for example, baud rates. Worse, some programs “know” too much about files and insist on certain naming conventions. So, in theory, you should be able to create a network socket, connect one end to a serial port and the other end to a program, and be done with it. In theory.
 The practice is different, of course. That might work in some very simple cases. You can use a utility called
 socat (like cat for a socket) to set it up. However, if the program you are trying to fake tries to set a baud rate, for example, it is probably going to throw up its hands. Some programs won’t even recognize your fake serial port.
About socat
The socat program is like a magic adapter cable that simply pipes everything from one place to another and also handles the reverse traffic. The program can read from files, pipes, devices, sockets, and a few other items. For example, you might want to build a simple TCP proxy to forward connections on the local host to another host. That’s easy with socat:
socat TCP4-LISTEN:88 TCP4:10.1.1.125:8000
That will only handle one connection, but you can even ask socat to fork off a new connection to handle multiple requests.
The Problem
If you try doing this with a serial port, though, it is unlikely to work without a lot of setup. This is such a common desire that there are several programs available to help. Most Linux distributions will support ser2net, a program made to handle the task of converting a serial port to a socket. If ser2net doesn’t suit you, there’s also some Python code that ships as an example with the pyserial library, but your distribution version of pyserial maybe too old to support it. If that’s the case, you’ll need to install it outside of your package manager using pip, for example. I’m going to assume you are using ser2net.
The ser2net program normally installs as a system service and you can edit /etc/ser2net.conf to configure it. I took out all the default lines and added the two serial ports I wanted to expose along with the baud rates I wanted:
7777:telnet:0:/dev/ttyUSB0:115200 8DATABITS NONE 1STOPBIT remctl
7778:telnet:0:/dev/ttyUSB1:115200 8DATABITS NONE 1STOPBIT remctl
Then you’ll need to restart the service (probably systemctl restart ser2net; if it fails to restart the first time, try again as sometimes it tries to start before the old copy is totally shutdown).
For debugging, you might want to stop the service and run with some debugging messages:
ser2net -d -C "7778:telnet:0:/dev/ttyUSB1:115200 8DATABITS NONE 1STOPBIT remctl"
Either way, once the service is running, the ports you specify (7777 and 7778 in my configuration file) will act like the associated serial ports.
A few notes. If you are doing this with a 3D printer and you have something like Octoprint running, you’ll need to shut it down or otherwise make it let go of the printer port before you set all this up. This would be true of any program that would hold the serial port you are interested in opening. For some standard ports, you need to make sure login is not holding the port open and waiting for a user. Exactly how all that works will depend on your setup. The same goes for your firewall. If you are listening on port 7777 and you use a firewall, you’ll need to set it up to allow connections on that port. Don’t forget you usually have to be root to open up low-numbered ports, too.
The Client Side
On the client side, you can use socat, but some programs will figure out it isn’t a real serial port. You can still, try though:
socat pty,link=$HOME/dev/ttyNET0,waitslave tcp:10.1.1.125:7777
Some programs are only going to look for devices in /dev, though. If that’s the case for you, you are going to need to run socat as root (use sudo) and then also set /dev/ttyNET0 so that you have read and write permissions (e.g., sudo chmod 666 /dev/ttyNET0).
Testing 1, 2, 3…
Instead of trying your program right away, though, I suggest you test using something like picocom. For example, on the client machine after you run socat, you should be able to run something like:
picocom -b 115200 $HOME/dev/ttyNET0
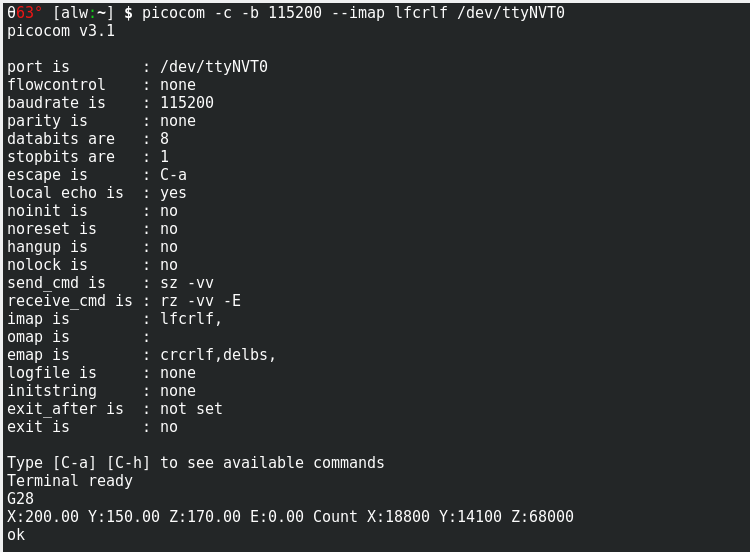
Obviously, you’ll need to use the right name and baud rate. You should be able to talk to the remote device. If not, figure out why before you run the regular program. If your serial device isn’t text-based, you might have more luck with cutecom but, alas, the program knows your fake serial port is fake and won’t let you select it. On the other hand, the program is open source, so you could easily create a local version that used any device name you like. There are other choices, of course. For example, gtkterm will let you pick up the fake serial port.
If you run into a protocol error, you may find that the serial port has moved (e.g., it was /dev/ttyUSB0 and now it is /dev/ttyUSB1) or you have an invalid baud rate. The error message isn’t very helpful, but don’t forget to use the -d option in ser2net while troubleshooting.
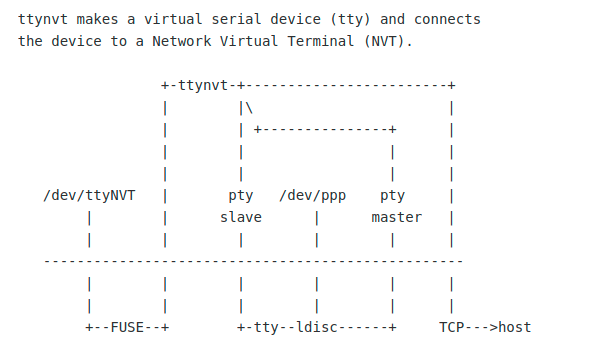
ttynvt program doesn’t have great documentation graphics, but they are accurate.When you do run the regular program, it might work. However, it also might throw an error or, in some cases, refuse to let you select the file because it isn’t really a serial port. In some cases, you are simply out of luck. However, a smarter client that understands the serial port might help, too. The ttynvt program is one example of that. You will probably have to build it from source, but it is very easy to do that. it does depend on libfuse, but otherwise doesn’t need anything exotic.
Once you have it built, try something like this:
sudo src/ttynvt -M 199 -m 6 -n ttyNET0 -S 10.1.1.125:7777
This will create the /dev/ttyNET0 device (so you need to be root). On my system, the new device had read and write permissions set for root and the dialout group. You might need to check and fix the permissions, though, depending on your setup.
Again, test with picocom, and then try your target program. Cross your fingers!
Why, Oh Why?
My original goal was to run Lightburn software for my laser cutter on a big machine using a remote desktop. I wanted the laser cutter plugged into the USB port on the local machine and have the software talk to a fake port on the bigger computer.
Alas, as of today, Lighburn is too smart for my naughty tricks and refuses to show my virtual serial ports. There’s no way that I know of to force it to use a file name of my choice, so I can’t even try to see if it would work. However, I was able to test the setup with some other G code software and it does work. I’ve mentioned this to Lightburn, so maybe it will be fixed by the time you read this.
The paradigm that “everything is a file” is very powerful. Unfortunately, every year it gets less true and that causes more hoops to jump through when you want to do something interesting like this. Still, in true Linux fashion, there’s always a way to get there. I have no doubt that I could trace the calls Lighburn is making to open the port and find a way to fake them for the serial client. I’m hoping, though, that I don’t have to.


Just as an FYI to future readers. The ser2net configuration syntax changed to a YAML output with the jump to Version 4.0.
The underlying code didn’t change so It should be just as functional.
For Example:
20108:raw:0:/dev/ttyACM0:115200 8DATABITS NONE 1STOPBIT
becomes:
connection: &con01
accepter: tcp,20108
connector: serialdev,/dev/ttyACM0,115200n81,local
There are some other documented changes as well. Check the version that ships with your distribution.
I suggest to run Lighburn with strace, once with a “true” serial port it recognizes, and once with the virtual serial port. Then compare the traces to see where it begins to differ.
Once you know where the problem is, you could use LDPRELOAD to change the syscalls to match the output to what the program expects.
It appears that LB uses QT which grabs the serial ports from udev. I don’t think ser2net registers with udev. There are a few possible answers to that, but I’m still working on it.
This is precisely what I just wanted to suggest :-)
Nice article, I actually did something very similar to this about a year ago. I picked up an old serial-controlled power strip (Baypath RPC-4?) for remotely rebooting a security camera setup when it periodically ‘wedged’. A hard power cycle would restore operations, but when I was 500 miles away, and it needed a local device with a serial port, I looked into ser2net and socat.
The controlling PC runs a minimal buildroot instance, with not much more than ser2net installed. From there it travels 500 miles over a VPN connection to my house, where I can run socat as mentioned above, and create a virtual local serial port. Starting GNU Screen pointed to it works great and I’m able to access the ancient interface.
socat also works as mentioned above on the Mac, with no surprises that I’ve found so far…
Don’t know how everyone got conned into using a proprietary piece of software (Lightburn) for laser cutters. Is grbl and laserweb really that useless to ya’ll? It’s rough being a K40 owner who wants to upgrade their mainboard and find everyone is perfectly okay with $$$ proprietary options that don’t even have source code so you can’t fix problems like this when the one it comes with has great open source software, Meerk40t.
+1
+1
I was liberated from configuring minicom with “screen /dev/ttyUSB0 115200”. What a refreshment from confuring minicom. If you are old enough, you might have tried to configure a modem under Linux in the nineties to connect to the internet…
If you are old enough, you might have tried to configure a modem under Unix SystemV/386 in the eighties to connect to the internet… ;^)
In the early 80’s / late 70’s it was Bulletin Boards, not Internet.
Even to the late 90’s as i did run one till 3-01-2000 then is was over caused by the Y2K bug(s).
In the world of “IoT”, we still stuck using async char steam based communication? Really?
We turn USB from a packet based protocol with checksum and resends back to a steam based.
Is it that hard to make communicate with raw USB packets? I have done that since VUSB was a thing and still haven’t used serial port stuff. For debug fine, but really for production code?
On my Windows machine I use USB to serial dongles with the ID EEPROM, windows can uniquely identify the serial ports even if I swap or plug them in new ports and the assignment survives reboots.
“Is it that hard to make communicate with raw USB packets?”
USB has some severe disadvantages. Lousy connectors, length limits and too bloated for simple tasks, just to mention a few. Async with RS-422 signalling can do 100kbps at >900m distance and needs about ten lines of assembly code to set up. Try that with USB!
+1,000
More like ^1,000
Hi! If you want a real serial port, just use usbip to forward it over the network. If will appear like a real serial device, because it’s the usb device passed over instead of emulating a serial port.
(Of course this requires using a usb to serial adapter, which is what I use on a pi with my 3d printer.)
You can also “normalize” your client serial port using two paired usb-tty converter.
You might want to have a look at that: https://github.com/lcgamboa/tty0tty
Its not exectly what you want but like this ist might be possible to mask the socat/ser2net stuff away from Lighburn.
+1 for tty0tty, it works great
Just one quibble, “everything is a file… in true Linux fashion, there’s always a way to get there”.
That’s UNIX, that is, and Linux copied it later.
“That’s UNIX, that is, and Linux copied it later.”
That was the whole reason of Linux, a free ,GPL, version of UNIX iso a costly comercial version.
As an alternative to ser2net on a PC or SBC, an ESP32 or ESP8266 can be a very effective UART forwarder, with a lot less to go wrong – no writable filesystem on SD (for example) to get corrupted, much lower power consumption, etc, etc.
There is a very mature firmware for ESP8266 called esp-link (https://github.com/jeelabs/esp-link).
I have also had great success with ESPHome on ESP32 (which actually has 3 serial ports, should you need that many). This requires a custom StreamServer component, which I found here: https://gist.github.com/oxan/4a1a36e12ebed13d31d7ed136b104959. A small modification to the constructor allows multiple instances to be created trivially. I am using this to connect my Texecom Premier alarm panel to my home network, rather than shell out for the official (expensive) COMIP or COMWifi peripherals.
+1 for esp-link. I keep a couple ESP8266s around with it installed, just b/c it’s always handy. Telnet in, done.
The web config page is very handy for troubleshooting, and if you configure a reset pin, you can even reboot the device in question remotely when it really gets wedged.
If your serial port comes via a USB adapter, you could transport it at the USB layer instead of the serial layer using the USP/IP project code. It’s in the linux-tools-common package on ubuntu. http://manpages.ubuntu.com/manpages/precise/man8/usbip.8.html
Thanks for this. I couldn’t find it until I found out that the package is called linux-tools-common.
If you’re writing perl, you can use Device::SerialPort and it all becomes easy. My own LAN of things uses this here and there, as do most of my physics data aq setups – handy for example when using arduino slaves with a pi master, to get IO expansion and more time-deterministic data acquisition – as well as that fast counter than almost all other popular uPs lack these days.