It would be great if you could create your own filament. On the face of it, it seems easy to do, but as [Thomas Sanladerer] found out when he was a student, there are a lot of details that can bedevil your design. His extruder sort of works, but he wouldn’t suggest duplicating his effort. In fact, he hopes you can learn what not to do if you try to do it yourself.
In all fairness, [Thomas] was a low-budget student and was trying to economize. For example, he tried using a drill to drive the auger. Why not? It looks like a drill bit. But he found out that wasn’t satisfactory and moved to a pair of wiper motors with their built-in gear train.
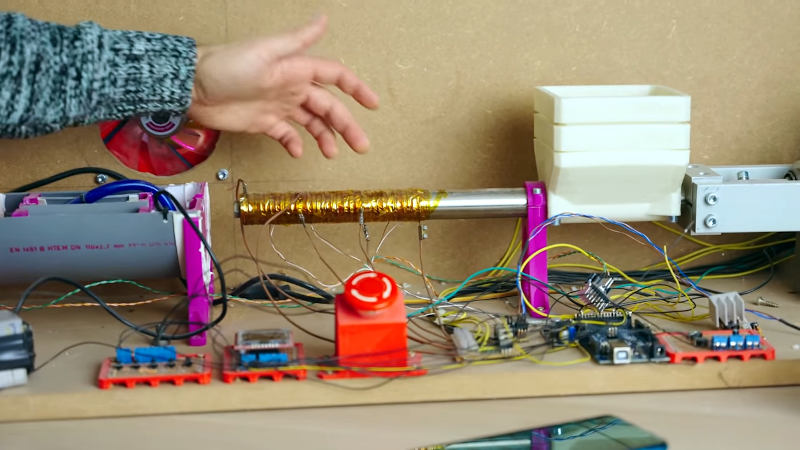
The wiper motors allowed him to get some ABS filament, but the machine had more troubles. Other lessons learned were to keep the water cooling tank closed so water doesn’t splash out onto electronics, and that it is hard to look at filament with a CCD sensor.
The controller is a simple Arduino. There are three heat zones before the plastic reaches the die. As you might expect, there’s a PID controller to regulate the machine.
[Thomas] says the flow rate was too high, so slowing down the production might have helped. A smaller auger is also on his list of things he’d do differently in hindsight. The melting area needed a heatbreak much like a 3D printer’s hotend to keep hot plastic from creeping towards the cooler part of the tube and clogging.
With his current experience and a bigger budget, we have no doubt he could end up with a workable extruder. As it is, we always enjoy learning from other people’s suboptimal builds. It is a little humbling to show you failed projects on the Internet, but it is a valuable service, indeed.
We want an extruder that can recycle our junk parts. We’ve seen some really cheap builds, but we don’t really know how well they work.


The real wtf is the trade name for the ABS resin pellets. “Polylac”, really?
Not sure why your reaction. For example ‘Cycolac’ is another ABS plastic trade name, and that goes back to the 1960s.
I’m not exactly a save the whales type but I do want to try to recycle all my old support material and failed prints for both economical and environmental reasons. However it’s mostly economical with the small bins I have at the moment. I have not found a reliable diy kit for such a task for even under $1k all said and done. Shredding and extruding I mean. Perhaps if I had my own machine shop it’d be feasible.
I applaud anyone attempting to make this happen especially the guy that used an old paper shredder, that was comical. There may be some combination of cheap parts out there that can make it happen but I don’t have the time to search, so until then my bins will sit patiently full of plastic.
One thing you can do pretty simply is just heat and smash the stuff into sheets. Get it hot enough to really soften and clamp some thickish preheated steel plate to it till it cools – a normal domestic oven can get hot enough for most filaments. Done so primitively don’t expect great results and don’t try to make really thick and large sheets, but still useful base material to play around with, that step above CAD (cardboard aided design) but before proper 3d modelling in that other CAD and whatever steps you end up taking to make it real…
As always be careful with hot things..
Is it possible to rig up a 3D printer to print directly from plastic granules?
Yeah, but it has many drawbacks: slow, inconsistent, and expensive.
You can find some examples on youtube with “pellet 3d printer”