Some of the most expensive hobbies have some of the more ingenious hacks on display, generally to lower the cost of entry to various parts the hobby itself. Amateur astronomy has expensive, necessary equipment such as telescopes and other optics, but also has a large group of people willing to build their own gear out of some surprising materials rather than buy pre-built equipment.
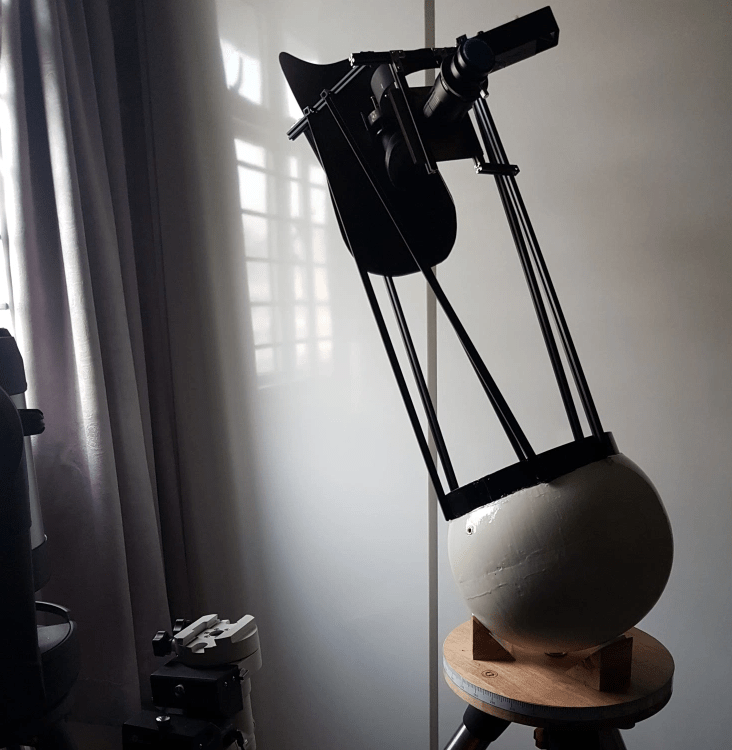
One of the latest telescopes from [The Amateur Engineer] uses several bowls from IKEA to build the mirror mount. It’s a variation of a Portaball telescope, which is similar to a Dobsonian telescope except that it is much easier to adjust and point in any direction. This “Portabowl” telescope uses two bowls epoxied together and weighted at the bottom as the core of the build. The mirror mounts inside the ball, and some supports are attached to it to hold the eyepiece and mount. With some paint and some minor adjustments it’s ready to go stargazing.
There are a few improvements to this build planned for the future, such as the creation of a larger ball that will make operating the scope easier. All in all, though, it’s an excellent example of amateur astronomy even without needing to go as far as grinding one’s own mirrors.


I made a 300mm ballscope based on an Ikea lamp. https://youtu.be/s16wwMrLlEA
Nice work, nice telescope (and nice telescope name), you should do an article on it.
Thanks! The name comes from a song of an Italian comedy rock band, where they make jokes about 30cm (12″), “art”, and the (in?)famous actor. :)
I wasn’t expecting you to just pick up the primary and set it in like that. Nice scope.
A telescope is the lense and mirror. If those can’t be had cheap, then nothing from Ikea is going to make a cheap telescope.
Are people still grinding their own? Apparently a long process, and it has to be precise. Or are they buying, which can’t be cheap? Edmund Scientific used to have a lot of surplus for telescope building, but they faded away, and you don’t hear about some other company selling surplus lenses (at least not outside of build your own telescope circles).
The topic deserves more than some flash about Ikea.
I know one local astronomy club had a telescope building contest up till a few years ago (I assume it still happens, but not certain). Better to focus on something like that.
Concrete casting molds, $27 each?
https://www.ebay.com/itm/12-half-sphere-poly-plastic-mold-cast-100s-12-across-plaster-concrete-mould/143760395537
Search ebay for: sphere 12″
and see many options.
So for most trackball scopes you need more that a hemisphere. I used this 16″ lighting globe (https://www.1000bulbs.com/product/7569/3202-16020-010.html) which I then strengthened with resin and fabric on the inner surface. If I had to do it again, I would just use fiberglass and resin, but the acrylic sphere works really well.
Oh nice, link to similar thing on amazn with a price:
https://amazon.com/Acrylic-Lamp-Post-Neckless-Opening/dp/B0086OHQ7W
Or in 14″
https://www.amazon.com/dp/B00435MT16/
Although the opening is only 5.25 Inch, material would have to be removed to be able to fit the mirror in it.
Yes, I did have to cut the top off to enlarge the hole. That was a very precarious maneuver. I used a power jig saw, but I would suggest anybody trying this to do it was a fine tooth coping saw. Its gonna take a long time, but you really need the control of the hand saw. I completely cracked my first sphere, and the second one has a few small cracks where I almost shattered the whole second sphere.
Brilliant! I have something like this rolling around in my garden. (Brought back after a drunken night out…) I never got around to using it for lighting… I had forgotten I had it until I read this!
Yes it too will need the opening widening to the diameter of the mirror to let the light in and out. The angle grinder and slitting disc can sort that out.
I also just had another great idea – the bit I chop off to widen the hole, flip it over, and it will make an ideal support ring for the ball to rest in.
GSO makes most of the mirrors that can be purchased for a reasonable price. A 10″ F/5 by GSO, with a secondary can be had for $330. https://agenaastro.com/gso-parabolic-primary-secondary-mirror-set-10-f-5.html
Also, there are many people still grinding mirrors, but for personal use, and for sale to amateur builders. Those ones are definitely not cheap
When you grind a mirror, you need a “tool”, which is basically another piece of glass as big a the mirror. That is surprisingly expensive the bigger you get. Supplies are not cheap. and pushing more than an 8″ piece of glass is somewhat physically demanding and requires space. then, there is the aluminizing. Even if your labor and skills are free, the savings aren’t that great, as I understand it, what you “get” is the skill development and satisfaction of doing it yourself.
It’s a real commitment of time and energy. What serious mirror grinders do is build themselves “machines” that do a significant amount of the deep grinding, leaving the fine figuring to be done by hand.
A tool of the same diameter as the mirror is convenient and was once considered almost essential, but many of today’s amateurs hand-grind with a smaller-diameter tool made of (for example) dental stone topped with glass or ceramic tiles. Mel Bartels has even used wood as a base for the tiles. https://www.bbastrodesigns.com/tm.html#myTelescopes
For initial grinding of the rough curve with coarse abrasive, some workers even use an iron barbell disk. Once the proper depth is reached a tool is made to fit the curve, and successively finer abrasives are used to smooth the surface prior to making a “lap” for polishing.
Generating the curve with a full-diameter tool requires that the mirror disk be on top of the tool, but sub-diameter tools are frequently used on top of the mirror.
I had a 14″ quartz disk that had been ground completely and was almost done polishing when it was accidentally destroyed. :(
I ground an 8″ mirror years ago, both for the experience and also because back then it was cheap (time is always free).
These days for the cost of aluminizing my ground blank I can buy an almost as good mirror off eBay or AliExpress. (And if not careful you may get a spherical mirror which you really don’t want.)
There are lots of amateur telescope making resources online. Grinding and figuring one’s own mirror isn’t particularly hard, just requires patience and attention to detail. It’s a lot easier to find resources when you spell the critical terms, like “lens” correctly, though.
Do they still call grinding your own lens/mirror “walking around a barrel”?
Being able to move completely round the work is useful, but not absolutely essential. People have made small mirrors on a table corner, swinging through 90 deg. Then you also have to turn the “fixed” part occasionally too.
Nope mirror are not that expensive. Neither extremely complex to do: “How to make a telescope” by Jean Texereau.
Written in the 50/60’s with France post war scarcity in mind.
On the other hand eyepieces are expensive, but china solved that problem long ago.
While it’s not like Edmund Scientific of old, which is still in business but sells high priced optical components for science research and military uses, this site has good prices on a range of optical components, with some surplus items.
https://www.surplusshed.com/
This looks interesting, where can I get a cheap quite spherical ball which is bigger than he ones featured here?
I already have a 12″ mirror bought cheap off eBay, a secondary bought cheap off Aliexpress, focuser, nice eyepieces, metal for the trusses etc.
My main issue is that the mirror focal length is around 5 feet. So the lower to the ground the mount is, the better!
So – maybe an old fishing bouy or something like that?
yeah that’s the struggle with all portaball-descended designs! that’s why the use of two bowls to make a sphere is a hack.
just thinking out loud here, i wonder if you could put a rigid skin on one of those big rubber balls they sell out of metal cages at the supermarket. using fiberglass, could you make a smooth enough finish to slide around on your base? not my specialty but it seems like if you don’t stop sanding until it’s good enough, it’d be good enough. :)
My hack was different and much simpler. I realized that, if you tilt the mirror, half ball is more than enough. I used an ikea lamp which is slightly less than half ball, in stainless steel. For more details, check my previous message out.
I used a 16″ acrylic lighting globe to make my 10″ f/4.5 scope. For the mount I typically use a 5 gal bucket. If I’m in a super dusty place (like Oregon Star Party) I have a 3d printed mount with a grove for a 6″ teflon o-ring, and I wax the polished outer surface of the ball.
“This looks interesting, where can I get a cheap quite spherical ball which is bigger than he ones featured here?”
That is a good question. I have used boot-sale bowling balls for a number of projects, but likely a bit small for your need.
For a telescope base, “quite spherical” might overstate the requirement. Fairly so is probably fine, as long as it can be supported and stable in any position.
Maybe a walking globe (circus-arts type balance prop)? about 600mm diameter. Oh. Wait. Not cheap, unless you find one at a boot sale.
A pair of acrylic (plexi, perspex, PMMA) skylight forms? When last I looked, a couple years ago, they were still available as half-spheres, and were pretty well faired, though not cheap. Less pricey than a walking globe, though.
You might need to make your own. Fibreglas isn’t that hard to work with.
Not cheap, but super spiffy, are these stainless steel spheres made for Van de Graaf generators:
https://unitednuclear.com/index.php?main_page=product_info&cPath=90&products_id=743
It doesn’t say how thick the stainless is, unfortunately. They might require re-enforcement. I bet they are super slippery, though. They only have 3.5″ openings, but that could be fixed with a Dremel and some grinding disks.
Does it have to be a sqhere though? You could built a mechanism with two rotating axis and friction linkages to let it sit in its position if let loose.
I’ve made one of these! (on imgur, the album is at *gallery/6vpXT3R).
I have a 10″ F/4.5 mirror in mine, so I needed a 16″ sphere. I ended up using an acrylic lighting globe from 1000bulbs[.]com. And then I used polyester resin and fabric to strengthen the globe.
The main tube is a tensegrity structure, with a 3d printed secondary holder/helical focuser. For the stand I use a 5 gallon bucket. Name brand buckets from HD or Lowes actually work a lot better than the generic buckets from walmart.
My whole scope weighs under 20lbs (most 10″ scopes typically weight 75lbs), and thanks to the tensegrity design, it only takes 5min to setup.
Thanks that looks handy. Do you get any odd diffraction effects from your secondary mounting arm?
I suppose it’s imperative to keep the main structure light, so the mirror keeps the centre of gravity low.
But I’m also wondering about adding a camera, the extra weight of that (at the far end of the ‘tube’) might be too much, requiring extra ballast behind the mirror.
Has anyone made a telescope mirror by stretching reflective Mylar across a strong ring with a precisely machined top edge and inner diameter at that end, then with the ring mounted and sealed to a strong back plate – pulled a vacuum to draw the Mylar into a parabola?
Someone did that on a large scale for a DIY surround mirror for a flight simulator.
I’ve contemplated this idea a lot in the last few years of telescope building, and I don’t think the resulting mirror will be precise or stable enough. Across a night of observing, even a 1 inch think slab of glass can move enough to require realignment due to thermal contraction caused by the mirror cooling down. While a mylar film could have a smooth enough surface, I suspect that the ambient pressure will change enough across the night that you would need some active, and highly precise, pressure management to maintain the correct focal distance. Without that, the eyepiece would constantly be out of focus.
This cheap 10″ (254mm) mirror (https://agenaastro.com/gso-parabolic-primary-secondary-mirror-set-10-f-5.html) has a surface quality of 1/16 wavelength RMS. The tolerances on the mirror shape are similarly tight, so even miniscule atmospheric pressure change would have a noticeable impact on the mirror performance.
The thing to remember is that telescope mirrors are just big light buckets. With that mirror you’re taking 50670mm^2 of collected light, and trying to send it through an exit pupil with 38mm^2 (7mm dia). So any deviation in the mirror shape is going to be very noticeable at the focal point
The bigger you go, the more it averages out though. If you could make a dustbin lid sized mirror for the cost of a decent 6″ and the performance of a middling 12″ it might be worth it.
It’s not going to be that much of a vacuum you have to pull on it, so the most thermally stable gas you can find, is what you’d want to flood it with first. Nitrogen comes to mind, as it is supposed to be a bit less expansive in tires, but not sure if you can do better with something a little more exotic. Or I guess you could put a heater wire inside it to keep it at a set temperature, 10C or something.
Though holy crap, mirrors have got really good and cheap since I last looked seriously 10 years back. That GSO set, you could barely get the glass blanks for that money, and GOOD mirrors were 1/4 wavelength accurate when I first thunk about it.
Thermally stable gas? Ahhh, one that doesn’t obey Boyle’s law.
I was told that one reason for the low cost of today’s mass-produced telescope mirrors is the meaning of “guaranteed 1/8 wave” or similar. It does not mean that every mirror will be of that quality. It means that if the mirror does not have that quality, it can be returned and exchanged.
Anyone seriously considering the purchase of a large mass-produced mirror should learn how to build and use a Foucault or Ronchi tester or a simple interferometer, so as to determine the actual curve.
Some high-quality mirrors produced by skilled professionals (or advanced amateurs) are sold to serious amateur astronomers. Such mirrors are about an order of magnitude more expensive than mass-produced mirrors.
There’s the idea of a liquid mirror.
https://en.wikipedia.org/wiki/Liquid-mirror_telescope
Bernard Schmidt, originator of the Schmidt camera, the predecessor to the popular Schmidt-Cassegrain telescope, used this technique to create the complex curve needed for the corrector lens. A glass disk was used instead of Mylar. The metal ring had to be of a precise diameter relative to the glass. When vacuum was applied the disk deformed in a pre-calculated fashion. This disk was ground and polished (tool on top). When the vacuum was released the disk would spring back up with the proper curve on it.
For the accuracy required ( around 200nanometres) sound waves would be a big problem.
I once used an Ikea stainless salad bowl to build my first potstill. It fitted exactly onto the electric cooking pan and I sealed it with a rubber tube to keep the fumes in.
It worked for about two years and then I started building larger potstills out of copper.
But Ikea made it all possible.
I don’t have a Dobsonian myself but the one I’ve been allowed to look through seem to be quite easy to move, both in altitude and in azimuth. “Buttery smooth” is the term often applied, as long as it’s been made and balanced properly; PTFE bearing on a particular type of composite countertop (Formica) material.
It sounds as though the gravel+epoxy makes this scope a fair bit heavier than a similar Dob. The author has undoubtedly used a Dob; is the motion of the ballscope improved enough to make it worth the hassle of lugging a heavier scope in and out of the car, house, etc.?
More than a few would-be enthusiasts eventually are put off by the struggle with a big, heavy scope.