For all of us fascinated with 3D printing, it’s easy to forget that 3D printer jams are an extra dimension of frustration to handle. Not to mention that our systems don’t really lend themselves well to being easily disassembled for experiments. For anyone longing for a simpler tune-up experience, you’re in luck. [MihaiDesigns] is dawning on what looks to be a cleanly designed solution to nozzle-changing, servicing, and experimenting.
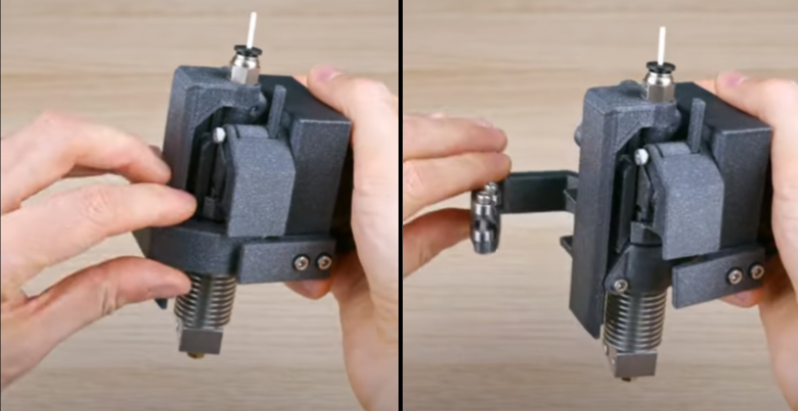
The video is only 39 seconds, but this design is packed with clever editions that come together with a satisfying click. First, the active part of the extruder is detachable, popping in-and-out with a simple lever mechanism that applies preload. For consistent attachment, it’s located with a kinematic coupling on the side with a magnet that helps align it. What’s neat about this design is that it cuts down on the hassle of wire harnesses; tools are set to share the same harness via an array of spring-loaded pogo pins. Finally, a quick-change extruder might be neat on its own, but [MihaiDesigns] is teasing us with an automatic tool change feature with a handy lever arm.
This is a story told over multiple sub-60-second videos, so be sure to check out their other recent videos for more context. And for the 3D printing enthusiasts who dig a bit further into [MihaiDesigns’] video log, you’ll be pleased to find more magnetic extruder inventions that you can build yourself.
The world of tool-changing 3D printers is simply brimming with excitement these days. If you’re curious to see other machines with kinematic couplings, have a peek at E3D’s toolchanger designs, Jubilee, and [Amy’s] Doot Changer.


Hotend heater current and pogo pins aren’t a good combination in my opinion.
At my work we regularly run >1kW through pogo pins for some of our end effectors, admittedly with axial mateups, far more pins and from a reputable connector manufacturer, and haven’t had any problems. I’m not in love with his implementation of them (though it looks fine IMO), I’d much rather axial mateup, but pogo pins aren’t necessarily evil.
I’m coming from service/repair type of job and when I look at something my mind goes: what could possibly go wrong. I had few consumer grade devices using pogo pins as some kind of quick connect, which after not a lot of time developed issues with them, so I’m a bit sceptical. Looking at that swapping mechanism I’m wondering how hard is it to accidentally dislodge from its mount (i.e. after collision with print or printer bed) as it looks like it doesn’t require much force to do a hotend swap. I’m also curious how much of software modification is required to thermal runaway protection to make it work properly as the thermistor is routed thru pogo pins and disconnecting it will halt the printer.
on a 24v printer, 50W hot end only means 2A and change
Hard to tell the size from video but typical 1.5 mm diameter pogo pin is rated at 2A max. I hope the pins are bigger.
All Bayonet light fittings are pogo pins 240v rated to well over 60w (usually at least)… I actually salvage as many of those fittings as I can when they break they are very handy for many things – like a project I need to finish at some point to recharge a cordless tool – plugging in cables manually is soo old fashioned and inconvenient (but not enough to have made it a priority task, so it will get done when the 3d printer is fixed, which will happen after the mill is fixed I expect, which will happen when it either can’t be used at all, or I really need to work in the x axis again (seems the crappy thing’s screw bent))..
Will echo fiddlingjunky though and say you really want to use them correctly, rather hard to tell if they are seeing any real abuse above, but it looks alright.
You could have all of the hotends permanently wired (in the same way that the Bowden tube is permanently connected). Then just use relays to power up the heater in use.
Do people actually have issues with jams?
I’ve had my chinese i3 for five years and I’ve had at most two jams, and those were in the first few months. I’ve upgraded the hotend from a knock-off to a genuine E3D but I didn’t have any issues with jams for the year or so it ran with the original either.
Yeah, in the early days with shoddy filament it was an issue. I don’t think I’ve had a straight up jam in over 2 years (been printing for almost a decade with 6 different machines).
IMO the only big hurdle left to have 3D printing in every home is bed leveling. Once a nozzle driven force-feedback method is perfected for mesh bed leveling, we’ll see an even bigger boom than C19 mask production drove.
It wasn’t only a filament problem. The early extruder drives typically had no springs to provide give in the case of uneven filament, and the first springs were very stiff and either slipped or deformed the filament on their own. The improvements in extruders started the path towards ending jams and the change to 1.75mm and better shaped filament put jams firmly in the past.
Great idea and looks nice.
I doubt alignment and calibration will be precise enough. Must be at least your printers resolution (0,01?).
That’s a hard demand to fulfill even with (metal) machined parts – heat and mechanical wear and tear.
Addtionally, risk of different extruders (heater, thermocouple) variations is high.
That’ll be a no from me.
Hard to tell which surfaces are really the geometrically important ones – but the core latching concept certainly can be very repeatable if done correctly, and it only needs to be held stably. As it really doesn’t matter how varied the other extruders are, as long as the gcode generation or machine has a concept of tool offsets – so it thinks “I just loaded tool 2, its -2mm out in x direction and +0.5 longer in z, so I shall account for this”. Most cnc machines, and even DRO have a tool library concept for this very reason.
The biggest thing I would worry about is keeping the cold side of the hot end cold enough – looks like its somewhat wrapped up, and has no active cooling, and any parked tools won’t even get the printers motion through the air to help cool them.
Yes, but, vertical video?
Wait, that wasn’t supposed to be a reply. It was supposed to be a new comment.
I have nearly the same thing drawn on my whiteboard at my shop :) Except my design has independent heater wires on every hotend that is toolchanged. Glad to see others thinking along the same lines though.
Give us a preview when you have one built. Would love to see it.
I’ve had no issues once I swapped in a Mosquito hot end. It is amazing all the other hacks people will go vs. just applying materials science and proper heat transfer theory, e.g. the heat break really needs to break the temperature gradient.