A Lot Of Effort For A Pi Laptop

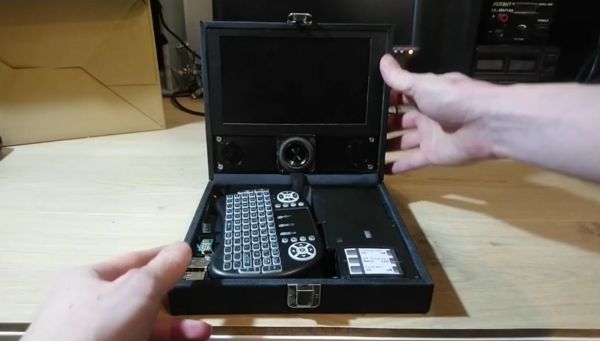
Building a Raspberry Pi laptop is not that uncommon. In fact, just a few clicks from any of the major electronics suppliers will have the parts needed for such a project speeding on their way to your house in no time at all. But [joekutz] holds the uncontroversial belief that the value in these parts has somewhat diminishing returns, so he struck out to build his own Pi laptop with a €4 DVD player screen and a whole lot of circuit wizardry to make his parts bin laptop work.

The major hurdle that he needed to overcome was how to power both the display and the Pi with the two small battery banks he had on hand. Getting 5V for the Pi was easy enough, but the display requires 8V so he added one lithium ion battery in series (with its own fuse) in order to reach the required voltage. This does make charging slightly difficult but he also has a unique four-pole break-before-make switch on hand which doesn’t exactly simplify things, but it does make the project function without the risk of short-circuiting any of the batteries he used.

The project also makes use of an interesting custom circuit which provides low voltage protection for that one lonely lithium battery as well. All in all it’s a master course in using some quality circuit-building skills and electrical theory to make do with on-hand parts (and some 3D printing) rather than simply buying one’s way out of a problem. And the end result is something that’s great for anything from watching movies to playing some retro games.

Continue reading “A Lot Of Effort For A Pi Laptop”

Treatment Triggers Teeth To Thrive

We humans like to think we’re pretty advanced, but we can’t regrow missing teeth in adulthood like sharks, alligators, and crocodiles. Once those pearly whites are gone, they’re gone for good, and we don’t even have a way to regenerate the protective enamel. However, this may not always be the case, because scientists at Kyoto University and University of Fukui in Japan have discovered a monoclonal antibody treatment that triggers tooth regeneration in laboratory mice.

Image by Katsu Takahashi/Kyoto University via Medical Express

Monoclonal antibodies are lab-fabbed molecules that act as substitute antibodies to enhance the body’s natural defenses against diseases like cancer and arthritis. These antibodies are also used to develop vaccines and treat COVID-19. In the case of cancer, monoclonal antibodies bind to antigens on cancer cells, effectively flagging them for removal, but they also do much more, such as deliver chemo and radioimmunotherapies.

By blocking the gene USAG-1, the scientists saw an increase in Bone Morphogenic Protein (BMP), which is a molecule that dictates the number of teeth a given creature will have in the first place. Because of this increase in BMP, the mice were able to regrow teeth. This proposition was a challenging one — BMP affects other aspects of development, and the early attempts did more harm than good by causing birth defects. The good news is that the treatment also worked in ferrets, whose teeth are much closer to human dentition than mice. Before moving on to human trials, the scientists will test it out on pigs and dogs. If you were given a second shot at a set of teeth, would you treat them better than the first, or even worse because you can just grow new ones again?

Speaking of pigs, it seems that pig-to-human organ transplants are on track for 2021.

Garage Door Controller Gets The IoT Treatment

[TheStaticTurtle] built a custom controller for automating his garage doors. He wanted to retain the original physical button and RF remote control interfaces while adding a more modern wireless control accessible from his internet connected devices. Upgrading an old system is often a convoluted process of trial and error, and he had to discard a couple of prototype versions which didn’t pan out as planned. But luckily, the third time was the charm.

The original door-closer logic was pretty straightforward. Press a button and the door moves. If it’s not going in the desired direction, press the button once again to stop the motor, and then press it a third time to reverse direction. With help from the user manual diagrams and a bit of reverse-engineering, he was able to get a handle on how to plan out his add-on controller to interface with the old system.

There are many micro-controller options available these days when you want to add IoT to a project, but [TheStaticTurtle] decided to use the old faithful ESP8266 as the brains of his new controller. For his add-on board to work, he needed to detect the direction in which the motor was turning, and detect the limit switches when the door reached end of travel in either direction. Finally, he needed a relay contact in parallel with the activation button to send commands remotely.

To sense if the motor was moving in the “open” or “close” direction, he used a pair of back-to-back opto-couplers in parallel with the motor terminals. He connected another pair of opto-couplers across the two end-limit switches which indicated when the door was fully open or closed, and shut off the motor supply. Finally, a GPIO from the ESP8266 actuates a relay to send the door open and close commands. The boards were designed in EasyEDA and with a quick turnaround from China, he was able to assemble, test and debug his boards pretty quickly.

The code was written using the Arduino IDE and connects the ESP8266 to the MQTT server running on his home automation computer. The end result is a nice dashboard with three icons for open, close and stop, accessible from all the devices connected to his home network. A 3D printed enclosure attaches outside the original control box to keep things tidy. Using hot melt glue as light pipes for the status LED’s is a pretty nifty hack. If you are interested in taking a deeper look at the project, [TheStaticTurtle] has posted all resources on his Github repository.

Homebrew RISC-V Computer Has Beauty And Brains

Building your own CPU is arguably the best way to truly wrap your head around how all those ones and zeros get flung around inside of a computer, but as you can probably imagine even a relatively simple processor takes an incredible amount of time and patience to put together. Plus, more often than not you’re then left with a maze of wires and perfboards that takes up half your desk and doesn’t do a whole lot more than blink some LEDs.

An early prototype of the Pineapple ONE.

But the Pineapple ONE, built by [Filip Szkandera] isn’t your average homebrew computer. Oh sure, it still took two years for him to design, debug, and assemble, his 32-bit RISC-V CPU and all its associated hardware; but the end result is a gorgeous looking machine that runs C programs and offers a basic interactive shell over VGA. In fact with its slick 3D printed enclosure, vertically stacked construction, and modular peripheral connections, it looks more like some kind of high-tech scientific instrument than a computer; homebrew or otherwise.

[Filip] says he was inspired to build this 500 kHz (yes, kilohertz) beauty using only discrete logic components by [Ben Eater]’s well known 8-bit  breadboard computer and [Robert Baruch]’s LMARV-1 (Learn Me A RISC-V, version 1). He spent six months simulating the machine before he even started creating the schematics, let alone design the individual boards. He tried to keep all of his PCB’s under 100 x 100 mm to take advantage of discounts from the fabricator, which ultimately led to the decision to align the nine boards vertically and connect them together with pin headers.

In the video below you can see [Filip] start up the computer, call up a bit of system information, and even play a rudimentary game of snake before peeking and poking some of the machine’s 512 kB of RAM. It sounds like there’s still some work to be done and bugs to squash, but we’ve already seen enough to say this machine has more than earned entry into the pantheon of master-crafted homebrew computers.

Continue reading “Homebrew RISC-V Computer Has Beauty And Brains”

Removable Extruder Pulls Out The Stops On Features

For all of us fascinated with 3D printing, it’s easy to forget that 3D printer jams are an extra dimension of frustration to handle. Not to mention that our systems don’t really lend themselves well to being easily disassembled for experiments. For anyone longing for a simpler tune-up experience, you’re in luck. [MihaiDesigns] is dawning on what looks to be a cleanly designed solution to nozzle-changing, servicing, and experimenting.

The video is only 39 seconds, but this design is packed with clever editions that come together with a satisfying click. First, the active part of the extruder is detachable, popping in-and-out with a simple lever mechanism that applies preload. For consistent attachment, it’s located with a kinematic coupling on the side with a magnet that helps align it. What’s neat about this design is that it cuts down on the hassle of wire harnesses; tools are set to share the same harness via an array of spring-loaded pogo pins. Finally, a quick-change extruder might be neat on its own, but [MihaiDesigns] is teasing us with an automatic tool change feature with a handy lever arm.

This is a story told over multiple sub-60-second videos, so be sure to check out their other recent videos for more context. And for the 3D printing enthusiasts who dig a bit further into [MihaiDesigns’] video log, you’ll be pleased to find more magnetic extruder inventions that you can build yourself.

The world of tool-changing 3D printers is simply brimming with excitement these days. If you’re curious to see other machines with kinematic couplings, have a peek at E3D’s toolchanger designs, Jubilee, and [Amy’s] Doot Changer.

Continue reading “Removable Extruder Pulls Out The Stops On Features”

Teardown: Linkimals Musical Moose

Like so many consumer products these days, baby toys seem to get progressively more complex with each passing year. Despite the fact that the average toddler will more often than not be completely engrossed by a simple cardboard box, toy companies are apparently hell-bent on producing battery powered contraptions that need to be licensed with the FCC.

As a perfect example, we have Fisher-Price’s Linkimals. These friendly creatures can operate independently by singing songs and flashing their integrated RGB LEDs in response to button presses, but get a few of them in the room together, and their 2.4 GHz radios kick in to create an impromptu mesh network of fun.

They’ll soon be back, and in greater numbers.

Once connected to each other, the digital critters synchronize their LEDs and sing in unison. Will your two year old pay attention long enough to notice? I know mine certainly wouldn’t. But it does make for a compelling commercial, and when you’re selling kid’s toys, that’s really the most important thing.

On the suggestion of one of our beloved readers, I picked up a second-hand Linkimals Musical Moose to take a closer look at how this cuddly pal operates. Though in hindsight, I didn’t really need to; a quick browse on Amazon shows that despite their high-tech internals, these little fellows are surprisingly cheap. In fact, I’m somewhat embarrassed to admit that given its current retail price of just under $10 USD, I actually paid more for my used moose.

But you didn’t come here to read about my fiscal irresponsibility, you want to see an anthropomorphic woodland creature get dissected. So let’s pull this smug Moose apart and see what’s inside.

Continue reading “Teardown: Linkimals Musical Moose”

New HackadayU Classes: Antenna Basics, Raspberry Pi Pico, And Designing Complex Geometry

Get ’em while they’re hot: a new session of HackadayU just opened with classes from three fantastic instructors and seats are filling up fast.

Introduction to Antenna Basics — Instructor Karen Rucker teaches the fundamentals of antenna design as if it were your first year on-the-job. She’ll cover the common types of antenna designs and the fundamentals of radio frequency engineering that go into them. Begins Thursday, May 6th.

Raspberry Pi Pico and RP2040 – The Deep Dive — Instructor Uri Shaked guides the class through the internals of the RP2040 microcontroller, covering system architecture, hardware peripherals, and dipping into some ARM assembly language examples. Begins Wednesday, May 5th.

Designing with Complex Geometry — Instructor James McBennett helps you up your 3D modelling game with a course on using complex geometries in Grasshopper3D (part of Rhino3D). Dive into Non-uniform rational B-spline (NURBS) and go from simple shapes to incredibly complex objects with a bit of code. Begins Tuesday, May 4th.

Each course includes five weekly classes beginning in May. Being part of the live class via Zoom offers interactivity with the instructor and other attendees. All tickets are “pay-as-you-wish” with a $20 suggested donation; all proceeds go to socially conscious charities.

For the benefit of all, each class will be edited and published on Hackaday’s YouTube channel once this session has wrapped up. Check out our playlists for past HackadayU courses, or watch them all in one giant playlist.

You might also consider becoming an Engineering Liaison for HackadayU. These volunteers help keep the class humming along for the best experience for students and instructors alike. Liaison applications are now open.

Continue reading “New HackadayU Classes: Antenna Basics, Raspberry Pi Pico, And Designing Complex Geometry”