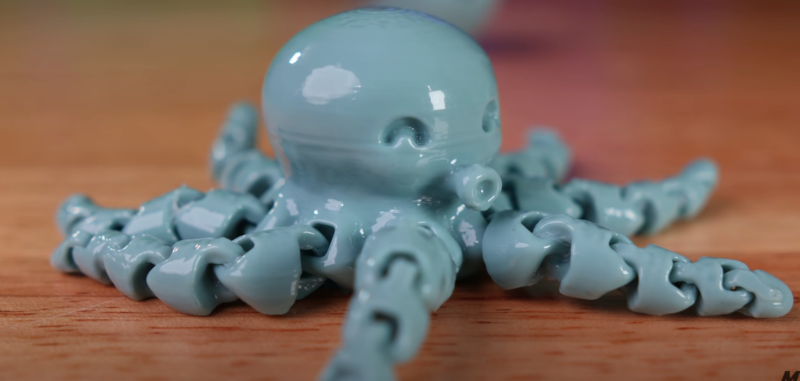
There was a time when most 3D printers used ABS, which is a great plastic for toughness, but is hard to print with since it tends to warp. Worse still, it stinks and the fumes may be bad for you. Most people have switched over to printing in PLA these days, but one thing you might miss with this more forgiving plastic is vapor smoothing with acetone; a smoothed print doesn’t show layer lines and looks more like plastic part that didn’t go through a nozzle.
[Major Hardware] likes the look of vapor smoothed parts, but doesn’t like working with ABS and acetone fumes, so he’s started using Polysmooth. As you can see in the video below, the results look good, but be warned that the filament is relatively pricey. Plus you need to use a $300 machine that atomizes your alcohol into a mist. We feel certain you could do the same thing for less since it appears to just be like a humidifier, but we’d also suggest being careful putting flammable substances in a consumer-grade humidifier and certainly don’t use a vaporizer.
The filament sounds like it is on par with PLA for ease of printing. The material has a higher glass temperature than PLA but less than ABS. The tensile strength and Young’s modulus (a measure of stiffness) numbers are comparable to ABS. Although all smoothing has some imperfections and you probably need to experiment with times and other parameters. The smoothing did fuse some movable joints, so anything that moves or fits together is probably a bad candidate for this process. We’ve also heard that thin-walled parts can get soft in water due to alcohol residue, but you can dry or soak the part clean to avoid that.
If you want to try your own hand at making a mist, this might get you started. After all, if it can handle acetone, we imagine alcohol isn’t any worse. While it isn’t as easy to handle as alcohol, we hear the solvents such as THF or ethyl acetate can smooth regular PLA. Heat guns and open flames are popular, too.


> soak the part clean to avoid that
Soak in what, water? Doesn’t alcohol displace water? Isn’t it used by pros to help dry things!
I guess the water should just dilute alcohol to the point where it doesn’t pose any danger.
You must drink in cheap bars.
Nah, alcohol dissolves readily in water, and vice-versa. Drying things by rinsing them with alcohol works because most of the water will flow away with the alcohol, and then the remaining alcohol evaporates faster than water would.
I’ve tried rinsing something in alcohol a few times, plenty of water did flow away with the alcohol, but I had a headache in the morning.
I find that I don’t really like these smoothing processes. It often blurs details and makes the prints look like they’ve been left in a hazardous environment for a long time. I also tend to prefer matte surfaces to shiny ones. Especially given the price on this process, I think I’d rather just stick to ABS if I absolutely needed something to be smoothed. If I want to hide layer lines, a little sanding and paint works just as well if not better.
smoothing + bead blasting is a good way to have smooth and mate result. But you will loose details for sure
Brazilians work too.
I agree with you here. Also, if I look at the before and after, I still see the same horizontal lines. The “smoothing” processing seems to mostly created a shiny finish.
There also seem some color consistency issues with this filament, it’s clearly darker below the nose of deathpool. The shiny finish also seems to hide this a bit more, but it’s still there.
Wow. I’m going to start coming here for makeup tips. Yours are great.
That was my thought referring to the fact you can still see the lines and the shininess makes it more obvious in spots. Light spot sanding and any glossy sealer would have the same effect. This “smoothing” method creates that melting candle look.
I’m a stickler for the endless sand-prime-sand-prime cycle, though I’ll use chemical smoothing selectively to get a head start on areas that will be hard to get abrasives into (inside corners and the like)
I am glad I am not the only one, to me it always looks like a 3d print, but melted a little, and details get distorted
It seems like an “airwick essentials mist” air freshener might be a good option for this.
They are essentially mini portable battery powered fog machines with an adjustable time delay. Their price varies between £4.50 and £8.50 retail around here. No doubt worth a try. People throw them out because the refills are expensive.
MEK will smooth PLA
Do you know if mke substitute works also? Mke tends be hard to find in big box stores now days.
I did some PLA smoothing with MEK substitute in a rice cooker (which is super dangerous) 6 or 7 years ago. The MEK substitute efficacy differs from brand to brand. In my own kinda sorta scientific testing, I found that some brands are great, some don’t smooth well at all, and some just melt. I got what I needed done and haven’t touched it ever since, so take that as you will.
*brand to brand of PLA, rather. Not by brand of MEK sub – I think. I only had access to one brand of MEK substitute.
Nebulizing chamber from medical nebulizer should cover vaporizing task pretty well. It’s relatively cheap spare part and only needs source of compressed air so there’s no risk of explosion. With extra alcohol inlet, non-return valve and vapor–liquid separator It could be easy hacked for closed cycle with minimal escape of fumes.
Is that the printer or the operator that is smoother with alcohol?
Pun definitely intended.
PETG is my preferred material, it sands easily like ABS and leaves a nice matte finish. Hit it with a little clear coat if you need shine.
That said I wouldn’t mind trying some PVB filament for testing out the durability.
Every filament article says people aren’t using ABS much anymore. I hope it doesn’t get hard to find!
PLA’s glass transition is too low. I don’t want to make things that I can’t set and forget in my car, garage or attic then retrieve later and find them still in the correct shape.
PETG isn’t bad. It’s more flexible than ABS or PLA though which for some applications is a bonus, for others it rules it out.
Nylon might be interesting but it’s fumes sound even scarier than ABS. I’ll pass.
Everything else is so EXPENSIVE.
How can people be so quick to give up on ABS? Putting an enclosure over your printer helps. The really tough prints might still require ABS juice, which is messy but not THAT bad. At least it doesn’t melt on a hot day!
I’ve moved to only using PLA+ if I can’t find what color I need in PETG or PCTG. I think there are just a lot of requirements to printing with ABS –enclosures, odor, hot end temp etc that keep me from even approaching ABS despite its durability. ABS isn’t an entry level printing material and 3d printing has spread so much that there are simply a whole lot more novices like me buying filament so the focus is on easy and cheap PLA. If youtube is any indication there are still plenty of you guys and gals who have the experience and rigs to work with ABS so I doubt it’s going anywhere.
Maybe there is some misinformation out there then?
Hotend temperature for ABS is on the low end of PETG temperatures. My first hotend, a PTFE lined J-Head printed ABS just fine while I never did try PETG through it because most spools of PETG were rated at a bit higher than the suggested maximum temperature of the J-head.
I think it’s funny to hear that ABS “isn’t an entry level printing material”. It’s what I was taught on. I don’t know, maybe PLA hadn’t taken off yet. Or maybe it’s just what we had on hand at the hackerspace I first printed at. Naturally it was the first thing I wanted to print with as soon as I had my own printer because it is what I knew.
You don’t NEED an enclosure for ABS. I printed for years without one. I was rarely happy with how large flat parts turned out as they tended to warp but other shapes were ok. At first I just used painters tape and glue stick. I still try that sometimes then move up to messier options only if I need to. I only seemed to have about 50% success rate though. Switching to ABS juice helped a lot. It almost always works with ABS juice.
I resisted ABS juice because it seemed like kind of an advanced technique, beyond novice. But is it? Just print ABS on tape and gluestick, save the scrap brims and failures. Once you have a little scrap throw it in a metal lidded jar. Pour in some Acetone. Sounds advanced there, having to buy a chemical right? It’s just nail polish remover, pretty common stuff to have in one’s house. Except nail polish remover is expensive and might contain dies or perfumes. The local hardware store will give you a big jug of the plain stuff for the price of one or two of those itty bitty bottles that are marketed for cosmetics.
Anyway, put the scrap and acetone in the jar, put the lid on and come back tomorrow. Heat your glass bed to temperature. Then turn the heater off and spread a thin coat of the now liquid ABS in the jar. You want to turn it off first because it is going to cool the bed a bit and might trip the thermal runaway protection of the printer. No big deal if it does, just means you have to turn it off and back on but that’s a pain. Anyway, just give it a few seconds then turn the heat back on and print.
Oh, and what to spread it with? The acetone might eat the bristles of some kinds of brushes. The ABS will solidify and encase the bristles if the acetone doesn’t get them. So a brush would probably be one time use, kind of a waste. I just cut a piece of single-ply cardboard out of whatever box is available, tv-dinner, tissue, etc… Then I cut a bunch of slits in one end dividing it into little fingers, kind of like bristles on a brush. That works great.
Anyway, this usually works, even without an enclosure.
I didn’t get an enclosure until several years in. When I was trying to print in the garage during winter a couple years ago I found I needed a bit more help. So I put an upside-down cardboard box over my printer. That was my first enclosure. Not exactly hard to get! It worked fine. The only problem is you can’t see through it. I suppose you could cut holes and tape plastic wrap over them for windows. I had a pi with a camera running octoprint so I just had to stick a light in there to go with it. Another alternative would be to install a network camera app on an old cellphone and throw that in there. But if those things sound advanced, scissors, plastic wrap and tape. It’s no different than a little kid making a cardboard box playhouse.
For a more permanent enclosure I made one with a plywood bottom and back plus a frame of 2x2s. I “temporarily” taped some old thin acrylic sheets on the sides. For the top and front I took a long piece that still had it’s backing and cracked it across the middle. the backing holds it together but it bends at the crack so I can set it on the top and hang it down over the front. That was supposed to be temporary, I was going to get thicker acrylic, print mounting brackets to replace the tape and add hinges for the door. But acrylic is expensive, I accidentally made the frame not quite square and don’t like how the paint turned out anyway. So I just keep using it as is.
Don’t get me wrong. I did try PLA for a time. After having pieces melt in my car and then on my little fishing boat on a hot sunny day I decided that was only for nicknacks and toys. My family likes to buy me PLA as presents so I will continue to print some PLA. I’m aware of PLA+ and other materials but… I get my ABS and PETG from Microcenter. It’s usually about $15 for 1Kg of ABS and maybe $20 for PETG. Often they are on sale for less. I know that’s cheap and most stuff at that price isn’t very good but their filament seems to do pretty well. So the jump up in price to buy special materials isn’t just the jump to a more expensive material, it’s also the jump away from Microcenter. Actually, they might have PLA+ but I don’t think it’s their namebrand. (which is actually rebranded Sun).
Why pay so much more when I can print with $15 ABS and it comes out fine?
When first getting into it pretty much everything I read/saw said stay away from ABS and since the other stuff worked fine I never looked deeper. I just ordered some ABS right at the price you mentioned and think I will experiment since I’ve got my machine pretty dialed in now. I honestly never thought ABS could print at temperatures so close to PETG.
If I am looking for smoothing or welding with a solvent, I like HIPS and D-limonene.