Design Tips To Hide Layer Lines In 3D Printed Parts

[Slant 3D] knows a lot about optimizing 3D prints so that they can be cranked out reliably with minimal need for post-processing, and in this short video he uses a cube as a simple example of how a few design changes can not only optimize for production, but can even hide layer lines pretty effectively.

Just to be perfectly clear, layer lines cannot be eliminated entirely without some kind of post-processing. But [Slant 3D]’s tips sure goes a long way toward making a part lose that obvious 3D-printed “look”. They also dovetail nicely with advice on how to optimize cranking out high numbers of parts in a print farm.

Adding texture to the outer layer is especially effective when combined with non-traditional part orientations.

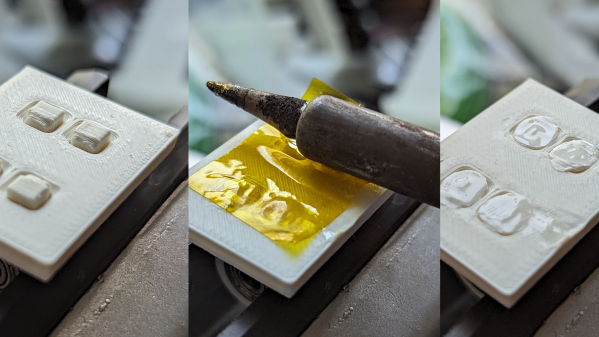
One simple way to avoid visible layer lines is to put some kind of texture onto the part. This can be modeled into the part’s surface, or the slicer software can be used to modify the exterior of the print to add a texture such as a geometric pattern or by applying a fuzzy skin modifier.

Printing a texture onto the exterior is great, but the outcome can be even further improved by also printing the object in a non-traditional orientation.

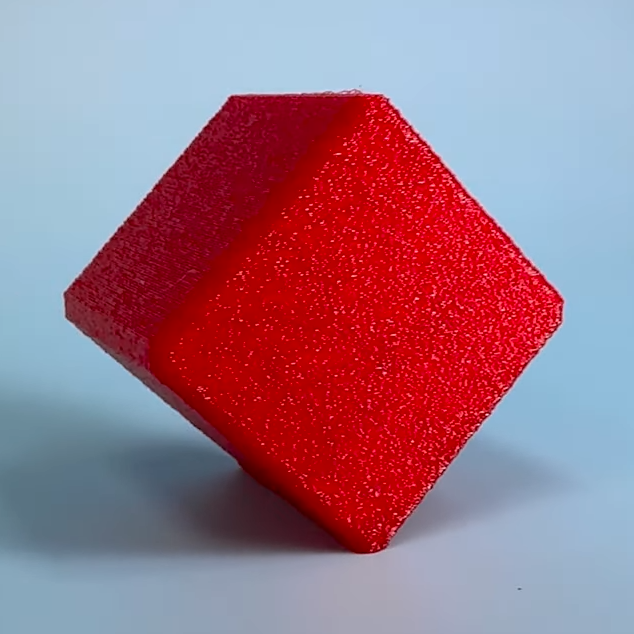
Using a cube as an example, printing the cube on a corner has the advantage of putting the layer lines in a different orientation as well as minimizing the contact area on the print bed. This applies the texture across more of the part, and looks less obviously 3D printed in the process. Minimizing bed adhesion also makes parts much easier to remove, which has obvious benefits for production. [Slant 3D] points out that performing these operations on a 3D-printed part is essentially free.

A few other optimizations for production involve rounding sharp corners to optimize tool travel paths, and putting a slight chamfer on the bottom of parts to avoid any elephant foot distortion (Elephant’s foot can be compensated for, but simply putting a slight chamfer on a part is a design change that helps avoid accounting for machine-to-machine variance.)

Even if one has no need to optimize for high production volume, the tips on hiding layer lines with design changes is great advice. Watch it all in action in the short video, embedded below.

Continue reading “Design Tips To Hide Layer Lines In 3D Printed Parts”

Tricky 3D Printed Joinery Problem? Give Heat Staking A Try

When you just can’t 3D print something as a monolithic part, you’re going to have to join pieces together. In such cases, most of us instinctively include threaded inserts or nut slots in the design, or even reach for a tube of CA glue. But perhaps you should be thinking more along the lines of heat-staking your printed parts together.

Although you might not be familiar with the term, if you’ve looked inside anything made out of plastic, chances are good you’ve seen a heat-staked joint. As [Richard Sewell] explains, a heat-staked joint is nothing more than the classic mortise-and-tenon made from plastic where the tenon stands proud of the joint face so it can be softened with heat. The tenon spreads out so the joint can’t be pulled apart. A variant on the theme includes a mortise with a generous chamfer so the melted tenon can spread out, providing not only extra resistance to pull-out be also a more flush surface.

To melt the joint, [Richard] simply uses a soldering iron and a little pressure. To spread out both the heat and the force a bit, he uses the barrel of the iron rather than a tip, although we could see a broad chisel tip being used for smaller joints. Either way, a layer of Kapton tape helps keep the iron from getting gunked up with melted plastic. [Richard] lists a host of advantages for this kind of plastic joinery, including eliminating the need for additional hardware. But we think the best feature of this joint is that by avoiding monolithic prints, each aspect of a part can have its layer lines optimized.

While it probably isn’t applicable everywhere, heat-staking looks like a technique to keep in mind. We’d love to see [Stefan] over at CNC Kitchen do some of his testing magic on these joints, like he did for threaded inserts.

Layer Line Removal Putty Reviewed

[Teaching Tech] is not alone in hating layer lines in 3D prints and also hates sanding. He recently tried Incredafill putty, a UV-curable putty that you can use to cover up lines in prints. Once covered and cured, you sand the putty smooth. You can see what he thought of the product in the video below.

As many people suggested in the video comments, you can pull the same trick with UV resin thickened with some other substance. We’ve even covered using diluted resin to get a similar effect. The putty has more of the appearance of hair cream or some kind of ointment, so it was easy to spread around with a gloved finger. A brush also worked. UV curing was done by a small flashlight or the handy sun. However, you’ll see later that he used a UV curing station and that works well if you have one.

Of course, even after applying the putty, you still have to sand. We are assuming the sanding is easier than trying to sand the actual layer lines smooth. On the other hand, the resin dust is probably pretty toxic, so there is a trade-off involved.

The results did look good. Of course, since there was still sanding involved, how good it looks will depend on your sanding tools, your technique, and — perhaps most importantly — your patience. Sanding can do a lot for 3D prints. We might not trust it completely with resin dust, but you could get rid of at least some of the dust with a downdraft table.

Continue reading “Layer Line Removal Putty Reviewed”

Smooth 3D Prints With Alcohol

There was a time when most 3D printers used ABS, which is a great plastic for toughness, but is hard to print with since it tends to warp. Worse still, it stinks and the fumes may be bad for you. Most people have switched over to printing in PLA these days, but one thing you might miss with this more forgiving plastic is vapor smoothing with acetone; a smoothed print doesn’t show layer lines and looks more like plastic part that didn’t go through a nozzle.

[Major Hardware] likes the look of vapor smoothed parts, but doesn’t like working with ABS and acetone fumes, so he’s started using Polysmooth. As you can see in the video below, the results look good, but be warned that the filament is relatively pricey. Plus you need to use a $300 machine that atomizes your alcohol into a mist. We feel certain you could do the same thing for less since it appears to just be like a humidifier, but we’d also suggest being careful putting flammable substances in a consumer-grade humidifier and certainly don’t use a vaporizer.

The filament sounds like it is on par with PLA for ease of printing. The material has a higher glass temperature than PLA but less than ABS. The tensile strength and Young’s modulus (a measure of stiffness) numbers are comparable to ABS. Although all smoothing has some imperfections and you probably need to experiment with times and other parameters. The smoothing did fuse some movable joints, so anything that moves or fits together is probably a bad candidate for this process. We’ve also heard that thin-walled parts can get soft in water due to alcohol residue, but you can dry or soak the part clean to avoid that.

If you want to try your own hand at making a mist, this might get you started. After all, if it can handle acetone, we imagine alcohol isn’t any worse. While it isn’t as easy to handle as alcohol, we hear the solvents such as THF or ethyl acetate can smooth regular PLA. Heat guns and open flames are popular, too.

Continue reading “Smooth 3D Prints With Alcohol”