There’s a lot happening in the world of Pi. Just when we thought the Raspberry Pi Foundation were going to take a break, they announced a new PoE+ HAT (Hardware Attached on Top) for the Pi B3+ and Pi 4, and just as soon as preorders opened up I placed my order.
Now I know what you’re thinking, don’t we already have PoE HATs for the Pis that support it? Well yes, the Pi PoE HAT was released back in 2018, and while there were some problems with it, those issues got cleared up through a recall and minor redesign. Since then, we’ve all happily used those HATs to provide up to 2.5 amps at 5 volts to the Pi, with the caveat that the USB ports are limited to a combined 1.2 amps of current.

The Raspberry Pi 4 came along, and suddenly the board itself can pull over 7 watts at load. Combined with 6 watts of power for a hungry USB device or two, and we’ve exceeded the nominal 12.5 watt power budget. As a result, a handful of users that were trying to use the Pi 4 with POE were hitting power issues when powering something like dual SSD drives over USB. The obvious solution is to make the PoE HAT provide more power, but the original HAT was already at the limit of 802.3af PoE could provide, with a maximum power output of 12.95 watts.
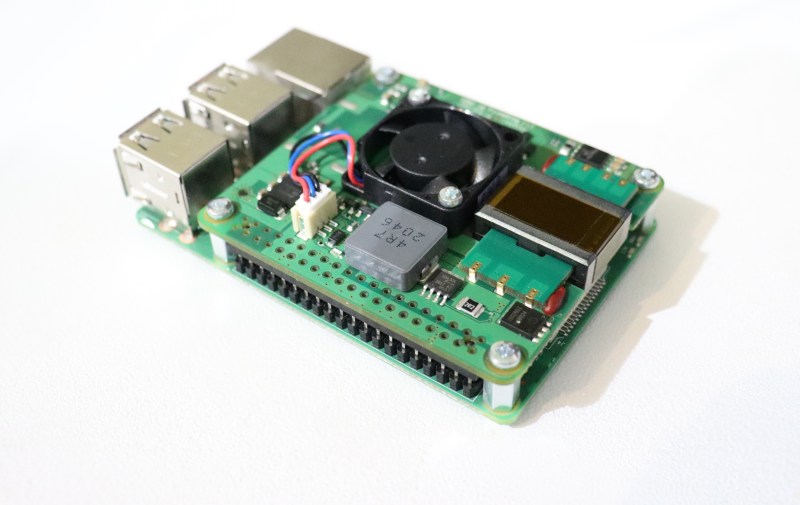
The solution the Raspberry Pi Foundation came up with was to produce a new product, the PoE+ HAT, and sell it along side the older HAT for the same $20. The common name for 802.3at is “PoE+”, which was designed specifically for higher power devices, maxing out at 30 watts. The PoE+ HAT is officially rated to output 20 watts of power, 5 volts at 4 amps. These are the output stats, so the efficiency numbers don’t count against your power budget, and neither does the built-in fan.
More Watts Than We Bargained For
The official specs don’t tell the full story, evidenced by the initial announcement that claimed 5 amps instead of 4. That discrepancy bugged me enough, I reached out to the man himself, CEO [Eben Upton]. The head honcho confirmed:
The spec is that it will supply 20W, but it’s been designed to 25W to give us some engineering margin
So if you want to be super conservative, and ensure the longest possible life, keep your power draw at or under 20 watts. I tested the HAT to the point where it gave up, and not to let the cat out of the bag, 25 watts is still a bit conservative. More on that later.
We know there’s a lot of available power here, but it’s not exactly easy to get to. For instance, the Pi 4 can push up to 1.2 Amps of power through the USB ports. At 5 volts, that’s only 6 watts of power, where’s the rest? In theory there’s a simple answer, as the HAT delivers power back through the 5v GPIO pins. All we need to do is jumper on to those pins and… Those pins don’t protrude through the HAT at all.
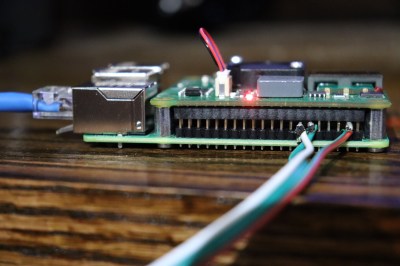
I would have loved to see an official solution to make the GPIO pins accessible with the HAT on, and not a inelegant solution like using those hokey pin extenders that were recommended for the original PoE HAT. Are we foiled, then? Nope. You see, there’s a good 1/4 inch of GPIO pin visible between the Pi and the HAT. It’s just enough room for a good old fashioned wire-wrapped connection, along with some solder for safety.
OK, now we have access to more than 6 watts of power. There are two obvious questions: How much power, and what can we do with it? To kill two birds with one proverbial stone, I grabbed a string of RGB LEDs and wired the voltage supply directly into the 5v rail. The PoE+ HAT has a wonderful feature — it adds a sysnode that tells you exactly how much current the HAT is providing. cat /sys/devices/platform/rpi-poe-power-supply@0/power_supply/rpi-poe/current_now
For testing the HAT, I invented a new unit of measure, the Cyberpunk Neon-purple Pixel. I used the PoE+ HAT to measure the power consumed by the Pi and Pixels, also recorded the power use reported by the PoE switch, and used a non-contact IR thermometer to find the hottest point on the HAT after a few minutes of powering the LED strip.
I've invented a new unit of power consumption: cyberpunk neon purple LEDs. Here's 100 CNPs. pic.twitter.com/aiNEiwfNDc
— Jonathan Bennett (@jp_bennett) July 5, 2021
I repeated the experiment with the original PoE HAT, and you can review my raw results if you’d like. There are a couple minor caveats, mostly related to temperature measurement. My IR Thermometer doesn’t provide the rich data that a full IR camera does. Additionally, I was limited to measuring just one side of the PoE boards. I believe that the hottest spots on the original PoE HAT are on the underside of the board, while on the new HAT, seem to be on the side facing away from the Pi — that’s a win in itself. All that to say, my temperature measurements of the original HAT are probably quite a bit too low.
More Launch Problems?
So remember how the first iteration of the PoE HAT had some problems? The big one was that some USB devices could trip the over-current protection at much lower levels than they should have. There was the additional issue of the board getting ridiculously hot at full load. There have been reports of the PoE+ version having some similar launch warts. The problems that have been identified are: high temperature, high power draw from the HAT itself at idle, the 1.2 amp USB limit, a long bolt that contacts the camera connector, a louder fan, and odd behavior when powering the Pi and HAT over the USB C connector. I’ll step through these one at a time. These are legitimate concerns, and I’m not necessarily here to debunk them, but I will put them in context of my own testing. Edit: Shoutout to Jeff Geerling and Martin Rowan, linked above and below, for their early work on reviewing the PoE+ HAT.
First up is temperature. The PoE+ HAT measures nearly 52°C at idle, at its hottest measured point. That is quite warm, and is hotter than the 44.5°C I observed on the original PoE HAT under similar conditions. This seems to be in contention with what [Eben] had to say about temperatures:
Thanks to improved thermal design it should run cooler (measured at the hottest point on an uncased board) at any load.
I can think of one explanation that satisfies all the observations. The original HAT’s hottest point is between the HAT and the Pi itself. This is observable in the EEVBlog video linked above. I tested with the HATs installed on the Pis, making it essentially impossible to get a reading on the underside. Setting that explanation aside, my measurements indicated that the original HAT got very hot at higher power outputs, while the PoE+ HAT stayed quite stable. Above 7 watts of power output, the new HAT ran cooler as per my measurements.
The PoE+ HAT pulls 4.9+ watts of power to run an idling Raspberry Pi 4. The original HAT does the same thing for as little as 2.9 watts. At low power levels, the original HAT is definitely more efficient. The difference is that the original HAT runs at about 78% efficiency no matter how much power is being drawn, while the new PoE+ HAT can be as much as 88% efficient at higher power levels. The crossover point is somewhere between 1.5 and 2 amps of output. If power efficiency is of concern, you might want to stick with the original HAT for lower power use.
The USB ports on the Pis only supply 1.2 amps. This is annoying, but isn’t a weakness of the PoE HAT at all. We can hope for a future Pi revision that raises that limit. Until then, the workaround of tapping power directly from the 5v rail works nicely.
As for the long bolt, I’ll let [Eben]’s response speak for itself:
A number of people have found that the bolt touches, but does not damage, their camera connector. We’re likely to back it off to an 11mm bolt (10mm, as has been suggested in one or two places, is definitely too short) in a future production run.
The fan is louder at full speed, but quieter at its lowest speed. Additionally, it moves more air at full speed, 2.4 CFM compared to 2.2 from the older hardware. With a few tweaks to the fan’s trigger temperatures, the new fan can be quite a bit quieter overall. Just a note, if you have the PoE+ HAT, and the fan isn’t spinning at all, you probably need to pull the latest updates for the Raspberry Pi OS, as the enablement code has landed quite recently.
The final complaint is that the PoE+ HAT doesn’t properly block backfed power when it’s left on a Pi powered via the USB C plug. There is an annoying coil wine, and the HAT actually powers the high voltage side of its power supply circuit. This is obviously not ideal behavior. It would have been nice to have the backfeed protection, but the official documentation does address this: “When the Raspberry Pi PoE+ HAT is connected to your Raspberry Pi, your Raspberry Pi should only be powered through the ethernet cable. Do not use any additional method to power the Raspberry Pi.”
How Much Power

Once I had my cyberpunk lighting rig set up, I thought it would be useful to find the hard limits and see how many pixels each HAT could power. The original HAT lit up 75 of them, but trying for 76 tripped the overcurrent protection. That indicates that 2.5 amps of output power is the threshold.
Now how many pixels can we turn cyberpunk purple with the PoE+ HAT? Once I hit 250 pixels, the resistance of the strip became a major factor, and increasing the driven pixels wasn’t really increasing the load. The last pixels were a noticeably different color as a result. To continue the experiment, I switched over to testing at pure white, AKA the individual red, green, and blue LEDs turned to 100% brightness. In this configuration, I was able to drive 140 pixels. The PoE+ Hat reported a maximum current of 5.4 amps, while my PoE switch showed that port pulling 30.6 watts of power, at a respectable 87.9% efficiency. The hard limit I finally hit was 5.5 amps at the HAT, at which point the Pi power cycled.
After a few minutes of driving the PoE+ HAT way beyond its rated power output, I measured 56.8°C at the hottest point I could find. That is an impressive, tough little board. I wouldn’t be comfortable running at those levels for long, or unattended, but it’s nice to know that it does work, and no magic smoke was released. Based on what Eben had to say about the device, 25 watts of power seems like the maximum power number to aim for. Given that the Pi itself will take at least 2.5 watts, essentially at idle, that leaves 22.5 watts of power you can potentially use for something clever. And all this with just an Ethernet cable running to the Pi. So the question, is what can you do with 22.5 watts? LED lighting is the idea that was obvious to me, but I’m confident the Hackaday community will continue to surprise me in what you can come up with, so let us know what you want to do with the PoE+ HAT.


Would like to see “the” Cyberpunk Neon-purple Pixel under a bell jar in an internation metrology exhibit!
Yuk, those ugly conductive metal screws attaching the fan, peeking under the board… Why not nylon screws mounted the other way around ?
…why not a small plastic or rubber mounting that would be both cheaper and way faster to assemble. Can’t understand how that screw setup made it to mass production.
I’m betting the Russians repurposed parts just like we did back in the day. There was nothing like looking out my cockpit windscreen on my ASW (Anti-Submarine Warfare Aircraft) P-3B and seeing a Russian Bear (Russia’s ASW Aircraft) overtaking us from 45,000 feet. Russia’s components and designs were sometimes just better than US’s sometimes. A famous line from a movie I’ll always remember, this aircraft is soooo big! “It’s Russian” The Russian aircraft used lots of tub designs in their communications & ASW equipment because of their reliability.
Now if they’d just add a LIPO charge controller to it with a battery header, and make it a combo POE+/UPS HAT, that would be awesome!
That is a really neat idea… Probably also want an alternate power input as well – so if you took your now battery backed Pi project somewhere that was not PoE you can still get power via USB, or barrel jack type stuff.. Also have to ask how much voltage you want in the battery – a single cell lipo only comes so large (probably not a problem, if its only a UPS but wanting serious uptime on battery…), but going to support a 12v battery with lipos is more effort setting up the charge controller – and if you go to 12v might as well support lead acid too.
Wonder how those thermals would do with a case?
How about a new model, skip the wifi, built in poe, full support for hats with no hacking. Put it all on one board and make lots of them, the price could be very competitive. An elegant solution for remote sensing, remote displays, remote cameras.
YES! POE enabled switches are now priced for the consumer. This will help declutter, and encourage it’s use.
I want PoE but in my use case there’s just not enough value to… especially if I have to buy a HAT that covers the board and requires use of a fan. My Pi4s are all passively cooled, and I don’t want PoE to force me to change..
(they’re just running Jenkins networking tests and have tons of sleep() calls so I’m OK with running them passively)
Maybe these would be more use for you
https://thepihut.com/products/mini-power-over-ethernet-poe-expansion-board-for-raspberry-pi-4-no-fan
Maybe this would be useful
https://thepihut.com/products/mini-power-over-ethernet-poe-expansion-board-for-raspberry-pi-4-no-fan
That sounds like a CM4 carrier board to me.
Better that way as then its up to you how much RAM, wifi or not, as all that is part of the CM4. And the price won’t actually be much different – at retail a CM4 IO board from the Pi foundation isn’t much different to the PoE Hat, add in a PCIe USB3 card (those are pretty cheap) and the slightly cheaper than its Pi4 equivalent wifi free CM4 – that set up will be larger, probably cost a little bit more, but it ticks all your boxes and more – having both CSI and DSI so a pair of camera etc is possible, and the optional soldered on ‘SD-card’ is really quite impressively fast or get one without and boot as normal Pi4 would… Its all on the one board and includes the freedom to not have USB3 but some other PCIe device – you will still have USB 2 – with an extra entry in the config.txt to enable it, though as Jeff Gearling has shown not every PCIe thing will work – and you almost certainly have to compile the kernel)
Will state while I know the CM4 IO board by the Pi foundation supports POE I don’t have a POE network to test it on, I just have to assume it works as advertised – do need to get some PoE gear at some point, but time and money limitations, its not high on the list..
“But the official documentation does address this: ‘When the Raspberry Pi PoE+ HAT is connected to your Raspberry Pi, your Raspberry Pi should only be powered through the ethernet cable. Do not use any additional method to power the Raspberry Pi.'”
I believe that’s a recent addition. When I was working on my testing and review of the board, I didn’t see any warnings about not powering it via USB-C (or other means).
You and Martin Rowan are probably responsible for getting that line added, then. I should really add a shoutout to you guys for your early work on testing the HAT. *heads off to add an edit*
It definitely wasn’t there originally. To me it smacks of the Apple iPhone signal strength issue when people were told they were “holding it wrong”.
What’s interesting is that HAT specification states clearly it HATs must include protection from back-feeding. Seems they aren’t compliant with their own standard. Does that mean the PoE+ HAT, isn’t a HAT?
Thanks for the mentions.
I don’t know what the “hokey pin extenders” were, but it’s hard to believe they were worse than this janky workaround of wrapping wire around the pins. They should have had a header that passed the pins through from the Pi to the top of the PoE hat.
http://www.makerspace-uk.co.uk/raspberry-pi-poe-hat/ Here they talk about this issue, with pictures.
Tnese work just fine for me
https://thepihut.com/products/4-40-pin-pin-extra-tall-header-push-fit-version-poe-hat-set
“It’s just enough room for a good old fashioned wire-wrapped connection,” great choice “along with some solder for safety.” Oops, there goes the goodness. WW is better than solder. Never mind.
I don’t have the tool or right kind of wire for a true WW, so mine was an ugly mash-up of the two.
Watts, amps… What lovely names for a common news site. Not for HaD. Use SI units (and proper prefixes).
Watts and amps are SI units.
What ‘hokey pi extenders’ are you talking about? I’ve used these and they work perfectly, and certainly far better than the job done in the article!
https://thepihut.com/products/4-40-pin-pin-extra-tall-header-push-fit-version-poe-hat-set
I know this thread is old as, but I’ve been looking for the fan pinout for the poe+ board, but can’t seem to find it in the documentation.
I want to change it to a Noctua A4x10 5v (3-pin model) and utilize the temp control.
It runs, but I have a suspicion that the pinout/connection is wrong. Anyone know/measured it?
Now I’m coming back and reading more and more reviews of the official Pi Hats, the 3rd party one I got and tested really seems like a mistake! Whilst it’s nice that it only uses the specific pins needed and leaves the rest free, the lack of control is a little annoying..