Down The Fabrication Rabbit Hole To Build A Recumbent Bike

‘Tis the time of the year to find as many reasons as possible to shut off the smartphone and get yourself outside. [Rich Olson’s] newest excuse is a recumbent bicycle he built from at least three donor bikes. Of course we’ve seen any number of bike mods over the years (the tall bikes that integrate a ladder to climb up to the saddle have always held a special place in our hearts), but [Rich] left us a nice trail of bread crumbs on how to get into this yourself without breaking the bank.
He worked from a set of open source plans, with additional instructions laid out by [Brian in Ohio] in a bicycle hacking series on the Hacker Public Radio podcast. We learn in the first installment that you can get your hands on a torch that uses oxygen and MAP gas to braze the pipe joints — a quick Duck Duck Go search turns up kits that have the torch and both gases for about eighty bucks. Ask around your neighbourhood and you’re likely to find some bike frames from the disused and broken cycles lurking in dark garage corners. That first podcast page even has images that show you how to lay out fishmouth cuts where the tubes will meet.

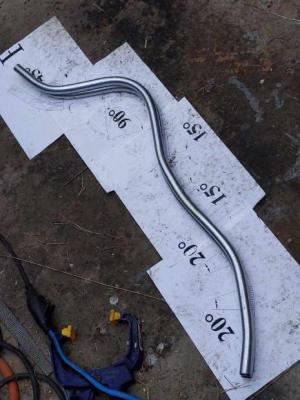
But what really grabbed our attention is the tube bending for the recumbent seat. This is a speciality part that you’re not going to be able to salvage from traditional bikes. [Rich’s] project shows off this image of a bend template and the two main rails he used from the seat; but how did he make those bends? The third episode of [Brian in Ohio’s] series covers the one simple trick that electricians don’t want you to know. Those rails are made out of electrical conduit and you can easily buy/rent/borrow a commonplace conduit bending tool which has the handy advantage of including angle guides.

You’ll find [Rich’s] video after the break which begins with a slideshow and ends with a demo ride. That lets us see the lacing on the back side of the seat fabric that keeps it taught, yet comfy in a way a standard bike saddle just can’t be.

If this still hasn’t convinced you to pick up a torch, you can also build a recumbent with a wooden frame.

Continue reading “Down The Fabrication Rabbit Hole To Build A Recumbent Bike”

Peeking Inside A Volcano Sensor

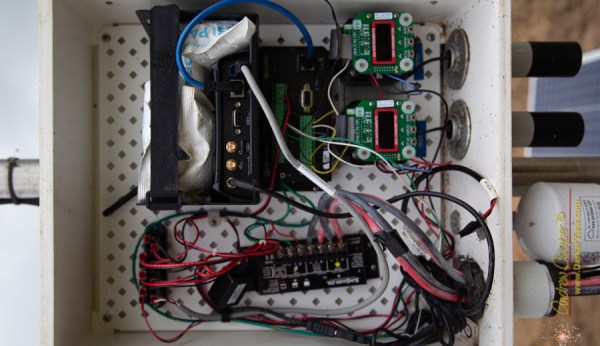
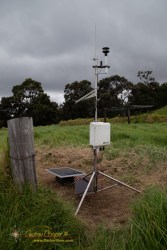
On a recent walk through the Hawaii Volcanoes National Park, [Andrew Cooper] stumbled upon an unlocked monitoring station. Being an engineer, he couldn’t resist taking a look. This station is one of a network of sulfur dioxide (SO2) monitoring stations installed around the park to keep an eye on volcanic emissions. Unsurprisingly, sulfur dioxide is unhealthy to breathe. Sensors like these keep people informed about local conditions before taking their strolls among the volcanic foothills, enjoying gorgeous vistas as [Andrew] describes it.

[Andrew] wasn’t particularly surprised at the contents of the station, since he builds similar equipment in his day job. Continuous power is provided by lead acid batteries kept charged by an array of three mis-matched solar panels. There are duplicate SO2 monitors, an air particulate meter, and a standard weather station affixed to the top. Data is logged on-site and reported up the chain by a cell-phone modem. [Andrew] wasn’t impressed with the workmanship, noting:

ItĀ appeared as if the circuits were wired by a ham-handed grad student with no sense of pride in their work.

Continue reading “Peeking Inside A Volcano Sensor”

Design A Custom Enclosure Using Modelling Clay And Photogrammetry

When it comes to designing enclosures which aren’t simple boxes or other basic shapes, the design process tends to get somewhat tedious and involved as the number of measurements to be transferred into the CAD program begins to skyrocket. One possible shortcut here is detailed by [Sebastian Sokolowski], who describes a process that combines modelling clay with photogrammetry.

[Sebastian] covers the design of a hand-held controller that should fit ergonomically when grasped. This starts off with the electronics and mechanical components that have to fit inside the controller: inside a CAD tool (demonstrated in Fusion 360), these components are arranged with a simple box enclosure around them. This box is then 3D printed and with modelling clay the desired shape of the controller is created around this box.

With a modelling clay version of the controller ready, it is photographed from as many angles as possible before these photos are processed by the open source Meshroom tool into a 3D model. After fixing up some issues in the mesh and knocking down the vertex count on this model so that the CAD tool doesn’t suffer a seizure importing it, it’s ready for final processing.

Within the CAD tool all that is left now is to refine the imported model to refine its outer shape and to create the inner details for mounting the electronics, switches and other components.

Continue reading “Design A Custom Enclosure Using Modelling Clay And Photogrammetry”

Analog Style VU Meter With Arduino And OLED Display

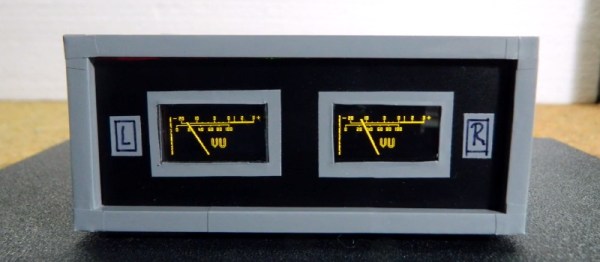
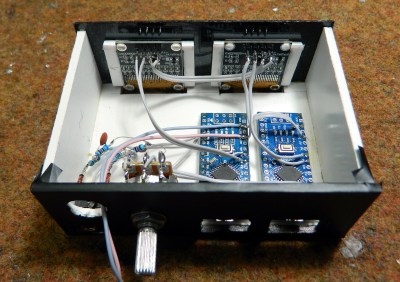
Looking for a digital recreation of the classic analog volume unit (VU) meter? If you’ve got an Arduino, a few passive components, and a SSD1306 OLED, then [mircemk] might have the answer for you. As you can see in the video below, his code turns a handful of cheap parts into an attractive and functional audio display.

The project’s Hackaday.IO page explains that the idea is based on the work of [stevenart], with code adapted for the SSD1306 display and some tweaks made to the circuit. While [mircemk] says the code could be modified for stereo as long as the two displays don’t have conflicting I2C addresses, he decided to simply duplicate the whole setup for each channel to keep things simple. With as cheap as some of these parts are nowadays, it’s hard to blame him.

[mircemk] has provided source code for a couple different styles of VU indicators, the colors of which can easily be inverted depending on your tastes. He also clarifies that the jerky motion of the virtual “needle” seen in the video is due to the camera; in real-life it sweeps smoothly like the genuine article.

Much like the project that aimed to recreate authentic “steam gauges” with e-paper displays, this as an excellent technique to file away for use in the future. Compared to authentic analog gauges, these digital recreations are quicker and faster to implement, plus going this route prevents any antique hardware from going on the chopping block.

Continue reading “Analog Style VU Meter With Arduino And OLED Display”

End Of An Era: NTSC Finally Goes Dark In America

A significant event in the history of technology happened yesterday, and it passed so quietly that we almost missed it. The last few remaining NTSC transmitters in the USA finally came off air, marking the end of over seven decades of continuous 525-line American analogue TV broadcasts. We’ve previously reported on the output of these channels, largely the so-called “FrankenFM” stations left over after the 2009 digital switchover whose sound carrier lay at the bottom of the FM dial as radio stations, and noted their impending demise. We’ve even reported on some of the intricacies of the NTSC system, but we’ve never taken a look at what will replace these last few FrankenFM stations.

If you are an American you may have heard of ATSC 3.0, perhaps by its marketing name of NextGen TV. Just like the DVB-T2 standard found in other parts of the world, it’s an upgrade to digital TV standards to allow for more recent video compression technologies and higher definition broadcasts. It has an interesting backwards compatibility feature absent in previous ATSC versions; there is the option of narrowing the digital bandwidth from 6 MHz to 5.5 MHz, and transmitting an analogue FM subcarrier where the old NTSC sound carrier on the same channel would have sat. Thus the FrankenFM stations have the option of upgrading to ATSC 3.0 and transmitting a digital channel package alongside their existing FM radio station. It’s reported that this switchover is happening, with one example given in the Twitter thread linked above.

The inexorable march of technology has thus given better quality TV alongside the retention of the FrankenFMs. We have to admit to being sorry to see the passing of analogue TV, it was an intricate and fascinating system that provided a testbed for plenty of experimentation back in the day. Perhaps as we see it slip over the horizon it’s worth pondering whether its digital replacement will also become an anachronism in an age of on-demand streaming TV, after all it shouldn’t have escaped most people’s attention that in 2021 the good TV content no longer comes to your screen via an antenna socket. Meanwhile we’ll keep our CRTs running, just in case we ever want to relive a 1980s night in with a VHS tape of Back To The Future.

Header image: Mysid, Public domain.

The Case Of The Mysterious Driveline Noise

Spend enough time on the automotive classifieds and you’ll end up finding a deal that’s too good to pass up. The latest of these in one’s own case was a Mercedes-Benz sedan, just past its twentieth birthday and in surprisingly tidy condition. At less than $3,000, the 1998 E240 was too good to pass up and simply had to be seen.

The car in question. Clean bodywork is too tempting to resist, even if there are mechanical issues.

The car was clean, too clean for asking price. Of course, a test drive revealed the car had one major flaw – an annoying hum from the drivetrain that seemed to vary with speed. Overall though, mechanical problems are often cheaper and easier to fix than bodywork, so a gamble was taken on the German sedan. The first order of business was to diagnose and rectify the issue.

Characterise, Research, Investigate

The first step to hunting down any noise is to characterise it as much as possible. In this case, the noise was most noticeable when the car was traveling at speeds from 40 km/h – 60 km/h, present as a vibrational humming noise. The location of the noise source was unclear. Importantly, the noise varied with the speed of the car, raising in pitch at higher speeds and dropping as speeds decreased. Engine speed had no effect on noise whatsoever, and the noise was present regardless of gear selected in the transmission, including neutral. Continue reading “The Case Of The Mysterious Driveline Noise”

Big 3D-Printed Lamp Tries Some New Features

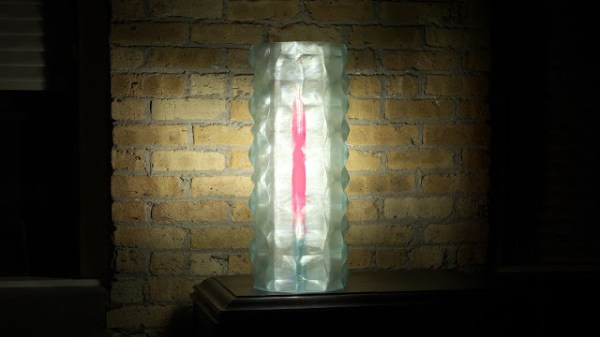
In lamp design, bulbs are usually given generous clearances because they get hot during use. LED bulbs however give off comparatively little heat, which opens a few new doors. [Mark Rehorst] created this huge 3D printed lamp, made with his custom 3D printer and a hefty 1 mm diameter nozzle, and the resulting device not only looks great, but shows off a few neat design features.

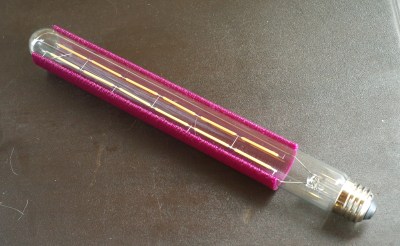
The LED filament bulb doesn’t give off much heat, so a PETG partial shade mounted directly to the bulb works fine.

[Mark] printed a partial shade in PETG that is made to sit directly on the bulb itself. The back of the shade is open, allowing light to spill out from behind while the front of the bulb is shielded, making it easier on the eyes. The result is pretty nifty, as you can see here. It sits in the center of the 600 mm tall lamp, which takes up most of the build volume of his self-made CoreXY-based printer, the UMMD.

The LED filament strands in this style of bulb are pretty neat in their own way, and some of you may remember that when they first became available as separate components, no time was lost in finding out what made them tick.