LED cubes are really nothing new, many of us consider the building of a good sized one almost an electronics rite of passage that not so many manage to find the time or have the skill to pull off. It’s our pleasure to draw your attention to a lovely build, showing all the processes involved, the problems and the solutions found along the way.
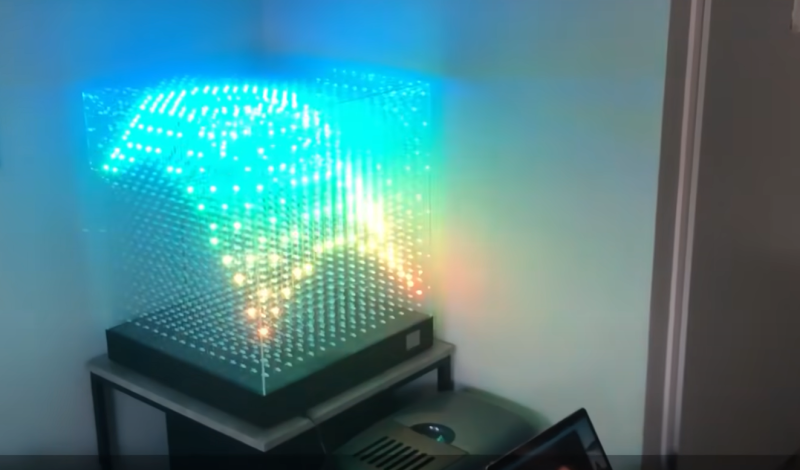
Building a small cube is somewhat of a trivial affair, especially without considering PWM colour mixing, however as simple maths will illustrate, as you increase the number of LEDs on each side, the total number will quickly get quite large. More LEDs need more power and increase control complexity considerably. A larger matrix like this 16 x 16 x 16 LED build, has a total of 4096. This would be a nightmare to drive with plain RGB LEDs, even with cunning multiplexing, but luckily you can buy indexable LEDs in a through-hole package similar to the ubiquitous WS2812-based SMT LEDs you see around. These are based on the PD9823 controller, which can be programmed as if they were a WS2812, at least according to this analysis. Now you can simply chain a column of LEDs, with the control signal passed from LED to nearest neighbour.
Early on in the video build log, you will note there are four power supply modules needed to feed this juice. If we assume each LED consumes 60 mA on full-white (the data for this product link shows a peak value of 100 mA) that is still a total of 246 A or around 1 kW of power. The video does shows a peak power measurement of around this figure, for the whole array on full white, so the maths seems about right.
Control is via a Teensy 4.0 using the FlexIO function of the IMXRT1060RM CPU, and a bunch of 74AHCT595 shift registers giving 32 channels of up to 1000 LEDs per channel if needed. Roughly speaking, using the DMA with FlexIO, the Teensy can drive up to 1 Million LED updates per second, which works out about 32 channels of 100 LEDs per channel updated at 330 frames/sec, so plenty of resource is available. All this is with almost no CPU intervention, freeing that up for handling the 2.4-inch LCD based UI and running the animations, which looks pretty darn slick if you ask us. You can checkout the description of the firmware in the firmware section of the GitHub project. 3D printed jigs allowed for bending and clipping the LEDs leads as well as fixing and aligning the LED column units, so there really is enough detail there to allow anyone so inclined reproduce this, so long as you can swallow the cost of all those LEDs.
For a different approach to LED cubes, checkout this sweet panel based approach, and here’s a really small 4x4x4 module for those with less space to spare.
Thanks [Keith] for the tip!


A small fortune for the LEDs alone.
Just for grins n giggles, I tried pricing out just the LEDs; it’s a total of 4096 LEDs. the usual commercial sources in the US (digikey and mouser) only have the adafruit branded through hole Leds, which are nearly a $1 each ($4.95/5 pack)
So I looked at the usual direct from china sources, and while those were slightly more reasonable, it was still over 2 grand for just the LEDs and nothing else.
Don’t get me wrong: it’s amazing, well thought out, and the attention to detail during the build is incredible. But it’s wickedly expensive for the components, not to mention the time investment for assembly of all those individual bulbs. It’s less of a hack than it is an art project.
It’s too late for me to be going through prices now, but I do wonder, if the LEDs were smd and ordered on ready made boards, say a three layer board the width of the LEDs themselves, with the connections broken out at the bottom and at each crossing point, perhaps in lengths of ten LEDs, so it’s modular and the boards are smaller, to keep costs down.
Good idea, as soon as transparent PCBs show up.
https://hackaday.com/2016/07/18/cnlohrs-glass-pcb-fabrication-process/
Perhaps it might be a viable option to use thin strips of clear flexible pcb and then install the cube in a solid metal frame.
Make it on ITO-coated glass, just like the LCD glass you are reading this through.
And just like the DSKY display build [Ben Krasnow] showed off not so long ago.
Chip LEDs embedded in apparently conductor-free glass plates is a commonly seen thing at optical vendor shows.
I don’t know – just looked at the usual Ali Website and got a offer of around 40$ / 1000 pcs. (search for LED cube), That sound bearable…
I did the same (because I REALLY want to build a big LED cube) and found some on Aliexpress for around $140 per 1000 quantity
https://www.aliexpress.com/item/32713415710.html
Which is a bit nearer $600 for the full set, but still a heck of an outlay for ‘just’ one part of the build. I wonder if someone can sidestep Aliexpress and dig into TaoBao or some such for a better price in this quantity?
But, seriously, hats off to the builder for this level of commitment.
Corrected, thanks.
” many of us consider the building of a good sized one almost an electronics rite of passage that not so many manage to find the time or have the skill to pull off”
He doesn’t even know what a rite of passage is.
“a ritual, event, or experience that marks or constitutes a major milestone or change in a person’s life Rites of passage celebrate the social movement of individuals into and out of groups or into or out of statuses of critical importance to the individual and to the community.”
It is, by definition, something that nearly everyone in a certain group goes through. If it’s something that not so many manage to find the time or have the skill to pull off, it’s not a rite of passage for that particular social group.
The power problem is common for massively parallel circuits like this. The way it’s usually handled is by using a current limited supply for the LEDs, independent from the logic power supply.
I had a similar issue with powering a thermal printer in an EKG display – even though no more than 1% of the elements were active on average, and when drawing grid lines, the peak current was supplied by electrolytic caps, the power supply had to be designed no to fail if a software error turned them all on continuously.
I would expect that with a power supply that could actually supply full power for the array described here, meltdown would begin only seconds after turning all of them on.
There used to be a club in Beaverton, Oregon, called Earthquake Ethyl’s. It had a bare-bulb incandescent array that surrounded the dance floor, controlled by a PDP-8 computer through individual triacs, as I recall (this was in the 1980s). I don’t know what the individual wattage was; probably around 10-20W each, and don’t recall what the bulb count was. In its programmed music-synchronized sequence, they did turn on all of the bulbs (momentarily) at times, and you could feel the infrared pulse on your skin. It was certainly in the tens of kilowatts.
someone’s gotta make a large low-res transparent oled panel for stacking
I’m having enough trouble just finding small transparent OLED panels 😒
It would be interesting to have one that has the same refractive index as say water or mineral oil, then when you sink the panels, they would seem to disappear and you’d just have free floating lights, I’m thinking bioluminescent deeps see jellyfish.
Also to be found in bulk on Alibaba, usually minimum order of 1000, price between USD$0.12 to USD$0.18 each. eg, https://m.alibaba.com/product/60583353154/PL9823-F5-5mm-RGB-LED-round.html
The P9823 being equivalent to the WS2812 has some notable downsides unfortunately – tight timings with its slow custom protocol & slow PWM.
What I’d really love to find us a through-hole equivalent of a APA107 (SPI, 9kHz PWM, 30Mhz transfer, 8bit color channels) or HD107S (SPI, 26kHz PWM, 40Mhz transfer, 8bit colour). Or even better, a HD108 equivalent, with full 16bit colour channels
Bit of an overview here, but alas it doesn’t cover though-hole equivalents: https://www.rose-lighting.com/the-difference-of-hd107s-apa107-sk9822led/
Link says: $0.12 – $0.16 ea., not $0.12 – $0.18 ea. Still, @ 4096 LEDs thats: US $491.52 – $655.36.
My bad for summarising a bit too heavily – that was the rough range from a number of listings.
I’d assume it’ll be on the higher end of a price range for messily 4096 units (past me would be kicking me for that comment 🙄). Buy yea, still expensive my standards for a project. Especially given you’d need to account for a certain percentage of duds. And just testing each one before the build sounds like a RSI nightmare.
I’ve been wanting to build one of these for years – it’s one of those projects that got me interested in electronics art projects (from a background in analog art & software development). Individually addressable though-hole LEDs might just push me over the where to finally do it… albeit smaller
Is it just me or is the perspective in the software modeler wrong?
Most CAD packages have the ability to display the model with or without perspective. The option without perspective has the advantage that dimensions do not vary by their distance from the viewing point. So even though it looks unnatural, you can easily see when surfaces or lines that are supposed to be parallel, are not.
Can someone help me understand in why this uses something like 1kW and a TV (oled, microled, future nanoled) still sits around 100-200. Those LEDs also produce a lot of nits, be it background or pixels. Heck my phone’s oled isn’t consuming tens of watts …
So how does that work? Serieally feeding the current through all, where these setups run power in parallel? If so, why that then?
It CAN use up to something like 1kW, because it’s got 4096 LEDs in it. A square array of pixels has x^2 pixels (or LEDs) where x is both the number of LEDs in a row and the number of rows. A cube array of pixels has x^3 pixels. In an LED array, all of the LEDs can be on at the same time, so the total power is the power consumed by one LED times the number of LEDs. Now, in a typical application, where you’re showing a 3D surface, you would never have all of the LEDs on at the same time, because you’re just stretching a 2D surface to add some curvature to it. In this case, a 16 x 16 x 16 cube would only typically have 16 * 16 = 256 LEDs on. If the full array takes about 1kW for 4096 LEDs, that’s about 1/4W per LED, so displaying a nearly flat surface in that cube would take 256 * 1/4 = 64W.
Now, it’s a whole different situation if you are using for example a stack of LCD panels for your 3D display, because the LCDs themselves take only a small fraction of the power of the display; most of the power is consumed by the backlight. In this case, the power consumption would be nearly constant, regardless of the number of pixels “on”.
Measuring the light output of a LED in nits (a measure of a surface brightness) is nonsensical. Lumens is the appropriate unit.
Comparing a LCD or TV to this is comparing a peashooter to a cannon. A 300-nit television or LCD produces 100-200 lumens (depending on size). 1 kW into even these relatively inefficient LEDs produces around 10,000 lumens.
Where is the Leia hologram?
We can “only hope”…
What is the next big step up from this ?
LTO (Indium Tin Oxide) on PET (PolyEthylene Terephthalate), or thin sheets of glass, for the PCB’s and addressable LED’s ?
Maybe electrically and mechanically hold all the LED’s in place with a fusible or eutectic alloy instead of regular solder ?
e.g.
Wood’s metal: 70 °C (158 °F)
Field’s metal: 62 °C (144 °F)
Cerrolow 136: 58 °C (136 °F)
Cerrolow 117: 47.2 °C (117 °F)
Bi-Pb-Sn-Cd-In-Tl: 41.5 °C (107 °F)
Anyone know how small you can get the addressable LED’s and are there any that are visible from the front and the back ? I guess you could do a double sided see through PCB with LTO tracks and addressable LED’s on both sides to work around LED’s that have 4 large square solder pads underneath that block the light. Kind of makes you wonder how large you could go with a pick and place machine.
> LTO (Indium Tin Oxide) should be ITO
Ahhh! We use ITO here at work, I was wondering how you got that acronym!
I’ve been pondering the possibility of combining this with magnetic levitation. And maybe wireless power, but I don’t know enough on the subject to know how compatible those are
“…LED cube you and build too” (Title)
I gave up trying to build the RadioShack 3x3x3 red LED cube Arduino shield.
Maybe, if I had built some kind of jig to hold the LEDs in place as I soldered them, I could have completed it.
(one of those “soldering robots” (metal stands with alligator clips) didn’t help much.)
I’m glad to see TriantaduoWS2811 lives on. This is exactly the sort of thing I’d hoped people would do with it. Nice work!!
Thanks Ward! Triantaduo was a great start to get me going with flexio. Had to write my own driver though, took me quite a read in the reference manual…
Oh, I didn’t dig down (up?) in the repo far enough to see that the link in the article is just to the Triantaduo portion. I’m glad to see you did the hard work of making a FlexIO library, they really are special little blocks. It’d be trivial to expand a couple to drive hundreds of GPIO at a couple of MHz. I hope more people come to see their value.
Each WS2812 is rated at 60ma max, so if you do the math, you’re looking at a 250A power supply to power it!