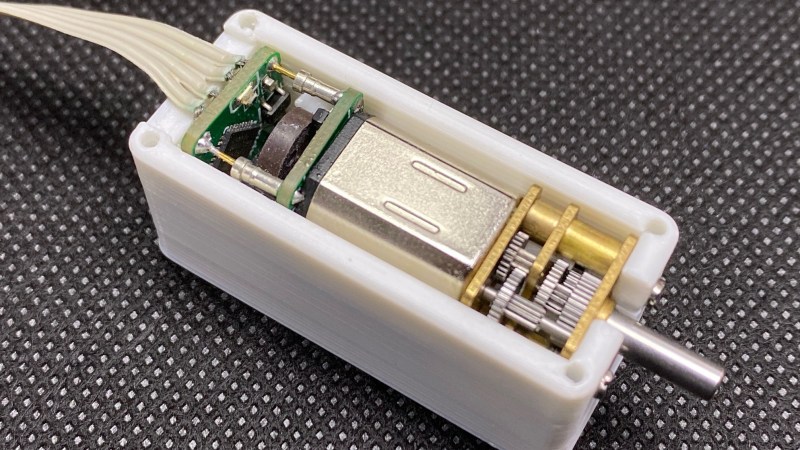
[Frank Herrmann] had an interesting idea to turn a geared DC motor into a servo motor assembly, but with a stepper motor-like interface. By stacking some small PCBs behind the motor body, it was possible to squeeze a DRV8837 DC motor driver and a pair of hall effect sensors on the first PCB layer, with the magnetic encoder nestled tightly behind it. Pin headers at the edge of the PCB connect to a second PCB bearing the microcontroller, which is based on the cheap STM32L432. The second PCB also holds an associated LDO and debug LED. Together, this handful of parts provide all that is needed to read the encoder, control the motor rotation and listen on the ‘stepper motor driver’ interface pins hooked up to the motion controller upstream. The Arduino source for this can be found on the project GitHub.
Whilst [Frank] mentions that this assembly has a weight and torque advantage over a NEMA 17 sized stepper motor, but we see no hard data on accuracy and repeatability which would be important for precise operations like 3D printing.
This project is part of a larger goal to make a complete 3D printer based around these ‘DC motor stepper motors’ which we will watch with interest.
While we’re on the subject of closed-loop control of DC motors, here’s another attempt to do the same, without the integration. If these are too small for you, then you always repurpose some windscreen washer motors.


Those cheap gear motors usually have a huge amount of backlash.
One funny way to compensate would be to somehow connect two of the cheap motors and drive them in opposite directions. That way they would provide preload against each other.
Here’s an implementation from a while back:
https://github.com/misan/dcservo
I have built a CNC machine, based on homofaciens’ design, using two DC motors from old inkjet printers and misan’s firmware. The controller runs grbl, and the DC motors now look like steppers, so it literally Just Works.
I’ve also used misan’s awesome and simple firmware. It works really well for direct drive. The backlash of geared motors means you’d need to compensate in your gcode planner, though that’s not a fault of the dc servo code.
At the till end which is cheaper… steppers or DC’s?
Very nice project. As described in the video, for servo motor v dumb stepper, servo motor is more efficient and servo motor won’t miss steps, or at least not without being able to provide a warning.
Also nice choice of hardware including the switching regulator (if I heard it correct as there is no schematic yet that I can see) motor driver and stm32 micro-controller.
The Arduino code looks very basic at the moment. In practice there are some hardware quadrature encoders in the stm32l4 timer peripherals, which could be used in preference to the bit-banged quadrature decoder currently in the code.
Backlash should not be too difficult to account for in software, though it adds another bit of complexity.
Anyway from what I read so far it looks like a very interesting project to follow.
Subscribed!
Could the backlash be dealt with in hardware by putting the position encoder on the output shaft, not the motor?
This was my thought as well
The motor speed is used as one of the position servo PID(https://en.wikipedia.org/wiki/PID_controller) variables and you get a much better resolution on the motor shaft itself since, on the output shaft, resolution will be reduced by turns ratio of the gearbox. I would guess that to a first approximation, you can assume a constant move of the motor shaft to counteract backlash, but there is nothing stopping you using an encoder on both the motor shaft and the output shaft I guess ( and the stm32L4 has more than one encoder peripheral,). That would be useful for testing anti backlash algorithms anyway, but It starts to make sense why stepper motors are used. Despite larger size and lower efficiency and everything else, they are simple and precise, especially with microstepping!
Yes, though there’s an issue in doing that, that when you’re inside the backlash region (as in, the drive has reversed but its movement has not yet propagated through the gearing to the sensor) you’re operating in an uncontrolled area and can run into some issues with integral windup and overshoot.
As someone else suggested, it may be a better idea to add encoders to both the motor and the output shaft and that way you have a better idea of what the motion system is doing.
This is how R/C servo’s handle backlash though they use a potentiometer. DC or brushless motor, gear box, POT on output shaft.
This looks extremely similar to:
https://hackaday.io/project/158429-smart-motor-driver-for-robotics
Oh man, I found this article only now and knew nothing about it. So glad my XMOTO project found it’s way here to the blog.
@Tony, this was one of the projects that inspired me to build XMOTO. But it only uses a Hall sensor and a PIC MCU. But I don’t plan to equip a 3D printer with it, I was concerned with the price, weight and curiosity if something like this can work. Anyway, thanks a lot and I’ll keep going.
The second video describes my test environment and I run some tests. We look at repeatability as well as backlash and performance:
https://www.youtube.com/watch?v=IH7HHuaDm94