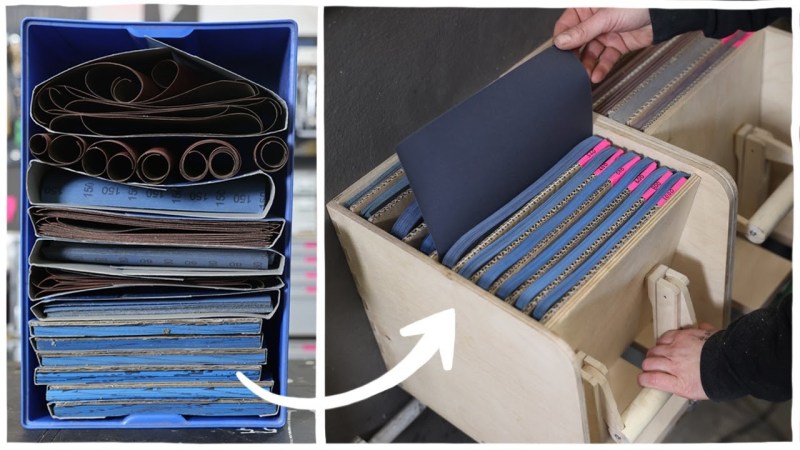
Maybe it’s the humidity, maybe it’s the cold weather. Something is making [Laura Kampf]’s nice fabric-backed sandpaper curl up into scrolls the second it comes out of the package. So you can understand why she urgently wanted to make a storage system that would be easy to flip through like a record bin, but also provide enough pressure to keep the papers flat.
Although [Laura] didn’t know what exactly the end result would be, she got started on it anyway — that’s a great way to get more projects off the drawing board and past the finish line. It worked out, because she got a great idea while building the box and using nice cam clamps to hold the finger joints together as the glue dried. Since she already had a bunch of these cam clamps in different lengths lying around, why not use a couple of them for this?
[Laura] has two major classifications of sandpaper — paper-backed and fabric-backed — and built them separate boxen using two clamps for each box. She joined the pins with a DIY handle in order to move the cams in unison, so all she has to do is pull out to flip through the papers, and push the handle back and down to re-pressurize the stack for storage. Be sure to check out the build and demo video after the break.
While DIY clamps are often wood and metal affairs, it’s good to have 3D printing in your corner.
Thanks for the tip, [hackbyte]!


I have one of those multi-document inboxes with 8 shelves, just buy the paper in sheets and lay flat.
(Inbox was almost free at the recycle place.)
I use a portable expanding filing system from office supply stores. Comes with index tabs for writing the grit size and a convenient carry handle.
This is the best solution.
The finished item reminds me of something an acquaintance told me about back in the 90s. He invented what he called his Chronologically Redundant Filing System. It was a cardboard box.
He started putting correspondence in the back of the box in date order. When he had filled the box he tossed out the oldest items at the back so there was room for new letters and bills at the front.
I was never sure whether he was a genius or just cheap but it can’t be denied that his system worked well.
I’ve seen this advocated. Sorting and storing is time consuming, and for many people, it’s extremely rare to look back at the records.
This approach saves a lot of time, and gives a basic sort by date.
If the box is sized to handle about 7 years of documents, you’ve got the typical financial retention period covered.
I never imagined curling sandpaper was a problem people struggled with. I’ve always kept sandpaper on a shelf somewhere under a cardboard box with some stuff in it.
Want!
Everyone here, including Laura’s old cardboard box with a stack of paper in it, all have better sandpaper storage systems than me. I have a little stashed here, a little stashed there, a few rolls in a drawer, a couple in a different draw, and a few in some plastic shopping bags next to some paint and stain.
I recently ate the last cookie in a round plastic cookie box. Maybe that will become my new organization system. =)
Ok, If you guys never tried this stuff(by any similar name), you have flat missed something!
FunTak(at walgreens) or Handi-Tack (wallmart).
Easily surpasses the description “greatest thing since sliced bread and peanutbutter”, i neither kid you nor exaggerate!
aka Blu Tack. Been using it for a while…
I just make sure that the sandpaper represents the potential of a smooth vector field, a handy result of which is that curl will always be equal to zero
How conservative
Semi-OT: My kids love Laura Kampfs “Machgeschichten” in the “Sendung mit der Maus” TV show…
(Can be found on the German television ‘WDR’ or on Youtube.)
This is ingenious. Will definitely take it’s inspiration for doing something about my curling sheets, particularly the finer grit, paper backed ones. I’ve always found my Klemmsia clamps fill a need for light quick acting clamping. Thanks for sharing.
First I want to say that I just LOVE this! The one thing that I will change if I build them for myself is to reverse the cam so that it locks when you push down, and releases when you pull up — so the natural work flow is to pull up and out to release the lock mechanism, and in and down to clamp things back down. This will also give you an extra inch or two of usable space give how far the handle sticks out, and keep the handle away from bumping elbows…