A person putting a screw into a CNC spoil board on the left of the image. Their drill is chartreuse and black. Clamps hold a rectangular board down at all four corners. The spindle of the CNC is just visible on the right hand side of the image.

Workholding Options For The Beginner CNC Operator

Designing a file to cut on a CNC is only part of the process. You also have to keep it in place while the machine does its work. [Garrett Fromme] walks us through five different work holding techniques.

Since every project is different and stock material can vary from thin veneer to much larger pieces, there’s no one right work holding method for every project, and not all methods are applicable to all materials. A vise is great for small projects that need to be held very securely and won’t be damaged, vacuum tables can make switching pieces quick in a production environment, fasteners will hold a piece securely at the expense of your spoil board, clamps are fairly versatile but fiddly to setup, and tape and CA glue are quick but require more consumables.

[Fromme] does a quick demonstration of setups with these different methods and their limitations, which is a great place to start for the beginner CNC operator. Just like 3D printers, CNCs are a far cry from the replicators in Star Trek that can automagically create what you ask it to, but proper workholding lets you waste less material and operate the machine more safely.

Our own [Elliot Williams] had a look at how CNCs aren’t as automated as you think. If you do need some CNC clamps, you might try these printable parametric clamps, or if you want something more beautiful, give these metal toe clamps a go.

Continue reading “Workholding Options For The Beginner CNC Operator”

OpenSCAD Cranks Out Parametric CNC Clamps

If you’ve ever used a CNC router or mill, you’ll know how many little things need to go right before you get anything resembling acceptable results. We could (and probably should?) run a whole series of posts on selecting the correct bit for the job at hand and figuring out the appropriate feeds and speeds. But before you even get to that point, there’s something even more critical you need to do: hold the workpiece down so it doesn’t blast off into orbit when the tool touches it.

Now that might sound like an easy enough job, and for basic flat stock, it often is. But if you’ve got an oddly shaped piece of material, you’ll quickly realize how inadequate those trusty c-clamps really are. When you get to that point, it might time to check out these OpenSCAD hold down clamps from [ostat]. Thanks to its parametric nature, you can plug whatever dimensions you need into the script, and in a few seconds it will spit out an STL file for a bespoke clamp that you can print out and put to work.

Continue reading “OpenSCAD Cranks Out Parametric CNC Clamps”

Harbor Freight And LEGO PCB Vise Is Cheap And Effective

It doesn’t take much chasing things around the bench with a soldering iron to appreciate the value of good work holding. And don’t get us started on those cheap “helping hands” alligator clip thingies; they’re somehow worse than no work holding. Isn’t there a better way?

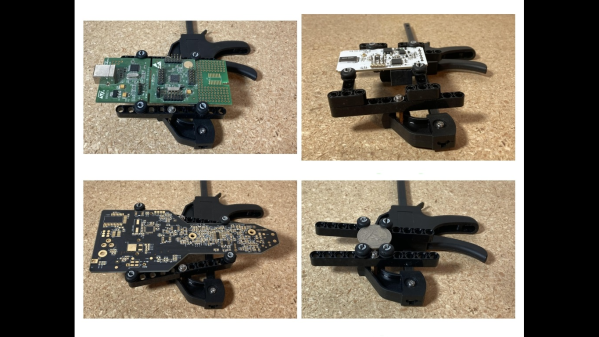
Maybe, judging by [Paul Bryson]’s idea for a dirt cheap PCB vise. It’s a pretty clever design that’ll have you heading to Harbor Freight, or whatever the moral equivalent is in your location, where you’ll pick up a small ratcheting bar clamp. [Paul] used a 4″ (10 cm) clamp; that which looks fine for a wide range of boards, but we suppose you could go bigger if you like. You could also stop there and just clamp your PCBs in the plastic jaws, but [Paul] adorned the jaws with swiveling arms made from LEGO Technic pieces, of all things. Rubber grommets slipped onto Technic pegs go into the holes on the beam to hold the PCB edges firmly, while the swiveling action adapts to odd-shaped boards.

To our mind, the biggest advantage to this design other than cost is how low it holds the PCB — a decided advantage while working under the microscope. Don’t have any Technics parts close to hand? No worries, 3D printed parts could easily stand in, and maybe even improve the design. [Paul] also shows off a substitute for the Technics beam rendered in PCB material, which would reduce the height of the workpiece over the bench even more.

We’ve seen a lot of PCB vises come and go, using everything from scrap wood to 3D printed compliant mechanisms. But we doubt you’ll find anything more cost-effective than [Paul]’s design.

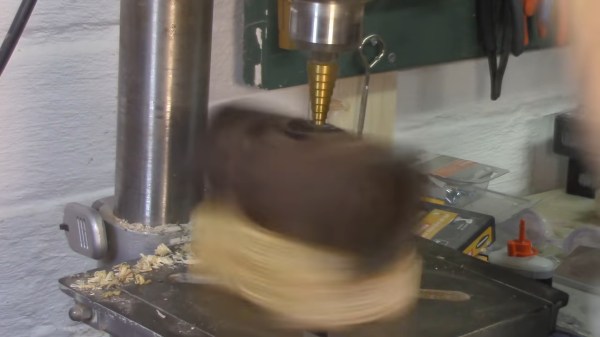
An unfastened piece of pipe in a drill press, rotating away

Drill Press Piece Fastening 101

What are the options you have for securing your workpiece to the drill press table? [Rex Krueger] shows us that there’s plenty, and you ought to know about them. He goes through the disadvantages of the usual C-clamps, and shows options like the regular drill press vice and a heavy-duty version that even provides a workpiece tilting mechanism, and points out small niceties like the V-grooves on the clamps helping work with round stock. For larger pieces, he recommends an underappreciated option — woodworkers’ wooden handscrew clamps, which pair surprisingly well with a drill press. Then, he talks about the hold-down drill press clamps, a favourite of his, especially when it comes to flat sheets of stock like sheet metal or plastic.

As a bonus for those of us dealing with round stock, he shows a V-block he’s made for drilling into its side, and round stock clamp, made by carefully drilling a pair of wooden hand screw clamps, for when you need to drill into a dowel from its top. The ten-minute video is a must watch for anyone not up to speed on their drill press piece fastening knowledge, and helps you improve your drilling game without having skin in it.

We’ve covered a few ingenious and unconventional drill piece fastening options before, from this wise held down by repurposed bicycle quick-release parts, to an electromagnetic wise that left our readers with mixed opinions.

Continue reading “Drill Press Piece Fastening 101”

Anti-Curl Sandpaper Storage Is Impressive

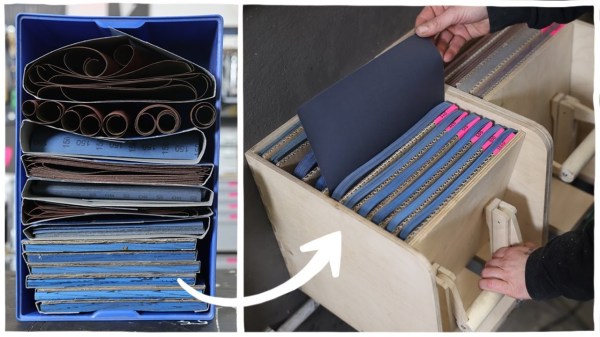
Maybe it’s the humidity, maybe it’s the cold weather. Something is making [Laura Kampf]’s nice fabric-backed sandpaper curl up into scrolls the second it comes out of the package. So you can understand why she urgently wanted to make a storage system that would be easy to flip through like a record bin, but also provide enough pressure to keep the papers flat.

Although [Laura] didn’t know what exactly the end result would be, she got started on it anyway — that’s a great way to get more projects off the drawing board and past the finish line. It worked out, because she got a great idea while building the box and using nice cam clamps to hold the finger joints together as the glue dried. Since she already had a bunch of these cam clamps in different lengths lying around, why not use a couple of them for this?

[Laura] has two major classifications of sandpaper — paper-backed and fabric-backed — and built them separate boxen using two clamps for each box. She joined the pins with a DIY handle in order to move the cams in unison, so all she has to do is pull out to flip through the papers, and push the handle back and down to re-pressurize the stack for storage. Be sure to check out the build and demo video after the break.

While DIY clamps are often wood and metal affairs, it’s good to have 3D printing in your corner.

Continue reading “Anti-Curl Sandpaper Storage Is Impressive”

Making Teeny Clamps With Hand Tools

Sometimes you need a small clamp, and sometimes it’s nice to use tools you’ve made yourself. [Neil] from [Pask Makes] delivers on both counts, with incredibly cute little clamps that he whipped up in his own home shop. You can even make them with hand tools!

The first step is to cut out a section of flat steel bar, and then drill a hole in the middle. The flats that form the key clamping surfaces can then be cut using a hacksaw. From there, it’s a matter of cleaning up the resulting blank with a file to take off sharp edges and neaten up the flats.

Drilling and tapping the main hole through the bottom of the clamp is the next job, and getting the hole straight and true is key to making a good usable clamp. The video shares tips on how to do this with even a simple cordless drill, by using a vice and a wood guide to keep things on track. The swiveling nut is then made out of a piece of round bar, and installed on the end of a bolt to create a nice clamping surface. A cute little brass handle is used to tighten it up.

It’s a useful tool, and the video goes on to show how the clamp can be made more quickly using higher-end facilities. While small clamps can be had cheaply, the video notes that making tools is fun and we think that’s as good a reason as any to make your own.

We’ve seen [Neil]’s work before, particularly in the case of this stunning “bladeless fan” build. Video after the break.

Continue reading “Making Teeny Clamps With Hand Tools”

Credit For Clever Corner Clamp

We love this design’s simplicity, but its mundane appearance is deceptive because a lot is going on here. [Bas van Hassel]’s clamp looks like a bench cookie or maybe a compressed hockey puck, but one pie piece-shaped quadrant extends on dovetails to form a right-angle channel, perfect for holding your ninety-degree joint while your glue dries. Opposing disc edges are flat, so your clamp won’t slip. Divots on the top and bumps on the bottom keep your stacks nice and neat when you put them away. All around, we have no trouble believing this designer has spent a lot of hours in the woodshop.

As long as your wood pieces are the same thickness, it seems like a practical use of printer filament, but if you have different sizes, you can always pull the dovetail out of its groove. Thanks to the scaling feature built into slicing programs, we expect some precision makers to utilize this in projects like dollhouses and model airplanes. If you have a high-resolution printer, you could make some miniature tools to construct a flea circus set. At that point, you may need to make some smaller clamps.

Print orientation for the puck is straightforward as it is a print-in-place design, but sometimes it isn’t always clear, so listen to those who know better and don’t be afraid of gears in your vises.