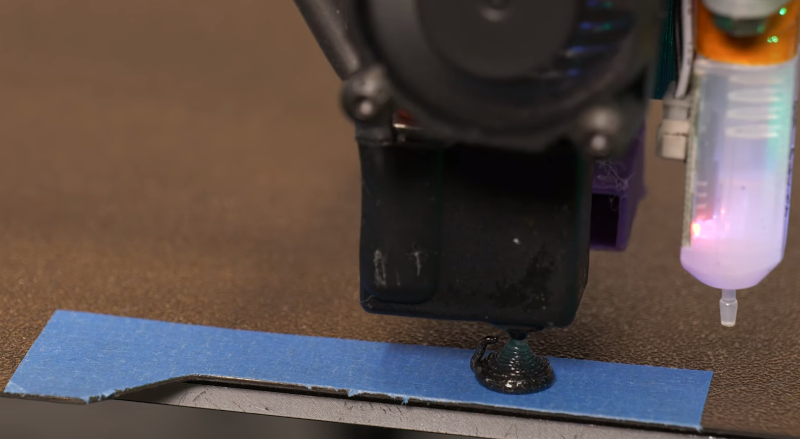
One popular option when 3D printing is to have the printer draw a loop or two around the print before starting. This serves several purposes: it clears the print head for one thing. It also marks the area of the print bed in use and many people use it to adjust the leveling if necessary. However, the little scraps of plastic do add up. [Makers Mashup] decided to try something different and now uses what he dubs the landing strip and kisses method.
The landing strip turns out to be a piece of blue tape and the kiss in question is like the chocolate kind and does not involve pressing your lips against the nozzle. There’s a wizard that generates startup code for you that has the style of purge if you like.
Is it better? That’s probably a matter of opinion. You still get little drops of plastic to recycle or dispose of. If you use the skirt for other purposes, you might not find this as useful. But maybe it is just your cup of tea and it costs nothing to try — assuming you have a roll of blue tape hanging around.
You may not care about the bed-level aspect of a skirt if you have a really flat bed or really good autolevelling. If skirts hanging around your shop really bother you, maybe just automate their disposal.


The video seems to be taken offline.
Any other link / source to be shared?
Works here
Maybe add the s to the link in the article?
I see, the tailing ‘s’ is not on the link in the article. The embedded video worked and reveals the correct url
wow, what a huge build area! the only time i don’t like the skirts is because they reduce my build area by a few mm on each side. the problem with kisses is that they’re taller than just one layer so they could also require a big clear area around them if your head isn’t a needle point. but my head is pretty narrow for several mm above the bed, so probably i could use this if i had a design where the skirt really truly wasn’t practical.
but what i do right now if i can’t afford a skirt is just extrude some filament in midair as part of the initialization G-code string. it’s enough to clear the head and prime the bowden and so on. i usually grab the dangling strand with my hands but even if it gets integrated into the bottom layer it doesn’t cause any trouble. (knock on wood)
that’s a fancy looking bed levelling probe!
BLTouch (the probe). The rod sticking out at the bottom is released/retracted via magnet. When leveling it’s released at the same height as your nozzle offset and as soon as it registers contact with the bed it retracts and saves the z.
It is called a bltouch, only a few bucks and works great!
That addresses the leveling, it doesn’t clear the print-head, as mentioned in the article.
I’ve recently upgraded my Voron with a KlickyProbe. The probe itself is a separate piece with a microswitch that gets (automatically) attached to the toolhead with some magnets. As the magnets are conducting they serve as the connectors.
Works great, every time.
Guy who created Cura here. So, I got a tiny bit of experience. And I say:
Bad idea. I experimented with this, failure rate of prints goes up, as the blob is more likely to detach and ruin your day. A detached skirt is slightly bad, a detached blob dragging by your nozzle is guaranteed failure.
Also, it doesn’t equalize the pressure in your nozzle like the skirt does, as you don’t have the backpressure from the bed you would normally have.
I’ve tried a lot of things. But the skirt gave me one of the highest success rates, after that, I would just do… nothing. No skirt, no priming, just go and accept that your first layer is slightly underfilled.
That’s what I was thinking. I’ve had plenty of times the skirt comes loose somewhere or perhaps even entirely, but since it’s such a small amount of plastic at any given point, it’s never caused my prints to fail; it just kind of gets embedded in the bottom-layers of the print and causes the bottom to look stupid, but that’s about the extent of it.
Yeah, on my prusa I modified the prime/wipe start gcode to continue the line for a bit with normal flow rate and don’t bother with the skirt anymore. I think I generated that gcode by slicing a 0.5mm x 75mm x 0.2mm thing with quite conservative print settings then appending to start gcode as appropriate, but it’s been years and I don’t remember exactly. It works even with special filament like flexibles.
Well you seem like the authority to ask.
Wasn’t the “skirt” originally intended to detect mechanical interference / collisions on more complex CNC devices that may operate via parallel kinematics or ensure all end-effector locations were within range on devices like SCARA?
I’m no authority on anything really. And the skirt is older the Cura.
But it’s a thing that catches a lot of things in one go. Priming the nozzle, checking if the build volume is clear, checking leveling. And it’s easy to implement, and easy to reason about that it should work without issues if your printer works properly.
I’ve done this for years (though with a *much* smaller ‘kiss’) to make sure the nozzle is partially primed before starting the skirt. It’s especially helpful for tiny prints where the skirt might be too small to prime the nozzle and properly print/attach if the printer has oozed a bit. (like <15mm on a side small). It's worked well for me.
How old is this post? Because my Ultimaker printer has this “prime blob” option which was already available for a long time. Personally I don’t like it, I prefer a skirt.
I fail to see the point. The main reason put forward is that the skirts make a mess, and “kisses” supposedly don’t, because they track less? Stop wearing shoes inside the house like a barbarian! :) Sry, cultural differences..
Only solid argument is that skirts can come loose, and mess up the print, but I find that highly contradictory, as a skirt coming loose is a very good indicator to a botched leveling, thus alerting you of possible failure early on. Besides all that, Cura already has a prime blob as a ready made option, real similar to this.. and if anything has caused incidents its these lumps being left in the printer as they are solid, and also they tend to gunk up the outside of the nozzle. Nope, this seems to me like an exercise for sheer content.
“If skirts hanging around your shop really bother you,”
Hmm. No, not at all. Especially if they bring kisses.
Also skirts, on a not leveled bed, tend to come off easily..
Yes, indeed.
Also, isn’t “landing strip” a colloquial name for a certain hair style?
;)
A skirt is also is good for monitoring your Z offset.
Using the skirt for bed leveing is what changed my first layer quality to be almost perfect everytime.
For situations when I needed every single mm and knew my bed was level, I would create a temp rectangle/section that was 1 layer height tall. Then Id turn on seq printing and print that item first. Essentially priming the hotend and allowing me to use the whole bed for the print. Works great.
Wait, wait, wait… No, no I’m not…I don’t think it’s even a thing yet, but I claim patent…
Now is that blue painters making tape? Blue vinyl tape, or blue duct tape?