Multicolor printing on FDM machines can be tricky to get working flawlessly, and purging hotends when changing colors can end up wasting a lot of filament and material. To solve this problem for the popular Prusa i3 and Ender 3 printers, [BigBrain3D] developed the Swapper3D, an automated system that swaps the entire hotend when the material is changed, eliminating the need for purging almost entirely. Video after the break.
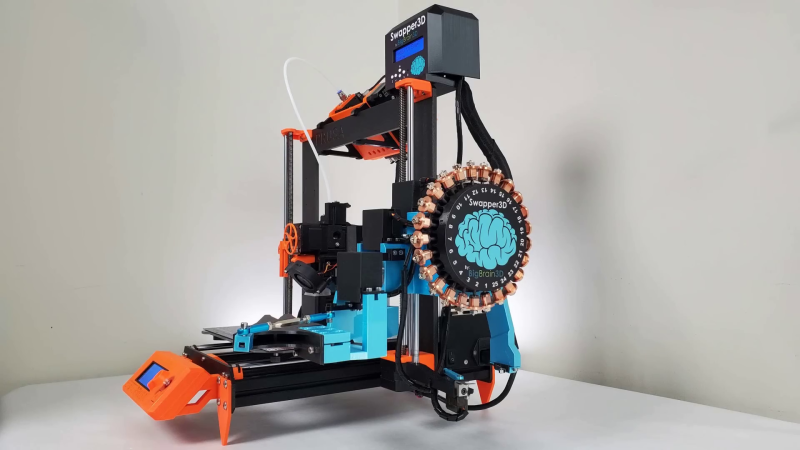
The Swapper3D works very similarly to the tool-changing systems on CNC machines, and is just as satisfying to watch. A large circular carousel on the side of the machine holds up to 25 hotends, and in practice, a pair of robotic arms pop out the previous hotend, cut the filament, and load up the specified hotend from the carousel. This means you can have a separate hotend for each color or type of filament. Since most existing hotends also integrate the heating element, [BigBrain3D] created a special hotend assembly that can be robotically removed/inserted into the heater block.
The Swapper3D is designed to be used with existing filament changers like the Prusa MMU and the Mosaic Palette. Using these systems involves a lot of purging, to the point where you sometimes end up using more filament during purging than you need for the actual part. On one five-color demo print, the Swapper3D reduced the print time by 45% and the filament used by a massive 86%. It also helps to eliminate problems like stringing and color fading in multicolor prints. With those advantages, it looks like the Swapper3D might be a worthwhile upgrade if you do a lot of multi-color printing, even though it adds quite a bit of complexity to the printer.
For larger, more expensive machines, swapping the entire toolhead is becoming more popular, with even E3D stepping into the fray.


This could be a very interesting product! With 25 hot ends, I wonder if this approach could make use of multiple nozzle sizes for the same material, and if that would have any practical benefits after the time spent swapping hot ends.
While I’ve not seen any actual scientific study showing multi wall thickness ranges from different nozzles its almost certain IMO it would – smaller nozzle are definitely better for fine detail but never produce parts as strong even if the wall thickness printed is identical as the larger nozzle, both things very well proven on their own.
So with a combined thick print where the strength matters and fine where the detail matters it really should be the best of both worlds, if nearly impossible to slice well, automatically anyway.
> smaller nozzles are better for fine detail
With the new Arache slicer engine that’s no longer true; 0.6mm nozzles provide equivalent detail to 0.4 but much faster. https://www.youtube.com/watch?v=WgXM2zPusXo
Its true slicers have improved but 0.4 also gets better detail now than it used to – the same tech that makes bigger nozzle more detailed still works on the smaller ones.
Except that’s not what the tests show at all.
@Pelrun he compares the old ‘normal’ slicing methods on 0.4 to the ariane method with the 0.6 – its not using the same new slicer tech on the 0.4 here.
It’s workable, except they sped up their own machine setting print. So it’s a lie that its “as fast” or faster.
It saves time by not having to print a huge purge block along with the intended print. That’s why it uses less filament.
prusa can also do purge into infill, or purge into separate object (if the color doesn’t matter for that one), so that’s a creative way not to spend to much time in building a useless purge tower.
That still takes the same time to push the excess contaminated filament out of the nozzle. It’s the purging part that is the problem, not building the tower or otherwise disposing of the contamination.
Well, you could just measure how much of filament you need (with help of couple diodes) cut it and push by end of next filament, a little bit harder with pellet printer but not impossible.
So we got faster speed, no filament waste, better durability of product by simple adding “scissor” and “optical ruler”.;P
There’s actually a commercial product that I believe works like this, the Mosaic Palette. I haven’t checked up on it in a few years but I believe it didn’t work fantastically when it launched.
Save filament yes. Save time, no. They still need to heat up hotend in order to print with new toolhead. hence my comment that video is actually a lie on printing speed. If you compare carefully, you can see that per layer videos, “theirs” is actually 3-4 layers per frame while “stock” is at 1 layer per frame, in least after first 3-4 layers. You can see it actually getting slightly behind then boom it speeds up.
Looks like it uses the existing MMU.
Printheads are so cheap there’s no need to swap nozzles anymore, just one printhead for each color.
For one or two materials, sure. But past that you’re looking at a massive gantry, or losing significant printable space in X/Y. This solution brings it’s own set of complications, but on balance it simplifies the X/Y mechanics compared to a multi-printhead solution.