Complex Movements From Simple Inflatables, Thanks To Physics

Inflatable actuators that change shape based on injected pressure can be strong, but their big limitation is that they always deform in the same way.

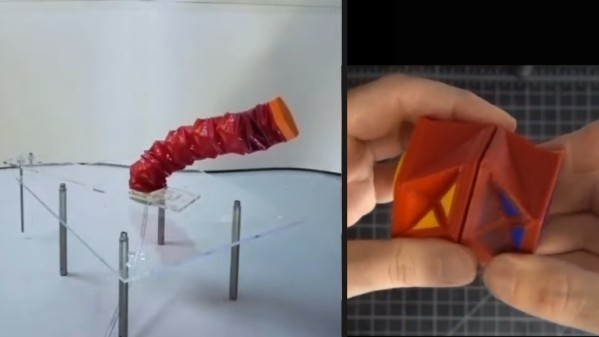
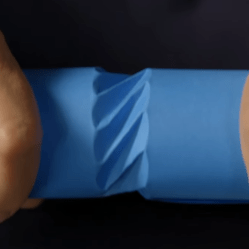
The Kresling pattern, which inspired the actuator design.

But by taking structural inspiration from origami, researchers created 3D-printed actuators that show it is possible to get complex movements from actuators fed by only a single source of pressure. How is this done? By making the actuators physically bi-stable, in a way that doesn’t require additional sources of pressure.

The key is a modified design based on the Kresling pattern, with each actuator having a specially-designed section (the colored triangles in the image above) that are designed to pop out under a certain amount of positive pressure, and remain stable after it has done so. This section holds its shape until a certain amount of negative pressure is applied, and the section pops back in.

Whether or not this section is popped out changes the actuator’s shape, therefore changing the way it deforms. This makes a simple actuator bi-stable and capable of different movements, using only a single pressure source. Stack up a bunch of these actuators, and with careful pressure control, complex movements become possible. See it in action in two short videos, embedded just below the page break.

Continue reading “Complex Movements From Simple Inflatables, Thanks To Physics”

Automated Hotend Swapping For Less Wasteful Multicolor Printing

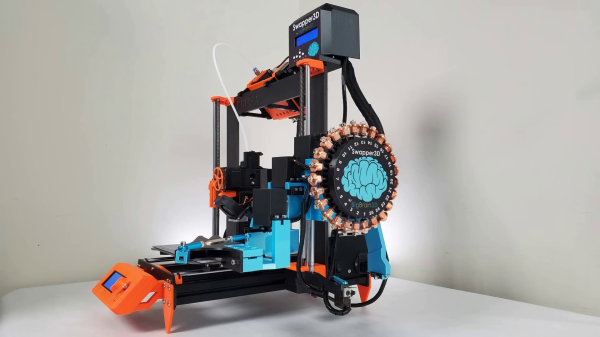
Multicolor printing on FDM machines can be tricky to get working flawlessly, and purging hotends when changing colors can end up wasting a lot of filament and material. To solve this problem for the popular Prusa i3 and Ender 3 printers, [BigBrain3D] developed the Swapper3D, an automated system that swaps the entire hotend when the material is changed, eliminating the need for purging almost entirely. Video after the break.

The Swapper3D works very similarly to the tool-changing systems on CNC machines, and is just as satisfying to watch. A large circular carousel on the side of the machine holds up to 25 hotends, and in practice, a pair of robotic arms pop out the previous hotend, cut the filament, and load up the specified hotend from the carousel. This means you can have a separate hotend for each color or type of filament. Since most existing hotends also integrate the heating element, [BigBrain3D] created a special hotend assembly that can be robotically removed/inserted into the heater block.

The Swapper3D is designed to be used with existing filament changers like the Prusa MMU and the Mosaic Palette. Using these systems involves a lot of purging, to the point where you sometimes end up using more filament during purging than you need for the actual part. On one five-color demo print, the Swapper3D reduced the print time by 45% and the filament used by a massive 86%. It also helps to eliminate problems like stringing and color fading in multicolor prints. With those advantages, it looks like the Swapper3D might be a worthwhile upgrade if you do a lot of multi-color printing, even though it adds quite a bit of complexity to the printer.

For larger, more expensive machines, swapping the entire toolhead is becoming more popular, with even E3D stepping into the fray.

Continue reading “Automated Hotend Swapping For Less Wasteful Multicolor Printing”

Hackaday Links Column Banner

Hackaday Links: July 24, 2022

OK, maybe that won’t buff right out. NASA has released a more detailed analysis of the damage suffered by the James Webb Space Telescope in a run-in with a micrometeoroid, and has deemed the damage “uncorrectable”. Not that any damage to JWST is correctable, at least in the sense that the Hubble Space Telescope was able to be fitted with optics to fix its precisely-yet-inaccurately-ground main mirror. JWST is far too remote for a service call, so correctability in this case refers to a combination of what can be accomplished by tweaking the shape and position of the affected mirror segment, and what can be taken care of with image processing. The damage to segment C3, as well as damage to the other segments in a total of six collisions in the half year Webb has been on station, are assessed via “wavefront sensing”, which looks at how out of phase the light coming from each mirror segment is. The damage sounds bad, and it certainly must hurt for the techs and engineers who so lovingly and painstakingly built the thing to see it dinged up already, but in the long run, this damage shouldn’t hamper Webb’s long-term science goals.

In other space news, we hear that the Perseverance rover has taken its first chunk out of the ancient river delta in Jezero Crater. The rover has been poking around looking for something interesting to sample, but everything it tried out with its abrading tool was either too brittle, too hard to get at, or scientifically dull. Eventually the rover found a good spot to drill, and managed to bring up a 6.7-cm core sample. This makes the tenth core sample collected overall, and the first from the delta area, which is thought to have the best chance to contain evidence of ancient Martian life.

Closer to home, we’ve all likely heard of robotic surgery, but the image that conjures up doesn’t really comport with reality. Robot-assisted surgery is probably a better term, since surgical robots are generally just ultra-precise remote manipulators that are guided by a skilled surgeon. But if a study on surgery robot performance is any indication, the days of human surgeons might be numbered. The study compared accuracy and speed of both a human surgeon controlling a standard Da Vinci surgical robot and an autonomous version of the robot alone, using a depth camera for sensing. Using a standard surgical skills test, the autonomous system matched the human surgeons in terms of failures — thankfully, no “oopsies” for either — but bested the humans in speed and positional accuracy. It’ll probably be a while before fully autonomous surgeons are a thing, but we wouldn’t be betting against it in the long run.

Most readers will no doubt have heard the exciting news that Supercon will be back this year as an in-person event! Make sure you set aside the first weekend in November to make the pilgrimage to Pasadena — it’ll be great seeing everyone again after the long absence. But if you just can’t wait till November for an IRL con, consider dropping by SCALE 19X, coming up this week in Los Angeles. The Southern California Linux Expo is being held July 28 through 31, and features a ton of speakers, including a keynote by Vint Cerf. Hackaday readers can save 50% on tickets with promo code HACK.

And finally, as a lover of Easter eggs of all kinds, but specifically of the hidden message in software variety, we appreciated this ode to the Easter egg, the embedded artistry that has served as a creative outlet for programmers over the years. The article lists a few great examples of the art form, along with explaining why they’re actually important artifacts of the tech world and what they’re good for. We tried out a few of the ones listed in the article that we hadn’t heard of before; some hits, some misses, but they’re all appreciated. Well, most of them — the corporate rah-rah kind can bugger straight off as far as we’re concerned.
Stackable 3D-Printed Gearbox For Brushless Motor

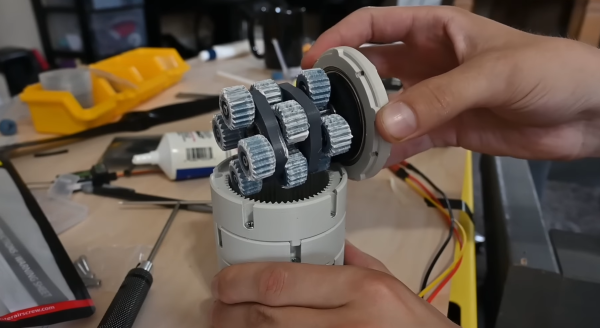
Affordable brushless motors are great for a variety of motion applications, but often require a gearbox to tame their speed. [Michael Rechtin] decided to try his hand at designing a stackable planetary gearbox for a brushless motor that allows him to add or remove stages to change the gear ratio.

The gearbox is designed around a cheap, 5010 size, 360 KV, sensorless motor from Amazon. Each stage consists of a 1:4 planetary gear set that can be connected to another stage, or to an output hub. This means the output speed reduces by a factor of four for each added stage. Thanks to the high-pressure angle, straight-cut teeth, and fairly loose clearances, the gearbox is quite noisy.

To measure torque, [Michael] mounted the motor-gearbox combo to a piece of aluminum extrusion, and added a 100 mm moment arm to apply force to a load cell. The first test actually broke the moment arm, so a reinforced version was designed and printed. The motor was able to exert approximately 9.5 Nm through the gearbox. This number might not be accurate, since sensorless motors like this one can not provide a smooth output force at low speeds. As [Michael] suggests, adding a sensor and encoder would allow for better testing and low speed applications. Check it out in the video after the break.

We’ve featured a number of [Michael]’s projects before, including a bag tracking corn hole board, and a 3D printed linear actuator. Continue reading “Stackable 3D-Printed Gearbox For Brushless Motor”

Interesting Optics Make This Laser Engraver Fit In A Pocket

We’re going to start this post with a stern warning: building a laser engraver that can fit in your pocket is probably not a wise idea. Without any safety interlocks and made from lightweight components as it is, this thing could easily tip over and sear a retina before you’d even have time to react. You definitely should not build this, or even be in the same room with it. Got it?

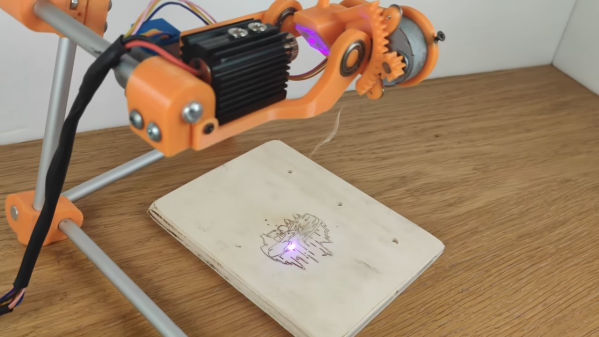
Safety concerns aside, [DAZ] has taken a pretty neat approach to making this engraver, eschewing the traditional X-Y gantry design in favor of something more like the galvanometers used for laser projectors, albeit completely homebrew and much, much slower than commercial galvos. Built mostly of 3D-printed parts, the scanning head of this engraver uses a single mirror riding on an angled block attached to gimbals with two degrees of freedom. The laser module and mirror gimbals are mounted on a stand made of light aluminum so that the whole thing is suspended directly over a workpiece; the steppers slew the mirror to raster the beam across the workpiece and burn a design.

The video below shows it at work, and again, we have to stress that this is about as close to this build as you should get. It shouldn’t be too hard to add some safety features, though — at a minimum, we’d like to see a tilt-switch that kills power if it’s knocked over, and maybe some kind of enclosure. Sure, that would probably spoil the pocketability of the engraver, but is that really a feature valuable enough to risk your eyesight for?

If there’s a laser build in your future, please read our handy guide to homebrew laser cutter safety — before you can’t.

Continue reading “Interesting Optics Make This Laser Engraver Fit In A Pocket”

Turn Drone Into A Large Propeller To Increase Hover Efficiency

Multirotor drones are significantly more popular than conventional helicopter designs for many reasons, which do not include efficiency. Making use of the aerodynamic effects behind this, [Nicholas Rehm] was able to significantly increase the efficiency of his experimental tricopter by turning it into one large spinning propeller.

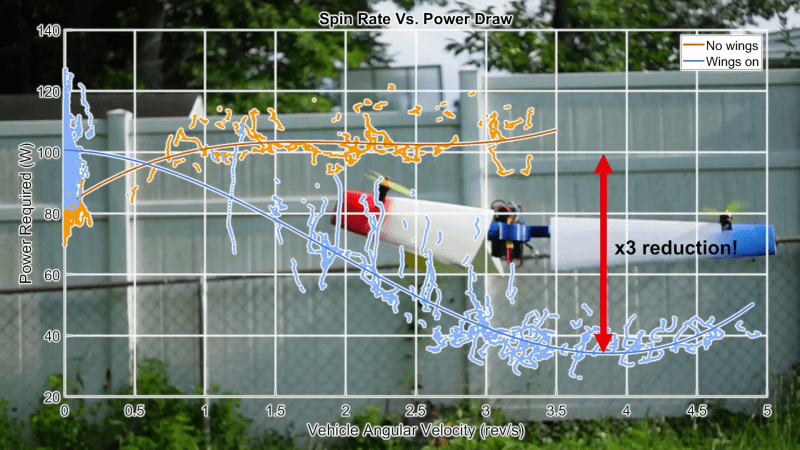
Since aerodynamic drag is proportional to velocity, a small, high-RPM propeller will require more power to produce the same thrust as a large, low-RPM propeller. With this in mind, [Nicholas] built a tricopter that can rotate all three long arms together using a single servo, giving it very aggressive yaw control. By attaching a wing to each of the arms, it becomes a large variable pitch propeller powered by tip thrusters.Power draw graph

To measure the efficiency of the craft, a small lidar sensor was added to allow accurate PID altitude control. While keeping the drone at a constant altitude a few feet off the ground, [Nicholas] measured the power draw of the motors in a hover, and then let the drone spin around its yaw axis up to almost 5 rev/s.

At a spin rate of 4 rev/s, the power draw of the motors was reduced by more than 60%. Even compared to the drone without the added weight of the wings, it still used 50% less power to maintain altitude.

Since [Nicholas] hadn’t yet implemented horizontal position control while spinning, the length of each test run was limited by the wind drift. He plans to solve this, and also do some testing of the drone in horizontal flight, where the added airfoils will also increase efficiency.

We’ve featured a few of [Nicholas]’ flying machines here on Hackaday, including a foam F-35 VTOL and a cyclocopter. Most of his aircraft run his open source dRehmFlight flight stabilization, created specifically for hacking.

Continue reading “Turn Drone Into A Large Propeller To Increase Hover Efficiency”

A ’70s TV With ’20s Parts

Keeping older technology working becomes exponentially difficult with age. Most of us have experienced capacitor plague, disintegrating wire insulation, planned obsolescence, or even the original company failing and not offering parts or service anymore. To keep an antique running often requires plenty of spare parts, or in the case of [Aaron]’s vintage ’70s Sony television set, plenty of modern technology made to look like it belongs in a machine from half a century ago.

The original flyback transformer on this TV was the original cause for the failure of this machine, and getting a new one would require essentially destroying a working set, so this was a perfect candidate for a resto-mod without upsetting any purists. To start, [Aaron] ordered a LCD with controls (and a remote) that would nearly fit the existing bezel, and then set about integrating the modern controls with the old analog dials on the TV. This meant using plenty of rotary encoders and programming a microcontroller to do the translating.

There are plenty of other fine details in this build, including audio integration, adding modern video and audio inputs like HDMI, and adding LEDs to backlight the original (and now working) UHF and VHF channel indicators. In his ’70s-themed display wall, this TV set looks perfectly natural. If your own display wall spotlights an even older era, take a look at some restorations of old radios instead.

Continue reading “A ’70s TV With ’20s Parts”