If you’re above a certain age, you probably remember the atmosphere of a pre-Powerpoint 35 mm slide show. The wobbly screen being unrolled, the darkened room, the soft hum of the projector’s fan, the slightly grainy picture on the screen and that unmistakable click-whoosh-clack sound as the projector loaded the next slide. Nowadays you’ll be hard pressed to find anyone willing to set up a screen and darken the room just to watch a few photos, so if you still have any slides lying around you’ll probably want to digitize them. If you’ve also kept your projector then this doesn’t even have to be that difficult, as [Scott Lawrence] shows in his latest project.
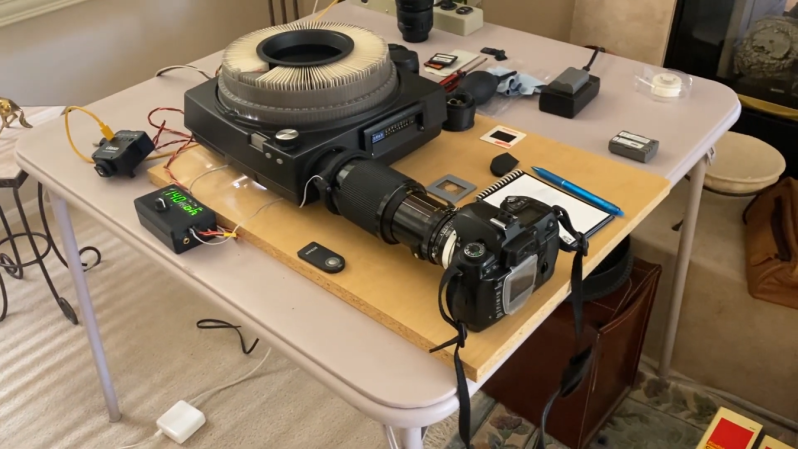
[Scott] made a setup to directly connect a DLSR, in this case a Nikon D70, to a Kodak 760 slide carousel. The attachment is made through a 3D-printed adapter that fits onto the Nikon’s macro lens on one side and slides snugly into the carousel’s lens slot on the other. The adapter also holds an IR transmitter which is aimed at the camera’s receiver, in order to trigger its remote shutter release function.
The carousel’s original light source was replaced with a compact LED studio light, which allows for precise brightness control and of course remains nice and cool compared to the original incandescent bulb. The light, camera and carousel motor are all controlled through a central user interface driven by an Arduino Leonardo which can automatically advance the carousel and instruct the camera to take a picture, thereby taking the hard work out of digitizing huge stacks of slides.
[Scott] plans to make the software and STL files available on GitHub soon, so anyone can go ahead and turn their projector into a digitizer. If you’ve misplaced your projector however, a simple 3D-printed slide adapter for your camera also works for small slide decks.


Why not just use a scanner with the slide attachments?
Why to even have Hack-A-Day right? /S
I thought this website was all about using what you have at your hands to get what you need… but maybe I’m wrong, sorry.
No.
If this site was about that this article would be detailing how you can buy a camera bellows on ebay for a few dollars that will attach to a slide projector and then you can spend 90 seconds pressing the trigger on the carousel and the shutter on the camera to bang out a whole box of slides. You could even do negatives, or 8mm up to 70mm with the same bellows! That very bellows could have been used by your local newspaper to steal shots from television footage back in the day, a little piece of local history!
No, Hackaday is mostly about justifying having bought a 3D printer and a joblot of Arduinos to find solutions nobody really needed in life, as this article demonstrates.
A robot arm that unpacked the negatives, blew dust off the slides, stacked them in the carosel and and then reboxed when you’re done might actually be a labor saver, though.
Because they are very slow and requires a lot of hands on manipulation of the slides.
I built a system similar to what is shown in the video but never bothered to fully automate it because it would rarely make it through a full carousel without a slide failing to drop. Even without full automation I could digitize a full carousel in minutes.
Or they’re expensive (though likely less than starting from scratch with this build). The video doesn’t show any results but my experience with these kinds of setups has been that there is uneven lighting and/or optical & chromatic distortion to deal with, and forget the little slide kits that come with some flatbed scanners – they’re awful.
I have scanned hundreds of archival family slides, but bit the bullet and bought a very good Epson flatbed photo scanner to do it. It will do a dozen at a time and to excruciatingly good detail (I can actually get a good image out of an 8mm movie frame out this thing, and it goes all the way to scanning big tintypes), but you pay for it.
Yeah I had a dedicated scanner but quickly realized that for most family photo collections filtering the wheat from the chaff was the main impediment to even starting the job.
Being able to rapidly get a good enough image and identify the slides that are worth putting the effort into archival scanning made the job of scanning thousands of slides doable. The reality I found was that most people just want something decent enough to share on facebook or instagram and most of the family pictures are not terribly high quality to start with.
The quality I have gotten from DSLR scanning has been more than good enough to match the 1950’s era camers used to take most of my family pictures. Ironically the latest set I scanned was shot on more modern gear but poor storage has left the slides in worse condition than the stuff shot in the 50’s.
That’s mainly it. If i didn’t do this, the slides would never be captured. None of us in the family would ever take the time to sort them, and personally the risk of sending them off somewhere is just too great… I had to forego dealing with dust, possible cropping/rotation… i can deal with those later, once i have the images digitized. My dad took about 20,000+ slides from the early 1960s through 2010 or so. (He was a professional photographer and would often shoot a dozen rolls of slides on a family trip).
Why not just send all your slides to a digitising bureau?
I have digitized many many negatives (with a reasonable special purpose negative scanner) and do that instead of sending it to a bureau because –
1) I don’t have to give the negatives to someone else, who night lose or damage them.
2) I can individually ‘tune’ how much work to do on each negative based on how important it is.
3) because of (2) I end up with a better result…
Whoosh!
Lots of slides? Many $$$.
Just checked online and it’s about $0.75 per slide. If you have 1000 slides then that’s $750… and you don’t even get a camera out of it.
Why not paying a homeless to it by hand?
the other answers are great and i would just add that if you happen to have the camera and the projector handy then you know what’s gonna happen … you know: “a hack.”
Because:
– I knew I had about 20,000 slides to do (I got through about 4000 or so)
– I needed it to be automated so i could run it while i was doing work/visiting my mom
– I didn’t have the time to do the manual effort involved with using a proper scanner.
– My mom has the carousel projector, I have a DSLR, can program an arduino… it just seemed like a good way to go, without spending any moneys.
DIY telecine scanning would be handy.
I also have a bunch of slides that need digitizing and already have a DSLR and a carousel. The only downside is lack of Integrated Infrared dust/scratch removal that a slide bureau or slide scanner (Plustek 8200i $400) can perform. Not an issue for 80% of the slides to copy and probably could send out some to copy but it would be nice to be able to clean up the slides at home
Sure… and some of the slides I digitized in this first run (about 4000 resulting images or so) have pretty bad dust… but these are not for professional use. They’re family photos. My goal was always to preserve the memories, not the silver halide… The goal is for me and my family can continue to view these old photos, rather than them disappearing forever in the closet they’re in. I only got through about 1/3 of them on this trip too!
I did the very same thing myself a few years ago, to digitize my fathers old slides.
Bought an old carousel projector and a bunch of carousels for cheap at a local flea market. Used an Arduino with micro relays to advance slide on the projector and to control the trigger on the DSLR.
I ordered a matching lamp, but with much lower wattage and made a diffuser from a piece of white plastic. It was not perfect (darker corners), but it worked good enough for me.
Oh yeah… I also dumped the photos to a USB drive directlry from camera. Here was my setup:
https://youtu.be/6lMmjbwEKiY
Very nice! :D
I’ve built something similar using a more modern camera so I could hard wire the shutter control. Works pretty well though I didn’t put as many features into the firmware. A couple of things to consider
– I assume you set the f number to 22 so you don’t have a depth of field problem with slide film mounts degrading and causing wavy film. I think at f/22 you run into diffraction. I had good luck with autofocus and a lower f-number.
– Are you cleaning your slides before putting them in the carrousel? I had a lot of dust on mine and set up a blower that cleaned the slide before it dropped into the imaging mount. Pretty effective. Just cleaning the slides before mounting wasn’t quite enough for me.
– I gave up on the kodak carrousel because of misfeeds and jams. Perhaps I need to learn about maintenance of it. Instead, I set up a manual Agfa slide rack that used a microswitch to trigger the camera cycle. Not automatic but relatively easy to do.
– I would have used a wired control, but the D70 is all I have. And its only interface is IR for remote triggering. I’ve very strongly considered hacking in wires to the shutter button.
– Yes. My final results were at f/22, f/11, f/8… around that range depending on the slide. Since i was using an old non-AI lens, as well as a non-AI 2x converter, autofocus was not even on the table. No problem though… I just adjusted the macro/focus manually before a few runs… (after changing the battery in the camera… i don’t have a power brick for it either)
– Most of the slides i was capturing were well stored. Either put into trays 40 years ago, or stored in their processing boxes 40 years ago… ;D Some of them did have some bad dust issues, but i was more concerned about quantity and didn’t clean them. I did have to use a rocket/squeeze bulb to blow dust off of the diffuser and over the slides in the trays for good measure though. :D
– All four Carousel projectors I’ve been using seem to be working well. I had to repair two of them, since there’s a plastic link on the frame advance solenoid which just disintegrates after 50 years.. The only issues i had were mainly with the stack loader. It was jamming pretty bad, but i cleaned it, lubed it a little, and adjusted the grabber blade thing, and now it works 100% of the time. :D I do have some double-exposed images from the 1964 World’s Fair that look really trippy thanks to the mistakes it was making though…hehhe
Fantastic work!
Got a question regarding the lightsource. Every built i see used some LED-Arrays.
Isn’t it possible to use the original bulb? If to bright, maybe with a ND-Filter between?
Or will the light anyway be much too bright?
The original bulb is way higher intensity than is needed for this purpose.
I used a single low wattage high CRI led and replaced the heat adsorbing lens with a piece of white acrylic to act as a diffuser.
For those of you who have automated this setup, have you worked out the timing for focus, shutter, and carousel advance stages? (i.e., how long to hold focus low before dropping shutter (could be 0), how long to hold shutter low (with or without first holding focus low), how long to hold carousel advance low, how long before starting the next shot.)