A slide carousel with a DSLR attached to its lens output

Digitize Your Slide Deck With This Arduino-Powered Slide Carousel

If you’re above a certain age, you probably remember the atmosphere of a pre-Powerpoint 35 mm slide show. The wobbly screen being unrolled, the darkened room, the soft hum of the projector’s fan, the slightly grainy picture on the screen and that unmistakable click-whoosh-clack sound as the projector loaded the next slide. Nowadays you’ll be hard pressed to find anyone willing to set up a screen and darken the room just to watch a few photos, so if you still have any slides lying around you’ll probably want to digitize them. If you’ve also kept your projector then this doesn’t even have to be that difficult, as [Scott Lawrence] shows in his latest project.

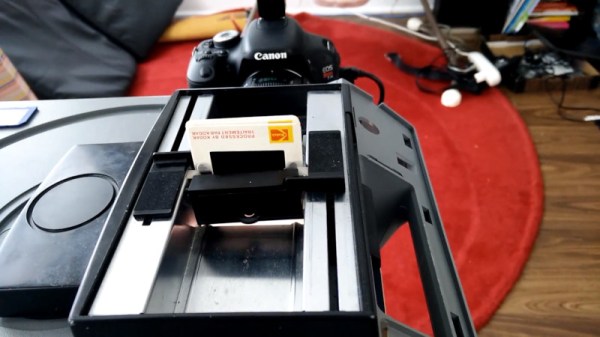
[Scott] made a setup to directly connect a DLSR, in this case a Nikon D70, to a Kodak 760 slide carousel. The attachment is made through a 3D-printed adapter that fits onto the Nikon’s macro lens on one side and slides snugly into the carousel’s lens slot on the other. The adapter also holds an IR transmitter which is aimed at the camera’s receiver, in order to trigger its remote shutter release function.

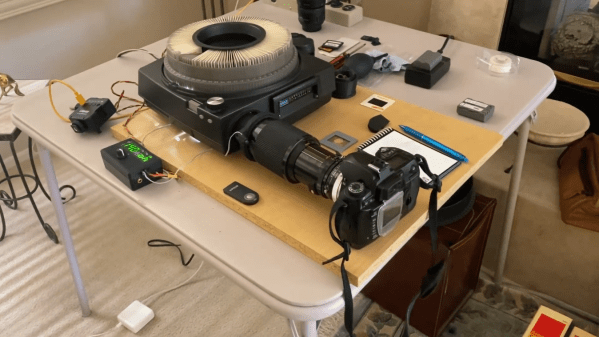
The carousel’s original light source was replaced with a compact LED studio light, which allows for precise brightness control and of course remains nice and cool compared to the original incandescent bulb. The light, camera and carousel motor are all controlled through a central user interface driven by an Arduino Leonardo which can automatically advance the carousel and instruct the camera to take a picture, thereby taking the hard work out of digitizing huge stacks of slides.

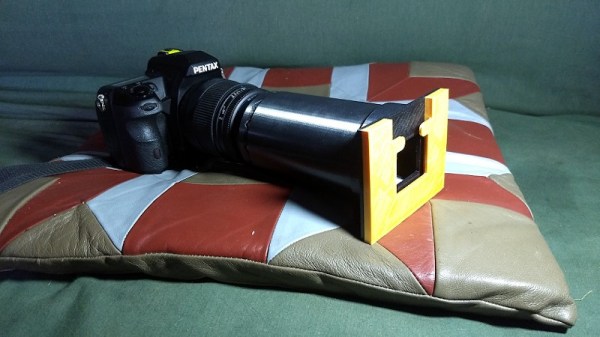
[Scott] plans to make the software and STL files available on GitHub soon, so anyone can go ahead and turn their projector into a digitizer. If you’ve misplaced your projector however, a simple 3D-printed slide adapter for your camera also works for small slide decks.

Continue reading “Digitize Your Slide Deck With This Arduino-Powered Slide Carousel”

3D Printed Adapter Puts Slides In Their Best Light

If you’ve got old family photos on slides there’s an excellent chance you’ve considered digitizing them at one point or another, but perhaps didn’t know the best way of going about it. In that case, this 3D printed adapter designed by [Rostislav Persion] that lets you photograph slides with a standard DSLR may be exactly what you were waiting for.

The idea is simple enough, you place the slide inside the adapter, get your focus right, and snap a picture. But of course, you’ve also got to provide some illumination. In this case, the camera is mounted on a tripod and pointed at an appropriate light source. Once you’ve experimented a bit and got the image backlit the way you want it, you can lock everything in place and easily power through a stack of vintage family memories in no time.

For such a straightforward concept, we really appreciate the little details in the execution. For example, rather than just sliding a 3D printed cylinder over the DSLR’s lens, [Rostislav] came up with a foam-padded “shim” that’s strong enough to hold the adapter on without marring anything. The two-part slide spacer that features a bit of springiness to hold everything tight is also a very nice touch.

An approach like this should work nicely for the amount of slides most families are likely to have, but if you’re in a position where you need to digitize thousands of images, some automation would certainly help things along.

A High-Speed Slide Scanner Build

Photographic slides were popular in the middle part of the 20th century, but are long forgotten now. If you’ve found a handful in a dusty attic, you might consider sending them away to be digitized professionally, or using a flatbed scanner at home. [Bryan Howard] found himself with over 200,000 slides, however, so that just wouldn’t do. Instead, he endeavored to build an automated scanner of his own. 

Like many similar projects, [Bryan] started with an existing slide projector as a base. This means that all the difficult work of slide transport is already taken care of. The projector has then been upgraded with an LED light source and other tweaks befitting its new role. An Arduino Pro Micro runs the show, firing off the camera to image each slide before loading the next one into place. The DSLR responsible for imaging is then hooked up to a PC so the incoming images can be checked while the machine is in operation.

Preliminary tests are promising, with the scanner successfully capturing several slides in a row. [Bryan] estimates that, with a capture time of between 1 and 2 seconds per slide, it should take somewhere between 2-5 days to image the entire collection.

We wish [Bryan] the best of luck with the project, and look forward to seeing the final results. We’ve seen similar work before, too. Video after the break.

Continue reading “A High-Speed Slide Scanner Build”