Raspberry Pi has just introduced a new camera module in the high-quality camera format. For the same $50 price you would shell out for the HQ camera, you get roughly eight times fewer pixels. But this is a global shutter camera, and if you need a global shutter, there’s just no substitute. That’s a big deal for the Raspberry Pi ecosystem.
Global vs Rolling
Most cameras out there today use CMOS sensors in rolling shutter mode. That means that the sensor starts in the upper left corner and rasters along, reading out exposure values from each row before moving down to the next row, and then starting up at the top again. The benefit is simpler CMOS design, but the downside is that none of the pixels are exposed or read at the same instant.
Contrast this with a global shutter, where all of the CMOS pixels are exposed and then their values stored until they’re all read out. This is a much more complicated device, because each cell essentially needs sample and hold circuitry, and this explains the lower pixel density. But the result is that the picture is actually a snapshot in time, and if anything in your scene is moving fast, that matters.
So who needs a global shutter? First and foremost, it’s a must for machine vision. The combination of moving subjects and rolling shutters distorts the shape of whatever is in view, and if you’re trying to measure it’s size or even determine its correct outline, then you need to be filming it with a global shutter. Quad pilots will know the flip side of the rolling shutter coin – the “jello effect” (YouTube video link). On quads, it’s not the scene but the camera that’s vibrating rapidly, and this makes even static scenes appear to wobble like that horrible old cliché dream-sequence effect. No good.
Or imagine that you’re taking pictures of lightning, or other short-lived events, and maybe you want to time it. With a global shutter, one frame will be dark and another will be light. With a rolling shutter, you’re almost guaranteed to have half-filled frames on either end.
Here I’ve pulled out the classic demo: a spinning propeller. Have a look at the strange shapes that come out of the rolling shutter camera! All of the images are blurred a little bit because the blade was moving fast during the exposure; if you need to reduce the blur, more light and shorter exposure times would help. But if you want to unbend the banana, only a global shutter can save you.


Similarly, check out the video demos. As I ramp up and down the propeller speed, you can get glimpses of the shape aliasing with the cameras’ frame rates. With the global shutter, you get nice clovers, but with the rolling shutter, you get sickles and even disconnected ghost blades. Trippy.
For more on rolling-shutter effects, check out this video.
Is This Camera for You?
If you have $50 burning a hole in your pocket, and you need a camera sensor for your Pi, what do you get? On the pros side, the global shutter camera has a global shutter – that’s obvious enough. It’s also got fairly good light sensitivity, can record 1440 x 1080 pixels at 60 frames per second in video mode, and each of those frames is an actual snapshot in time. The big con is that the resolution is a lot lower relative to the HQ rolling-shutter camera. But for computer vision, and a lot of other non-artistic applications, 1080p is plenty. Honestly, if you’re running CV on a Raspberry Pi, the reduced pixel count is probably a blessing.
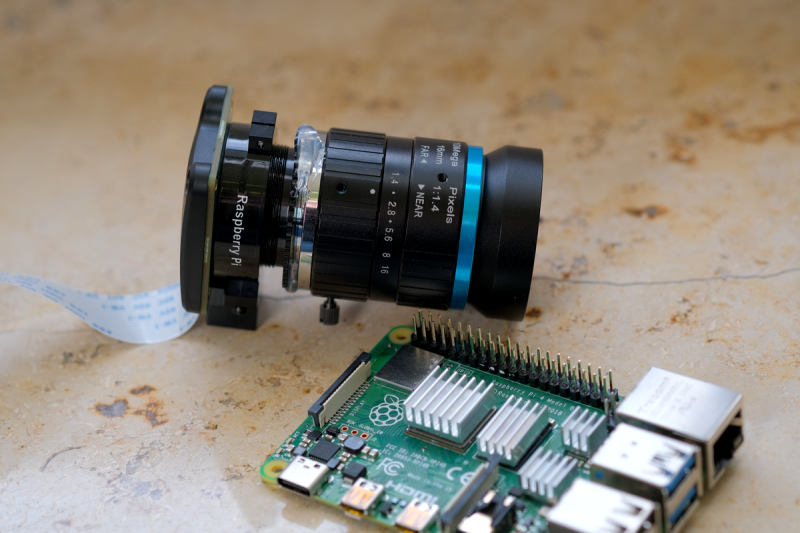
Like the HQ camera, this camera has a bigger sensor than the cheaper Raspberry Pi cameras, but you have to (or get to) provide your own lens. Both the HQ and the global shutter cameras have C and CS mounts, which means that you can screw in any CCTV lens, or even 3D print an adapter to attach these to anything from a microscope to a telescope. Sometimes you want a camera, other times you just want the sensor. Here, you’re just getting the sensor and a tripod mount. Factor the price of a lens into your budget if you want a camera.
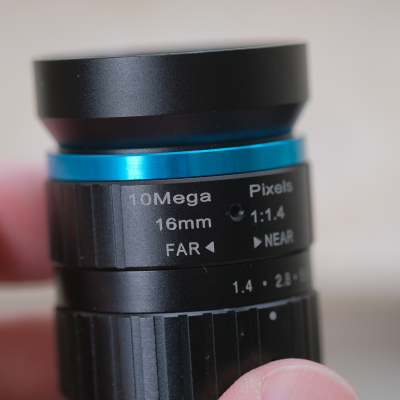
I got this model for free for review from Raspberry Pi, and they included a lens. It’s pretty good, but for whatever reason it wasn’t easy to get it to focus correctly on the sensor. I think it’s missing a spacer somewhere in the C-mount adapter stack-up, which explains the hot glue in my glamour shots. Longer-term, I’ll probably 3D print up the correct size ring. I also love that the lens manufacturers rated the (analog) optics for the number of megapixels it produces. Physics!
As with the HQ camera, you have to use the new libcamera software and drivers. They are a lot more capable and user-friendly than the old raspistill and raspivid, so it’ll be no problem if you’re writing your own code. But do note that some older programs, like the excellent RPi Cam Web Interface, don’t work with the newer libraries yet.
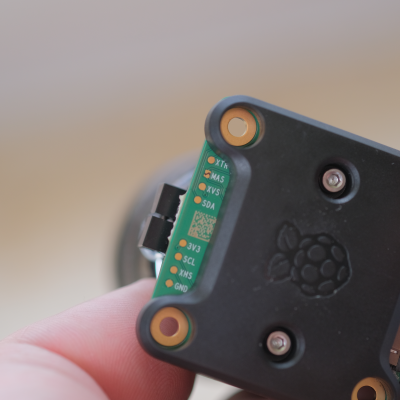
Finally, and I don’t know if this is in common with the HQ camera, there are some inviting test points broken out on the back side of the camera. Anyone know what to do with them?


Oh man,
I have done some low level camera stuff and work and academically.
Those broken out pins are related to configuring the camera sensor. Specifically, the I2C lines are for configuring the registers of the internal Camera controller. These little cameras mostly use MIPI to the actual transferring of image data between the camera the larger system. (which has been a nightmare of locked gates to work with)
My guess is that the other exposed pins are to break out functionality of the sensor to the real world, hence Xyz for “Xternal.” Maybe XTR for external trigger, I wonder what the others are, maybe some sort of external shutter or exposure control.
maybe XHS and XVS are external horizontal scan and external vertical scan? That would be a cool way to change to a custom resolution on the fly.
X is sometimes used as bar, as in active low. So probably syncs for vertical and horizontal. MAS could be master? So you can sync multiple cameras.
It’s for camera module streaming mode, google “Camera module Stream Mode manual” for an explanation.
I posted a link to the explanation *and* a link to the full datasheet of the sensor, but the HAD spam system ate the submission.
Here’s an obfusticated link to the full datasheet for the sensor:
scientificimaging (dot) com (slash) wp-content/uploads/2021/01/FSM-IMX296_V1A-V1B_Datasheet_v1.1b_Full (dot) pdf
Those are for camera stream mode: http://wiki.veye.cc/index.php/Camera_module_Stream_Mode_manual
One camera module is configured in master mode, and the other camera modules are configured in slave mode.
The camera module in master mode outputs XVS and XHS signals, while the camera module in slave mode follows the master module for exposure and output data.
In this mode, the exposure parameters of the camera module can be configured manually or automatically.
Also, the full datasheet for the imager chip is here:
https://scientificimaging.com/wp-content/uploads/2021/01/FSM-IMX296_V1A-V1B_Datasheet_v1.1b_Full.pdf
Does that genlock the cameras too? Synchronous exposure would be very useful for some applications (e.g. object tracking).
if only there was a pi available to plug it into
I know, right? I actually had to borrow my son’s Minecraft server just to make those demo images.
Good thing it’s as easy as pulling out one SD card and putting in another. But I gotta remember to set things right again before the weekend…
🤣🤣🤣
Oh man. I would somehow hate and love to be your son.
I really wish there were more $30-40 SBCs that had CSI2 ports and the appropriate Linux drivers for their camera hardware, it might be easier to try out the new Pi cameras on obtainable hardware.
But looking at the cost of the SBCs that support CSI2 ports, it makes me wonder if there is a ridiculous licensing fee to use the standard.
There used to be a time when even consumer grade pocket cameras had global shutter, because they were using CCDs with a dark frame: the device was actually two sensors edge to edge where one half was covered up.
When the exposure was done, the camera would quickly move the image over to the dark frame, because with a charge coupled device you march the pixels along the line in analog mode towards the ADC. The CPU would simply strobe every line very quickly to shift the picture, then take its time reading it out line by line, pixel by pixel, avoiding the need of ultra-fast ADCs.
The rolling shutter problem became a problem when manufacturers started cutting cost with CMOS sensors, because the chip size is immediately halved – but with active switching circuitry in every pixel they were less sensitive to light, had worse dynamic range, and with the megapixel wars the cameras became downright shitty. You get the same effective “quality” from a modern 21 mpix CMOS camera as you do from a 12 mpix CCD camera from 15 years ago after you pull all the tricks to stack exposures and filter out noise – only the older camera did it in a single shot without the benefit of AI algorithms to guess what’s lurking in the darkness.
Any examples on those types of cameras? Can’t seem to find them documented
There are several kinds of CCD architectures. You might find some by looking at “frame transfer CCD”. Note that DSLR cameras typically use full frame sensors – and have mechanical rolling shutters.
Example from 1991
http://lampes-et-tubes.info/sd/sd004.php
For what little information remains online, it seems that at least Pentax used frame transfer sensors in their early digital cameras from 2001 onwards. I think most CCD cameras around 2005-2015 actually used interline transfer sensors with microlenses.
https://andor.oxinst.com/learning/view/article/ccd-sensor-architectures
Interline transfer places the “dark frame” in alternating bands over the sensor, so you can use the full sensor area for light input – at least if you direct the light to the active area of each pixel with a microlens. It has the same property of virtually instant frame capture without a mechanical shutter, which was a selling point of CCD cameras over CMOS back in the day.
It’s a whole lot more complicated than this in reality I’m afraid. Yes CCD’s have a huge advantage of a global shutter, or almost so in frame transfer camera described above, although you can get great streaking in very bright areas surrounded by dark.
The huge advantage of cMOS sensors is they usually have more than a single readout channel and can readout larger sensors, more rapidly without too much compromise on the readout signal-to-noise (S:N). If you have a 512×512 CCD with a single readout then a 10 MHz readout rate gives about 30m frames/s. This gives a pretty terrible S:N, to faster readout you need more than one ADC, which cMOS have. In fact current CMOS sensors have 10’s of megapixels which can read at 60, 120 or even 240 frames/s, this just isn’t possible with CCD type sensors.
Yes CMOS sensors have all kinds of weirdness, hot pixels, fix pattern noise, etc but the inbuilt corrections can fix a lot of this and their advantages far outweigh the drawbacks.
On the other hand, with frame/interline transfer CCD, you can be exposing the next frame while you’re still reading the previous because the two are not strictly coupled, so that helps with the frame rate.
The advantage of CCD in yesterday’s digital cameras was that consumer grade cameras could not afford very fast or many parallel ADCs. For disadvantages, you had much higher power consumption and the streaking problems etc.
For the advantages of CMOS, it’s about which compromise you like better. I would rather live with the rest to have the better noise characteristics, dynamic range, and low light response back. In fact, the blue/violet chromatic bleeding is kinda cool in my opinion. It gives the picture a nostalgic look. Maybe the next generations find the speckled “plastic face” noise reduction algorithms used on CMOS the same.
Thanks for highlighting this! We’ve a project that tracks bumblebees using a global shutter camera and flash. The camera is 70-80% of the unit cost. So this could be really interesting…
If you have a flash why not use a rolling shutter and just fire your flash when all your pixels are active?
Because the shutter may not reveal all the pixels at once. With shorter exposure times, the shutter is only partially open with the back and front curtains following in close proximity. That would be the case when you’re trying to capture something fast using the flash to freeze motion.
In DSLRs that problem is partially solved by pulsing the flash for an extended period of time, so the flash is on for the full duration of the shutter motion. You still get the rolling shutter effect though.
Point being, the shutter curtains can’t move arbitrarily fast – in most cameras they move at a fixed speed, so to get to short exposure times you send the front curtain moving and then almost immediately send the back curtain after it, so the difference in time between the front and back curtains corresponds to the desired exposure time.
That means, the full frame is exposed at once only with long exposures, like 1/50. You can fire the flash at that moment, but it’ll over-expose the image unless you’re shooting in the darkness.
Darkness or your lens is stopped down…
> With a large pixel size of 3.45μm × 3.45μm providing high light sensitivity, the Global Shutter Camera can operate with short exposure times (as low as 30μs with adequate lighting), an advantage for high-speed photography. Would that would imply a maximum framerate of 33,333 fps.
1456 x 1088p60 is the default, so that would imply that 57 x 50p33333 might be possible ?
The exposure time is between the cell erasure and readout. There’s other processing going on besides that.
I wonder if the ’10Mega Pixels’ rating is a “you won’t see any of the lens defects on a sensor lower than this” type thing. As it is sort of believable that the lens quality can actually be marked that way – though exactly which type of defects they do and don’t consider for that…
Certainly strikes me as rather odd.
Either way seems like another good Pi product, sensible price for an interesting sensor.
It depends on what you count as a “pixel”. WIth a bayer pattern sensor, depending on the de-mosaicing algorithm used, the pixel count of a sensor gives you about 2/3rds the amount of actual RGB pixels of information after it’s been averaged out.
“Blurring” the picture in this manner is actually necessary to avoid moire and other aliasing effects with the pixel grid. 2/3rds or approximately 0.7 just happens to be a good compromise to avoid artifacts while maintaining sharpness in the typical case. Guessing from that, a lens that draws at “10 megapixels” is sharp enough to resolve about 6-7 mpix worth of actual detail, because that much is what you’d get in the output anyways.
This is great, but I am still waiting for direct input and output on the camera module for light strobe and trigger from other sources. Does anyone know if such modules exist and if not. How do you handle hardware trigger when timming is at most importance?
Many, many cameras exist that have trigger and strobe lines, but those that actually break them out to the user are generally sold as such, with corresponding price points. Thorlabs, IDS Imaging and Point Grey all have multiple models available.
But many modules at lower price points have the outputs/inputs too, but not broken out to connectors. You can get them on footprints on the camera board.
The famous MT9M001 sensor, used in the Kinect and available cheap, is one. Arducam can drive it, and has a board for it. It’s also kind-of available (though end of life) as the IDS UEye UI-1240 or the Thorlabs DCU or DCC camera families.
Yeah. I should be clear that the lens is a “CGL Electronic Co, LTD” product, and the Raspberry folks just supplied it.
But a lens is a lens. You _can_ talk about its ability to resolve two lines from each other, but there you have to talk about the distance between them. How many pixels this is depends on the pixel density of the sensor and etc.
Anywhoo. I’m just nitpicking. Point is that it’s probably not a good enough lens if you’ve got a 20 MP sensor, but it’s probably just fine for 5 MP, and that’s actually useful information from the manufacturer. So I should leave the nits alone! :)
Still, the number of megapixels doesn’t tell you the physical sensor size, which is what you need to tell whether the lens is good enough for this many Mpix.
Well, for more megapixels you can make the pixels smaller or the sensor bigger. The lens has a border where two pixels are so close together, that they see no difference (blur due to lens quality), and a size border, which is the biggest archievable picture size (depending on usable focus and lens diameter). These two combined define a maximum of obtainable pixels, which only depends on lens properties.
If you rate the lens by how many “megapixels” it can throw over its largest useful drawing circle, that number would not be relatable to sensor megapixels because the sensors do not occupy that much area.
By my calculation, if my camera has 100 pixels and yours has eight times fewer then you owe someone 700 pixels.
With positive multiplication, you raise the number you’re multiplying with to the power of +1. With negative multiplication, you raise the number to the power of -1. It’s that simple.
Eight times fewer is simply multiplying by 8^-1
I can’t stop seeing the smoking emoticon in your reply.
(puff) that was for emphasis.