Blender is a professional-grade 3D-rendering platform and much more, but it suffers sometimes from the just-too-perfect images that rendering produces. You can tell, somehow. So just how do you make a perfectly rendered scene look a little more realistic? If you’re [sirrandalot], you take a photograph. But not by taking a picture of your monitor with a camera. Instead, he’s simulating a colour film camera in extraordinary levels of detail within Blender itself.
The point of a rendering package is that it simulates light, so it shouldn’t be such a far-fetched idea that it could simulate the behaviour of light in a camera. Starting with a simple pinhole camera he moves on to a meniscus lens, and then creates a compound lens to correct for its imperfections. The development of the camera mirrors that of the progress of real cameras over the 20th century, simulating the film with its three colour-sensitive layers and even the antihalation layer, right down to their differing placements in the focal plane. It’s an absurd level of detail but it serves as both a quick run-down of how a film camera and its film work, and how Blender simulates the behaviour of light.
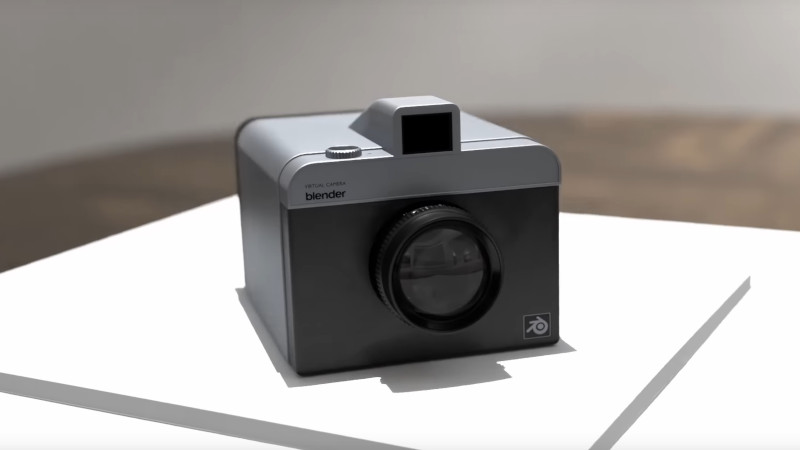
Finally we see the camera itself, modeled to look like a chunky medium format Instamatic, and some of its virtual photos. We can’t say all of them remove the feel of a rendered image, but they certainly do an extremely effective job of simulating a film photograph. We love this video, take a look at it below the break.
Thanks [Concreted0g] for the tip.


Amazing work but the grain doesn’t work in realistic way.
Film grain isn’t just digital noise (well, usually it is because of the mediocre digitization techniques used). Grain is clumps of silver crystals and those behave differently based on luminosity because grain defines “tonality” or “tones” as it is either lots of holes or not holes at all in the developed negative.
What causes the digital noise?
Bad scanning. Or bad image compression. (Or photos taken with digital cameras)
Well.. digitalization :) Usually consumer level scanners resolve grain as noise and people think that it is the real grain structure – but it isn’t. The noise follows the grain patterns for sure. Problem is that at even at *real* 2400 DPI resolving capability, the grain is too small to be resolved.
I heard it was the actual photons hitting a sensorpixel or not.
This is about scanning already made analog pictures. If you take a picture with a digital camera there is (of course) no film grain as there is no film. ^^
When you use a modern raytracer, instead of casting a ray from each pixel, scanning from left-to-right, top-to-bottom, instead it picks a random pixel to sample, or perhaps it actually casts from the light-source instead of from the camera. The result result is a sparse, noisy sample that you can stop when it’s good enough instead of running all the way through which takes forever. Usually at that point, the sparse image is passed through a denoiser (This is where AI image diffusion came from. NVidia RTX raytracing e.g. is a real-time AI denoiser.) In the case of this project, they turned off the denoising step, or minimized it as much as the tool would let them.
I keep looking at the image of the camera and kept thinking, “something is wrong here.” And now I think I figured it out. The lens is on the wrong side of the camera.
The viewfinder is just above the lens. If this were the arrangement on a real camera, the lens would be pointed at your face.
Good catch! Ha, ha, I couldn’t figure out what was wrong either.
Selfie camera?
B^)
I thought it was a light meter or maybe a split window rangefinder.
That’s a viewfinder camera, a Blender camera embedded in in the model used to point the model camera right. There is no back piece, as there is a software camera inside and not, obviously, an eye. Somewhere in the video he mentioned creating a darken filter in this camera to guess the correct exposure.
Blender simulates light, yes, but cannot do coherent light (laser)
Now add flash to the camera 📸.
B^)
There are many professional rendering packages which work this way, such as Maxwell. Really cool to see it implemented in Blender though!
This idea is not at all new – “unbiased rendering” systems like Maxwell, which really do simulate light, include detailed simulations of real optics and film stock, and give fantastic results at the cost of unbelievably long rendering times.
I say unbiased renderers “really do” simulate light, because most renderers don’t. The common technique that comes closest is ray tracing, which asks “what paths can light take from the light source(s) to this pixel?”, but in reality, the question is “where do the photons from the light sources end up?” For nearly all photons, the answer to that question is “not at the image plane”, which means unbiased rendering spends most of its time on calculations that don’t end up directly affecting the image.
But the advantage is you can model scattered light, and quantitatively calculate the contribution from different sources. So if you’re an architect or interior designer, you can see what it would *actually* look like to have a space lit by, say, an Erco 30 degree halogen spot plus indirect sunlight bounced off plaster walls. Standard renderers can fake some of that (with tricks like ambient occlusion), but you have to tell them how the image should come out, rather than the software telling you. And no fast renderer can fake scattering well.
Even unbiased renderers aren’t perfect simulations, as they don’t model diffraction (with very specific exceptions).
Cycles, the renderer in Blender, is already unbiased. Overall it’s very minor aspect in the qustion of physicality of the light simulation, and completely unrelated to film/lens simulation. More relevant property here would be spectral rendering, modeling light as a spectrum of wavelengths instead of just RGB triplet; that would have gotten the dispersion effects that the author abandoned.
There was tests done years ago on the Luxrender forums using data from fisheye lens patents.
Does it do halation?
That is literally mentioned in both the article text and the video.
But no picture of the virtual camera taken by another virtual camera.
Guess he only made one and was out of mirrors
There is a selfie in the video though :D
All that work and it just looks like standard renders with a noise filter on top.
Somewhere something went wrong
Yep, there’s an error in your expectations.
Ha, that’s one way of looking at it.
And it’s universally usable. It’s all just one humongous error in our expectations.