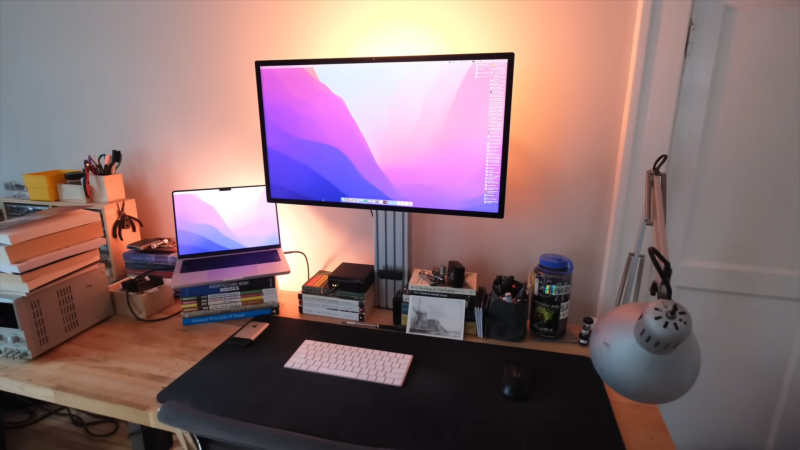
Monitor stands vary wildly in price, from a few cents for a pile of books from a thrift store to hundreds of dollars. One trendy style, as [Steven Bennett] puts it, is the “General Grievous,” with adjustable arms splayed around a central pole. While effective, it is not particularly aesthetically pleasing. [Steven] set out to make his monitor stand out of extruded aluminum.
[Steven] started with a cantilever design with a VESA adapter and a c-clamp. With some 3D-printed adapter brackets, he could attach them directly to the tracks in the aluminum. Of course, the 3D printed parts, while great for prototyping, might not be the best choice for the loads he was planning on. He sent it off to a fab to get some powder-coated steel parts. After using it for a few months, he revisited the drawing board. Moving away from the cantilever with an offset center post, he switched to a single 1×4 piece of aluminum. This allowed him to create 3D-printed attachments to hold his headphones, flash drives, and cables. A build guide is available online, as well as printable add-ons.
While it doesn’t have a built-in computer like this glorious wooden stand, we can’t deny the utility or the aesthetic of the aluminum version.
Video after the break.


under a grand? cough choke srsly?
Thanks. I’ll put up with the scrap of 2×4 screwed to my wall. Bonus: zero desk footprint.
And almost a grand left over to spend on a monitor too.
I’ve repurposed a CRT era folding arm clamp on the desk type by removing the big tray and hacking the metal but not plastic parts of the stand to connect with the swiveling end . 2D freedom for free. I have at least one other still in the box.
If you dig the extruded aluminum look but don’t want to track down all pieces for a height adjustable monitor stand that had to be screwed into your desk, you could just buy an Ergo Desktop Kangaroo for a few hundred bucks.
I’ve had mine for over a decade, and it’s the bees knees.
Was idle so watch most of the vid.
I’m kind of light in the 3d/design acumen, but found it amusing at how the guy felt it was a challenge to ‘design’ and ‘build’ such a challenging product….
Some extruded aluminum of AMZ, a piece of plate, a hand drill and a couple of taps for $20… Most difficult thing might be getting a C-clamp attached.
Seriously asked how/why Apple was charging $1K for a 500mm single pole attachment before showing how everything Apple does is CNC-intensive.
$125-150 for a DIY Amazon industrial crap looking should easily be do-able by most non-Contractors.
I agree with Paul, get the level you want and throw a piece of strut, angle or 2×2 on the wall for $20 and now you have close to a grand left over for stuff.
I
I made a triple monitor version using rose+krieger 4080 profile with adjustable side arms for less than £200
I guess I didn’t mean to imply in the video that the project was particularly challenging or the solution was at all ingenious. I just figured some people might want to make one for themselves seeing as there aren’t many comparable alternatives at this price point.
Hi Steven – you have a great video. Not everyone is as technically inclined as Mr. Boots up above. I can definitely say your monitor stand design has given me a few ideas for something to whip up on my end. Thank you!
“Seriously asked how/why Apple was charging $1K for a 500mm single pole attachment before showing how everything Apple does is CNC-intensive.”
The $1k price would make more sense if it was manually machined. By dwarves, in Moria.
Well done. From a technical point of view.
The design isn’t exactly my taste, though.
It looks too raw, like it’s meant to be used in a sub marine. And the room.. *sigh* No carpet, no room plants. No cat. 😔
On the bright side though, the dude is very optimistic. Thumbs up for that. 👍
Thanks for sharing.
Aluminum extrusions are the the Erector set of the modern era. I have come to absolutely, positively adore them and, since my wife at least tolerates the look, have started using them throughout my house (CNC machines, furniture, kitchen accessories, and many more things). It took me some time to learn the important fundamentals (like, how to choose among the various incompatible “profiles” that are available), but I’ve got all that worked out and can now quickly throw together pretty much anything I can imagine—though It helps that I’ve purchased a massive collection of different connectors, which are the magic that makes this all work
8020.net is my favorite site for educational material and some specialized parts, and OpenBuilds (great company!!!) is my go-to for most of the components, including the extrusions themselves, that I use. Maker Store has some very useful connectors that I haven’t seen elsewhere, and a lot of generic parts are available from various sellers on Amazon (just consider carefully the compatibility). If your project will involve motion components (as with CNC machines), you need to understand the difference between the original T-slot profiles and the superior V-slot versions developed by OpenBuilds (open design, so also available elsewhere).
If you’re scared off by Steven’s use of 3D-printed parts (or the need to purchase custom components), note that he seems not to have investigated the available connectors. Inexpensive, off-the-shelf parts could replace his two specialized joining plates, if used creatively. Having a broad collection of connectors like I do, even if you initially buy only a few pieces of each, can make it vastly easier to solve complicated design problems. All of the various parts can be made compatible if you approach this with an open mind, and you can also incorporate zillions of ordinary mounting parts available from big box stores. A 3D printer and custom-made parts might make for more elegant solutions to some problems, but you can easily get by without then.