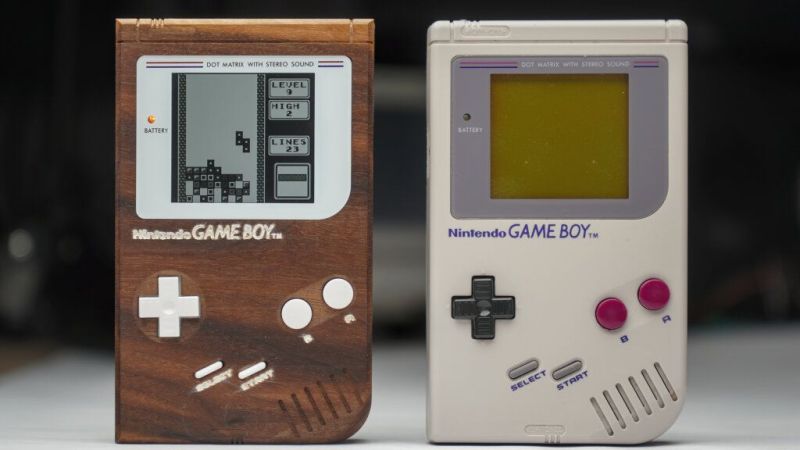
[Sebastian] describes himself as “a total noob” when it comes to CNC, so in an attempt to get to know his new CNC router, he chose about the most complex possible project — replicating an original Game Boy case in wood. And spoiler alert: he nailed it.
Of course, he did have a few things going for him. At least from a straight woodworking perspective, it’s hard to go wrong by choosing walnut as your material. Then again, it can be unforgiving at times, and picky about tooling, which is probably why [Sebastian] used nine different tools to get the job done. But where he upped the difficulty level was in reproducing so many of the details of the original injection-molded plastic case. There are top and bottom shells, each of which has to be milled from both sides. This makes registration tricky when the parts are flipped. Specific indexing holes were used for that, along with the old “blue tape and CA glue” fixturing trick, which seemed to work quite well. For our money, though, the best bit is the lettering on the front face, which was milled out with an engraving bit and then filled with a spritz of white spray paint. A surfacing bit then came along to knock the overspray down, leaving labels that contrast beautifully with the dark wood. Gorgeous!
It wasn’t all easy sailing, though. There are just some things plastic can do that wood can’t, like holding screw threads in small studs without splitting. So, the case had to be glued shut once the mix of salvaged and new components went in. Still, it looks fabulous, and [Sebastian] says what we see in the video below is the one and only piece. Pretty sweet for the first try. Surprisingly, it doesn’t seem as if we’ve seen a wooden Game Boy before — a wooden NES, sure, but not a Game Boy.


Very nice!
‘Wood Boy’ would be a nice name.
The link to the wooden NES is wrong, it just goes to the wooden Game Boy.
But how many tries did it take to get it right?
Awesome job, especially for a beginner. Now I need a CNC router for Xmas…
what is the cnc router?
this is expensive?
From the linked post:
> My machine is a Genmitsu PROVerXL 4030 V2
Quick google shows it’s ~1400.
Now, it looks like this is a good machine for wood. The problem in CNC land is that there is people doing wood and doing metal. And metal requires a totally different class of machines, but both are called CNC mills. And then people go all “that machine sucks, it’s not stiff enough!” while it is fine/great for wood and ok for aluminum (alu is quite soft)
I’ve build my own custom machine, at 1500x400mm. It costed about half. But it’s not super stiff, so I get some inaccuracies when cutting. But 0.1mm “backlash” on a large 2D cutout isn’t really an issue for me.
That is a gorgious work of art!
Very nice work but if “he nailed it” wouldn’t that ruin it ?
As opposed to screwed it? :-)
Nails, screws don’t ruin projects if that’s what is functionally necessary.
I think a glued case like he ended up with is sub optimal since you can’t access the internals without destroying it.
I’d tend to either design for wood screws or better, add some metal glue in or screw in threaded inserts and machine screws.
If you really want to hide the screws you could fill holes dowels maybe of a contrasting color like maple and make it look like joinery. You’d have to drill through them to get inside but at least you’re not destroying the case.
As to the screws in wood?
try leaving as much of a tower or blocky section on the interior, as possible, to help with load spreading where the holes need to be drilled.
Of course watch your grain and if possible, re-orient the wood blank before any cutting, so as to use its strengths.
once you got the layout decided and set. (pre-drill the screw holes of course) And be sure that they are large enough for the fasteners of choice.
Longer, thinner screws can be a help with soft materials and stripping or splitting.
Lets you use a slightly larger hole and reduces the splitting force, but still keeps reasonable grip.
I began to notice the Longer & Skinnier” screw, idea used in many wooden boxes and low price imported clocks etc, back in the 1970’s
But here’s an extra trick that I have quite often used with speaker cabinets.
Many speaker boxes are built from MDF or Particle Board and are prone to crack out or split from the screws.
I’ve learned to take CA adhesive and VERY carfully put a drop or 3 into the screw holes.
But you have to WAIT until it is absorbed by the wood and is completely DRY, before running the screws in.
If it’s still wet? you will live to regret that, if, you ever need to remove the screws.
But it makes an easy way to greatly reduce the splitting and chipping.
Happy projecting everyone.
Oh and nearly forgot to mention.
Watch out where you use the CA glue!!
It will spread a bit as it is absorbed.
This can easily cause an area the is darker than its surroundings.
Since it’s soaked in, you can not just sand the top to remove the dark areas.
It also will not take any stain or oil finishes.
So keep the usage tiny and discrete!
Or my thoughts could ruin the appearance of your project with it.